Topdown Tank Battle: Part 10
Sat, Aug 4, 2018In this tutorial series, we’ll walk through the steps of building a 2D top-down tank game using Godot 3.0. The goal of the series is to introduce you to Godot’s workflow and show you various techniques that you can apply to your own projects.
This is Part 10: Homing missiles
You can watch a video version of this lesson here:
Introduction
This time, we’re going to build on the existing bullet object to create a heat- seeking missile. We’ll also adjust the shooting code to allow for multiple shots in a spread.
Adjusting the Bullet script
We’re going to start by adding the homing functionality to the existing bullet script. First, we’ll adding some new variables:
export (float) var steer_force = 0

var acceleration = Vector2()
var target = null
steer_force represents the missile’s agility - how quickly it can turn and chase
its target. A value of 0 will be a regular bullet that travels in a straight
line.
When the missile spawns, we can pass it a target, but we want to be able to ignore
that when spawning “dumb” bullets, so adjust the start() function like so:
func start(_position, _direction, _target=null):
    position = _position
    rotation = _direction.angle()
    velocity = _direction * speed
    target = _target
Next, in the _process() function, we need to apply a seeking behavior if there
is a target assigned:
func _process(delta):
    if target:
        acceleration += seek()
        velocity += acceleration * delta
        velocity = velocity.clamped(speed)
        rotation = velocity.angle()
    position += velocity * delta
We’ll find our needed acceleration via the seek() function (more about that in
a moment), and apply that to the current velocity. We also need to clamp the velocity
so that when heading straight for the target, the missile doesn’t continue to
accelerate above the maxiumum speed. Finally, we set the rotation so that the
missile will point in the direction of motion.
Seeking behavior
“Steering behaviors” is the collective name for a number of algorithms that produce movement such as seeking, following, flocking, etc. If you’re not familiar with the topic, I highly recommend reading The Nature of Code, which has a fantastic chapter on the subject, along with interactive demos.
For our missile, we will be using the “seek” behavior:
func seek():
    var desired = (target.position - position).normalized() * speed
    var steer = (desired - velocity).normalized() * steer_force
    return steer
This works by first finding the desired movement vector, which is straight
towards the target at maximum speed. However, to avoid “instant” turning, we then
calculate the steer vector by finding the difference between the current velocity
and the desired one. The “amount” we move our velocity (i.e. accelerate) is that
difference scaled by the steer_force. The result: the bigger the steer_force,
the faster the object turns to move towards its target.
Missile scene
The missile scene is an inherited scene created from Bullet.tscn. I’ve chosen
the following image from the spritesheet for the missile:
![]()
Set its speed to 400 and steer_force to 25 in the Inspector and save
the scene. Drop it in to the Bullet property of one of the enemy tanks in your
map scene.
Launching missiles
If you ran it now, your missiles would still travel in a straight line, because
they’re not getting the target value from the enemy. Update the shooting line
in EnemyTank.gd to pass this data (the enemy already has the player set as
its target):
shoot(target)Now update the base Tank.gd script to pass this data along to the missile
when it spawns:
func shoot(target=null):
    if can_shoot:
        can_shoot = false
        $GunTimer.start()
        var dir = Vector2(1, 0).rotated($Turret.global_rotation)
        emit_signal('shoot', Bullet, $Turret/Muzzle.global_position, dir, target)
        $AnimationPlayer.play('muzzle_flash')
Finally, the Map.gd script, when it receives the signal, needs to pass the target
to the missile:
func _on_Tank_shoot(bullet, _position, _direction, _target=null):
    var b = bullet.instance()
    add_child(b)
    b.start(_position, _direction, _target)
Try running the scene and testing that the missiles seek the player. Try changing
the steer_force and speed (and the missile’s lifetime) properties
to see how they affect the missile’s behavior.
Missile trail
To make the missile look more appealing, we’re going to add a smoke trail. Add
a Particles2D node to the missile scene. Particles nodes have a large number of
properties, so I’ll list the adjustments in the table below:
| Property | Value |
|---|---|
| Amount | 35 |
| Lifetime | 0.4 |
| Visibility/Show Behind Parent | On |
| RayCastUp | (0, -32) |
For the texture, I found the following smoke animation on Open Game Art:

Add this to the Texture property and set the HFrames to 24.
Now add a new ParticlesMaterial in the Process Material property and set its
values like so:
| Property | Value |
|---|---|
| Gravity | (0, 0, 0) |
| Initial Velocity | 0 |
| Animation/Speed | 1 |
Finally, in the Scale section, add a new Scale Curve and set its endpoints like the picture below:
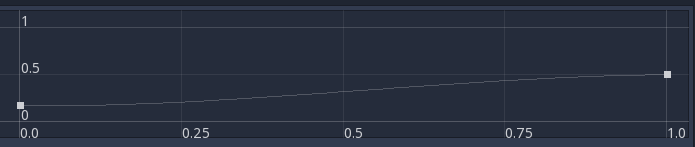
This will make the smoke grow gradually larger as it dissipates.
The missiles should now have a pleasing smoke trail:
Multi-shot
One more improvement we can make to shooting: multi-shot. This will allow us to have an enemy (or player) shoot multiple shots at once in a spread.
Start by adding two more new properties to Tank.gd:
export (int) var gun_shots = 1 # number of projectiles per shot
export (float, 0, 1.5) var gun_spread = 0.2 # angle between them
Once more, we need to update the shoot() function:
func shoot(num, spread, target=null):
    if can_shoot:
        can_shoot = false
        $GunTimer.start()
        var dir = Vector2(1, 0).rotated($Turret.global_rotation)
        if num > 1:
            for i in range(num):
                var a = -spread + i * (2*spread)/(num-1)
                emit_signal('shoot', Bullet, $Turret/Muzzle.global_position, dir.rotated(a), target)
        else:
            emit_signal('shoot', Bullet, $Turret/Muzzle.global_position, dir, target)
        $AnimationPlayer.play('muzzle_flash')
If the number of shots is 1, we can just do as we already are doing. However, if
the number is greater, we need a counting loop to generate each one and set its
angle based on the spread. Calculating that angle (a) is complicated by the
fact that num may be even or odd. If it’s odd, we want the center shot to go
forward, and the others to its left and right. Howevef, if num is even, there
is no center bullet, so we need an equal number to the left and right. The a
formula will calculate that for us.
Now our player and enemy tanks need to pass these properties when they call shoot:
EnemyTank.gd:
if target_dir.dot(current_dir) > 0.9:
shoot(gun_shots, gun_spread, target)Player.gd:
if Input.is_action_just_pressed('click'):
    shoot(gun_shots, gun_spread)
Conclusion
That completes Part 10 of this series. For coming features and ideas, I’ve created a project tracker, which you can see here:
Please comment below with your questions and suggestions.