Topdown Tank Battle: Part 11
Mon, Aug 20, 2018In this tutorial series, we’ll walk through the steps of building a 2D top-down tank game using Godot 3.0. The goal of the series is to introduce you to Godot’s workflow and show you various techniques that you can apply to your own projects.
This is Part 11: Pickup items
You can watch a video version of this lesson here:
Introduction
In this installment, we’re going to create a “pickup” item: something the player can grab to provide them with healing/repairs, ammo, powerups, etc. To begin with, we’ll make a healing pickup, since we already have tank damage working.
Pickup scene
For the pickup object, we’ll use an Area2D node, with a Sprite and CollisionShape2D
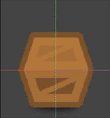
attached. I’ve chosen this crate image from the spritesheet:

Add a circular collision shape, sized to extend just past the edges of the crate. We don’t want enemy tanks to accidentally collect the pickups, so uncheck all of the Collision Layers and set the Collision Mask to “player”.
Now add a script:
extends Area2D

enum Items {health, ammo}

export (Items) var type = Items.health
export (Vector2) var amount = Vector2(10, 25)
In the enum we have a list of the pickup types we want to implement. Then we
have a Vector2 representing the min/max value we want the pickup to supply. We’ll
pick a random value in this range.
Attach the body_entered signal:
func _on_Pickup_body_entered(body):
    match type:
        Items.health:
            if body.has_method('heal'):
                print("healing")
                body.heal(int(rand_range(amount.x, amount.y)))
        Items.ammo:
            pass
    queue_free()
In this function, we’ll check the type, and apply healing if the player has a
heal method (right now it doesn’t).
Instance one of these items in the map scene and verify that you can pick it up.
Juicing the crate
The crate works, but it’s pretty boring to look at. It’s hard for the player to tell the crate apart from other obstacles that may be on the map. To make it stand out a bit, we’re going to add some animation effects to “juice” up the crate.
Add an AnimationPlayer to the Pickup scene.
Bouncing animation
First, we’re going to make the crate bounce up and down a bit. Create a new animation called “bounce” and set it to Autoplay and Loop.
Click on the Sprite and add a keyframe for its
Transform/Position property (which should be (0, 0) at this point). Then move
the scrubber to 0.5, change the position to (0, -20), and add another
keyframe.
Press the Play button and you will see the crate bounce up and down. However,
it’s very linear and doesn’t look very bouncy. In the timeline, click on the dot
for the first keyframe, then select the “edit keyframe” button. This will let you
change the “Transition” curve of the keyframe. I selected a sine curve and adjusted
it as shown (you can drag the line with the mouse, or click and type the -1.5
directly):
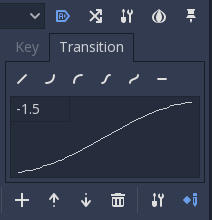
The bounce should look smoother at the ends now.
Drop shadow
We can also give a sense of depth by adding a drop shadow to the crate. Add another
Sprite named “Shadow” and use the shadow texture:

Set the shadow’s Position to (0, 25) and its scale to (.25, .5). Add the scale
as a new track in the “bounce” animation, then move the scrubber to 0.5 and
keyframe the scale at 2⁄3 (you can type (0.25/1.5, 0.5/1.5) in the Inspector
and it will do the math).
We also want to animate the opacity of the shadow, as it’s a bit too dark, so put the scrubber back at the start and keyframe the Self Modulate with an alpha of a little over 50%. Then at the halfway point of the animation, key the alpha at around 25%. You should see a nice fading/shrinking effect on the shadow:
Icon
The last thing we need to add to the crate is a way to indicate what type of crate it is. The player needs to be able to see it and tell that it’s a repair crate.
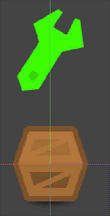
Add another Sprite called “Icon” and use the wrench texture from the assets
folder:

Move the Position to (0, -85) and Scale to (0.7, 0.7). Then we’re going
to animate its scale and opacity. At the start of the animation track, keyframe
both the Scale and Self Modulate properties. Then, at the end of the track,
key them at values of (0.5, 0.5) and alpha of 0 respectively.
Finally, in the Modulate property, choose a nice bright shade of green. The result will be a flashing green wrench icon making it clear that this is a repair crate.
Conclusion
We’ve added some very simple effects to the pickup crate. In a later installment, we might get fancier with some shader effects and a repair animation on the tank itself.
That completes Part 11 of this series. For coming features and ideas, I’ve created a project tracker, which you can see here:
Please comment below with your questions and suggestions.