Godot 101: Intro to 3D, Part 3
Sun, Mar 10, 2019![]()
In the previous tutorial, we covered how to import 3D objects and how to arrange them in a scene. In this installment, we’ll add more objects to the scene, including a user-controlled character.
About this series
A word of warning: 3D development can be quite a bit more complex than working in 2D. While many of the same principles apply - such as working with nodes, writing scripts, and handling logic/data - 3D brings with it a number of other considerations. For this reason, it’s a good idea to stick to 2D for your first few projects, moving to 3D once you have a good understanding of the game development process. This tutorial will assume you have completed at least an introductory Godot 2D project.
You can also find a video version of this lesson here:
Building the Scene
We’re going to continue using the Kenney Platformer Kit we downloaded last time. Select all the “block*.glb” files and in the
“Import” tab set their “Root Type” to StaticBody and click “Reimport”. Select
“blockLarge.glb” and make a new inherited scene. Add a “Convex Collision Sibling”
to the mesh using the menu as you did in the last tutorial. Rename the root node
to “BlockLarge” and save the scene - I recommend making a separate folder for
this, as soon you’re going to have a bunch of scenes representing the
differently shaped platform parts.
You can download a starter project with all the block objects already configured and ready to use here: LINK
Open the scene from the last tutorial with the “Ground” plane and the crates.
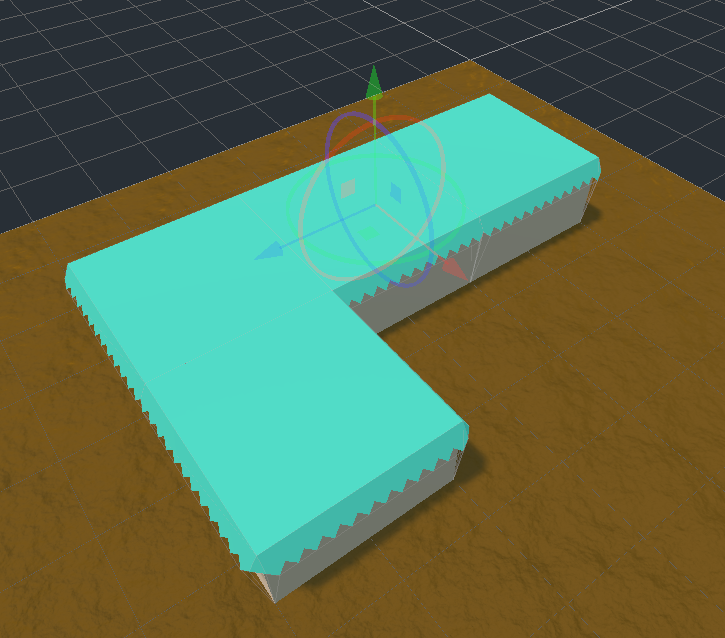
Delete the crates and add an instance of the large block. We want to be able
to place these blocks so that they line up. To do this, select “Configure Snap”
from the “Transform” menu at the top of the Viewport and set Translate Snap
to 0.5. Then click on the “Snap Mode” button (or press the Y key). Now
duplicate the block a few times and drag them to arrange.
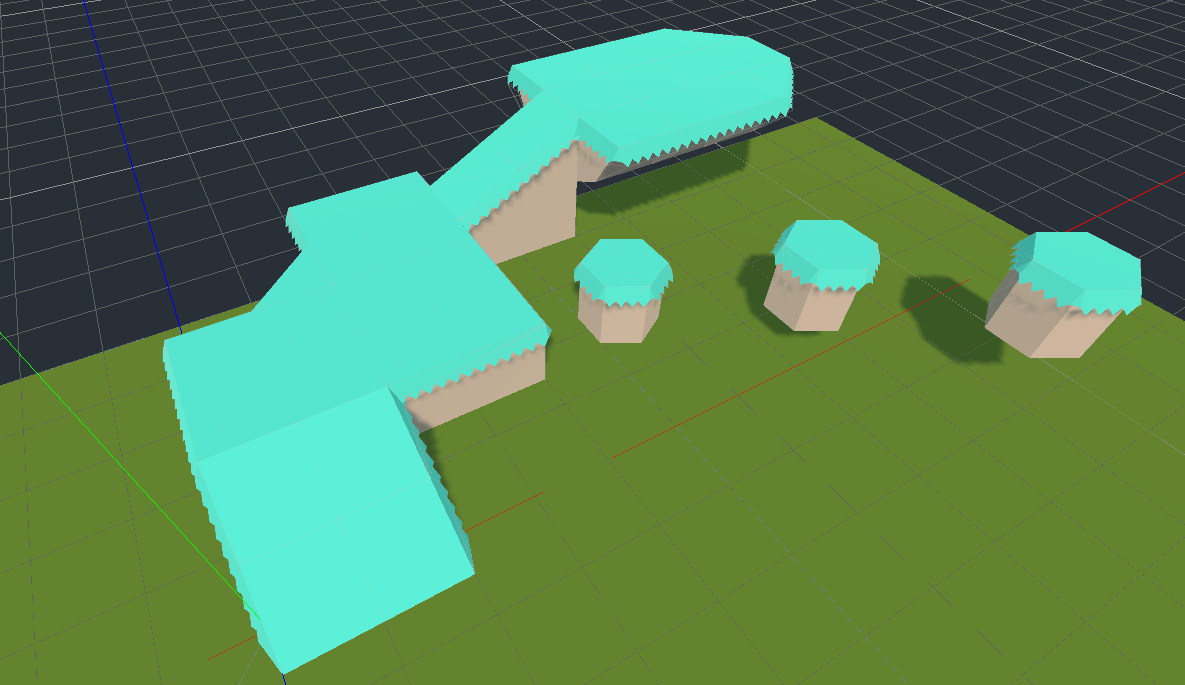
If you like, go ahead and add scenes for some of the other platform blocks and arrange them into a pleasing level. Be creative!
Adding a Character
Now we’re going to make a character so we can walk around on the platforms.
Open a new scene and start with a KinematicBody named “Character”. This
PhysicsBody node behaves very much like its 2D equivalent (you’ve already
done the 2D tutorials, right?). It has a move_and_slide() method that we’ll
use to perform the movement and collision detection. Gravity will be added
manually each frame, accelerating in the -Y direction.
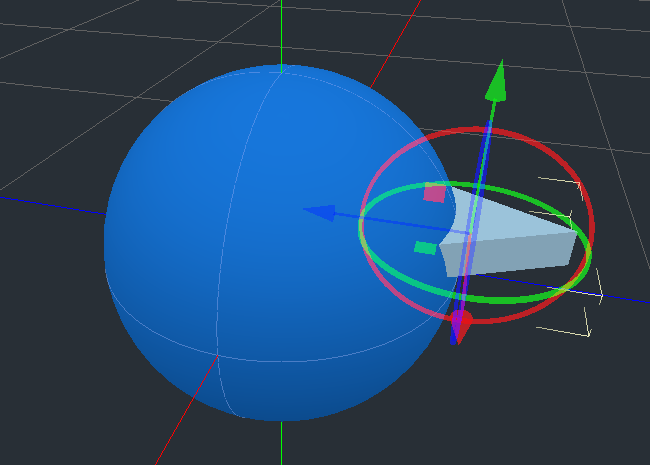
Add a sphere-shaped MeshInstance and a matching CollisionShape. Remember,
you can add a SpatialMaterial to the mesh and set its Albedo property to
change the color.
The sphere is nice, but it’s going to be hard to tell what direction it’s
facing. Let’s add another MeshInstance, this time with a PrismMesh shape.
Set its Size to (0.5, 0.5, 0.1) and then its x rotation to -90
degrees. Arrange it so it’s pointing along the negative z axis. (You can
tell which way is negative because the gizmo arrows point in the positive
direction).
Let’s also add a Camera to the scene, so it will follow the player around.
Position the camera behind and above the character, angling it down a bit. Click
the “Preview” button to check the camera’s view.
Before we add a script, open the “Project Settings” and add the following inputs on the “Input Map” tab:
| Input Action | Key |
|---|---|
| move_forward | W |
| move_back | S |
| strafe_right | D |
| strafe_left | A |
| jump | Space |
Now let’s add a script to the body.
extends KinematicBody

var gravity = -12  # strength of gravity Vector3.DOWN * 12
var speed = 4  # movement speed
var jump_speed = 6  # jump strength
var spin = 0.1  # rotation speed

var velocity = Vector3()
var jump = false

func get_input():
    velocity.x = 0
    velocity.z = 0
    if Input.is_action_pressed("move_forward"):
        velocity.z -= speed
    if Input.is_action_pressed("move_back"):
        velocity.z += speed
    if Input.is_action_pressed("strafe_right"):
        velocity.x += speed
    if Input.is_action_pressed("strafe_left"):
        velocity.x -= speed

func _physics_process(delta):
    velocity += gravity * delta
    get_input(delta)
    velocity = move_and_slide(velocity, Vector3.UP)
The code in _physics_process() is pretty straightforward: add gravity to
accelerate in the positive Y direction (downward), call get_input() to
check for input, and then use move_and_slide() to move in the direction
of the velocity vector.
In get_input() we check to see which key is pressed and then move in that
direction. Run the program and test:
This is all good, but we need to be able to rotate. Let’s add a camera to the body and we’ll use the mouse to rotate. Place the camera above and behind the character so you have a good view, then add the following code to the character’s script:
func _unhandled_input(event):
    if event is InputEventMouseMotion:
        if event.relative.x > 0:
            rotate_y(-lerp(0, spin, event.relative.x/10))
        elif event.relative.x < 0:
            rotate_y(-lerp(0, spin, event.relative.x/10)
This will convert any mouse motion in the x direction into a rotation around
the y axis. We use lerp() to smooth it out based on how fast you move
the mouse.
Run the scene and confirm that moving the mouse rotates the character:
However, there’s a problem. No matter which way we’re facing, pressing W moves us along the Z axis. Our movement is using global coordinates, but we need to move in the object’s forward direction.
The Power of Transforms
This is where transforms come in. A transform is a mathematical matrix that
contains the object’s translation, rotation, and scale information all in one. In
Godot it’s stored in the Transform data type. The position information is
called the transform.origin and the orientation information is in the
transform.basis.
Remember how the 3D gizmo can be set to “Local Space Mode”? When in this mode,
the gizmo’s X/Y/Z axes point along the object’s axes. This is the basis
of the transform. The basis contains three Vector3 objects callsd x, y,
and z that represent these directions. We can use this to ensure that pressing
the W key will always move us in the object’s forward direction.
Change the get_input() function like so:
func get_input():
    var vy = velocity.y
    velocity = Vector3()
    if Input.is_action_pressed("move_forward"):
        velocity += -transform.basis.z * speed
    if Input.is_action_pressed("move_back"):
        velocity += transform.basis.z * speed
    if Input.is_action_pressed("strafe_right"):
        velocity += transform.basis.x * speed
    if Input.is_action_pressed("strafe_left"):
        velocity += -transform.basis.x * speed
    velocity.y = vy
Now forward and back will always move along the objects’ Z axis, and the strafe keys along its X.
Jumping
Let’s add one more movement to the player: jumping.
Add these lines to the end of get_input():
    jump = false
    if Input.is_action_just_pressed("jump"):
        jump = true
And add these to the end of _physics_process():
    if jump and is_on_floor():
        velocity.y = jump_speed
Wrapping Up
In this tutorial you learned how to build a more complex scene, and how to write movement code for a user-controlled character. You also learned about transforms, which are a very important concept in 3D - you’re going to be using a lot in the future.
In the next part, we’ll add some more objects to our 3D world.
Next: Godot 101: Intro to 3D, Part 4
Support these lessons: 