Car steering
Problem
You need to create a 2D top-down car controller.
Solution
When approaching this problem, beginners often wind up creating something that handles nothing like a real car. Some common mistakes you’ll find in amateur car games:
- A car doesn’t rotate around its center. Put another way, a car’s rear wheels don’t slide side-to-side. (Unless it’s drifting, but we’ll talk about that later.)
- A car can only turn when it’s moving - it can’t spin in place.
- A car isn’t a train; it’s not on rails. Turning at high speeds should involve some sliding (drifting).
There are many approaches to 2D car physics, mainly depending on how “realistic” you want to be. For this solution, we’re going for an “arcade” level of realism, meaning we’ll prioritize action over realism.
The method below is based on the algorithm found here: http://engineeringdotnet.blogspot.com/2010/04/simple-2d-car-physics-in-games.html
The recipe below is broken into 5 parts, each adding a different feature to the car’s movement. Feel free to mix-and-match for your needs.
Scene setup
Here’s the car scene setup:
 KinematicBody2D
     Sprite
     CollisionShape2D
     Camera2D
Add whatever sprite texture you like. For this demo, we’ll use art from Kenney’s Racing Pack. CapsuleShape2D is a good choice for the collision, so that the car won’t have sharp corners to get caught on obstacles.
We’ll also use four input actions: “steer_right”, “steer_left”, “accelerate”, and “brake”.
Part 1: Movement
The first step is to code the movement based on the algorithm described above.
Start with a few variables:
extends KinematicBody2D

var wheel_base = 70  # Distance from front to rear wheel
var steering_angle = 15  # Amount that front wheel turns, in degrees

var velocity = Vector2.ZERO
var steer_angle
Set wheelbase to a value that works with your sprite.
Since we’re using keyboard controls, turning is all-or-nothing. If you’re using an analog joystick, you can instead vary this value based on the distance the stick moves.
func _physics_process(delta):
    get_input()
    calculate_steering(delta)
    velocity = move_and_slide(velocity)
Each frame, we need to check for input and calculate steering. Then we pass the resulting velocity to move_and_slide(). We’ll define those two function next:
func get_input():
    var turn = 0
    if Input.is_action_pressed("steer_right"):
        turn += 1
    if Input.is_action_pressed("steer_left"):
        turn -= 1
    steer_angle = turn * deg2rad(steering_angle)
    velocity = Vector2.ZERO
    if Input.is_action_pressed("accelerate"):
        velocity = transform.x * 500
Here we check for user input and set the velocity. Note: the speed of 500 is temporary so that we can test movement. We’ll address it in the next part.
func calculate_steering(delta):
    var rear_wheel = position - transform.x * wheel_base / 2.0
    var front_wheel = position + transform.x * wheel_base / 2.0
    rear_wheel += velocity * delta
    front_wheel += velocity.rotated(steer_angle) * delta
    var new_heading = (front_wheel - rear_wheel).normalized()
    velocity = new_heading * velocity.length()
    rotation = new_heading.angle()
Here is where we implement the algorithm from the link:
- Find the wheel positions.
- Move the wheels forward.
- Find the new direction vector.
- Set the velocity and rotation to the new direction.
Run the project and the car should move and turn. It’s still very unnatural though - the car starts and stops instantly. To fix that, we’ll add acceleration into the calculation.
Part 2: Acceleration
We’ll need another setting variable and one to track the car’s overall acceleration:
var engine_power = 800  # Forward acceleration force.

var acceleration = Vector2.ZERO
Change the input code to apply acceleration instead of directly changing the car’s velocity.
func get_input():
    var turn = 0
    if Input.is_action_pressed("steer_right"):
        turn += 1
    if Input.is_action_pressed("steer_left"):
        turn -= 1
    steer_angle = turn * steering_angle
    if Input.is_action_pressed("accelerate"):
        acceleration = transform.x * engine_power
Once we’ve got our acceleration, we can apply it to the velocity like so:
func _physics_process(delta):
    acceleration = Vector2.ZERO
    get_input()
    calculate_steering(delta)
    velocity += acceleration * delta
    velocity = move_and_slide(velocity)
Now when you run, the car should gradually increase its speed. Careful: we don’t have any way to slow down yet!
Part 3: Friction/drag
A car experiences two different deceleration forces: friction and drag.
Friction is the force applied by the ground. It’s high if driving on sand, but low if driving on ice. Friction is proportional to velocity - the faster you’re going the stronger the force.
Drag is the force resulting from wind resistance. It’s based on the car’s cross-section - a large truck or van experiences more drag than a sleek race car. Drag is proportional to the velocity squared.
This means that friction is more significant when moving slowly, but drag becomes dominant at high speeds. We’ll add both of these forces to our calculation. As a bonus, the values of these quantities will also give our car a maximum speed - the point where the force from the engine can’t overcome the drag force any longer.
Here are our starting values for these quantities:
var friction = -0.9
var drag = -0.0015
As you can see in this graph, these values mean that at a speed of 600 the drag force overcomes the friction force.

You can play with the values here to see how they change: https://www.desmos.com/calculator/e4ayu3xkip
In _physics_process() we’ll call a function to calculate the current friction and apply it to the acceleration force.
func _physics_process(delta):
    acceleration = Vector2.ZERO
    get_input()
    apply_friction()
    calculate_steering(delta)
    velocity += acceleration * delta
    velocity = move_and_slide(velocity)

func apply_friction():
    if velocity.length() < 5:
        velocity = Vector2.ZERO
    var friction_force = velocity * friction
    var drag_force = velocity * velocity.length() * drag
    if velocity.length() < 100:
        friction_force *= 3
    acceleration += drag_force + friction_force
First, we’ll set a minimum speed. This will ensure that the car doesn’t keep creeping forward at very low speeds as friction never quite reaches zero.
Then we calculate the two forces and add them to the total acceleration.
Part 4: Reverse/Brake
We’ll need two more settings variables:
var braking = -450
var max_speed_reverse = 250
Add the input to get_input():
    if Input.is_action_pressed("brake"):
        acceleration = transform.x * braking
This is fine for coming to a stop, but we also want to be able to put the car in reverse. Currently, that won’t work, because the acceleration is always being applied in the “heading” direction, which is forward. When we’re reversing, we need to accelerate backward.
func calculate_steering(delta):
    var rear_wheel = position - transform.x * wheel_base / 2.0
    var front_wheel = position + transform.x * wheel_base / 2.0
    rear_wheel += velocity * delta
    front_wheel += velocity.rotated(steer_angle) * delta
    var new_heading = (front_wheel - rear_wheel).normalized()
    var d = new_heading.dot(velocity.normalized())
    if d > 0:
        velocity = new_heading * velocity.length()
    if d < 0:
        velocity = -new_heading * min(velocity.length(), max_speed_reverse)
    rotation = new_heading.angle()
We can find whether we’re accelerating forward or backward using the dot product. If the two vectors are aligned, the result will be greater than 0. If the movement is in the opposite direction the car’s facing, then the dot product will be less than 0 and we must be moving backward.
Part 5: Drift/slide
We could stop here and you’d have a satisfactory driving experience. However, the car still feels like it’s “on rails”. Even at top speed, the turns are perfect, as if the tires have perfect “grip”.
At high speeds (or even low ones, if desired), the turning force should cause the tires to slip and result in a fishtailing/sliding motion.
var slip_speed = 400  # Speed where traction is reduced
var traction_fast = 0.1  # High-speed traction
var traction_slow = 0.7  # Low-speed traction
We’ll apply these values when calculating the steering. Currently, the velocity is instantly set to the new heading. Instead, we’ll use linear_interpolate() to cause it to only “turn” partway towards the new direction. The “traction” values will determine how “sticky” the tires are - a value of 1.0 would represent no sliding.
func calculate_steering(delta):
    var rear_wheel = position - transform.x * wheel_base / 2.0
    var front_wheel = position + transform.x * wheel_base / 2.0
    rear_wheel += velocity * delta
    front_wheel += velocity.rotated(steer_angle) * delta
    var new_heading = (front_wheel - rear_wheel).normalized()
    var traction = traction_slow
    if velocity.length() > slip_speed:
        traction = traction_fast
    var d = new_heading.dot(velocity.normalized())
    if d > 0:
        velocity = velocity.linear_interpolate(new_heading * velocity.length(), traction)
    if d < 0:
        velocity = -new_heading * min(velocity.length(), max_speed_reverse)
    rotation = new_heading.angle()
Here, we select which traction value to use and apply linear_interpolate() to the velocity.
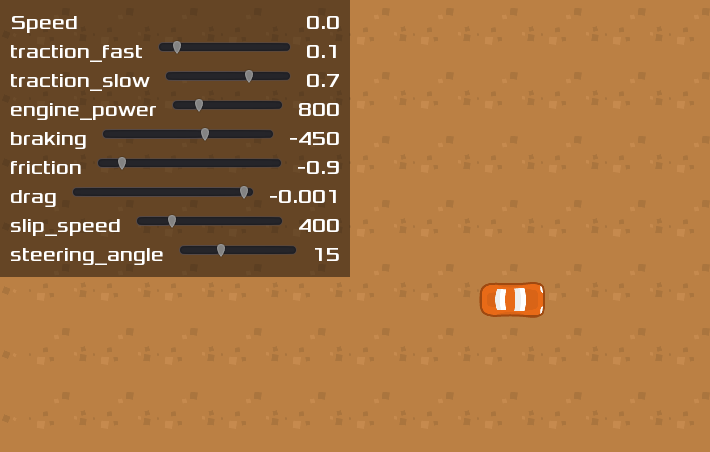
Adjustments
At this point, we have a large number of settings that control the car’s behavior. Adjusting them can drastically change how the car drives. To make experimenting with different values easier, download the project for this recipe below. When you run the game, you’ll see a set of sliders you can use to change the car’s behavior as you drive (press <Tab> to show/hide the slider panel).