Nodes: Godot's building blocks
Nodes are the basic building blocks for creating games in Godot. A node is an object that can represent some kind of specialized game function. A given type of node might display graphics, play an animation, or represent a 3D model of an object. The node also contains a collection of properties, allowing you to customize its behavior. Which nodes you add to your project will depend on what functionality you need. It’s a modular system designed to give you flexibility in building your game objects.
Working with Nodes
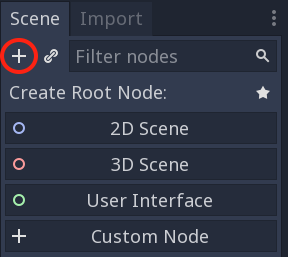
Nodes are objects, in the programming sense. They encapsulate data and behavior, and they can inherit properties from other nodes. Rather than use one of the default suggestions, let’s click the “Add/Create a New Node” button in the scene dock.
Here you’ll see the whole hierarchy of node types available in the engine. For example, the nodes with the bluish-purple icons all fall under the “Node2D” category, meaning they will all have the properties of a Node2D. More about that in a moment.
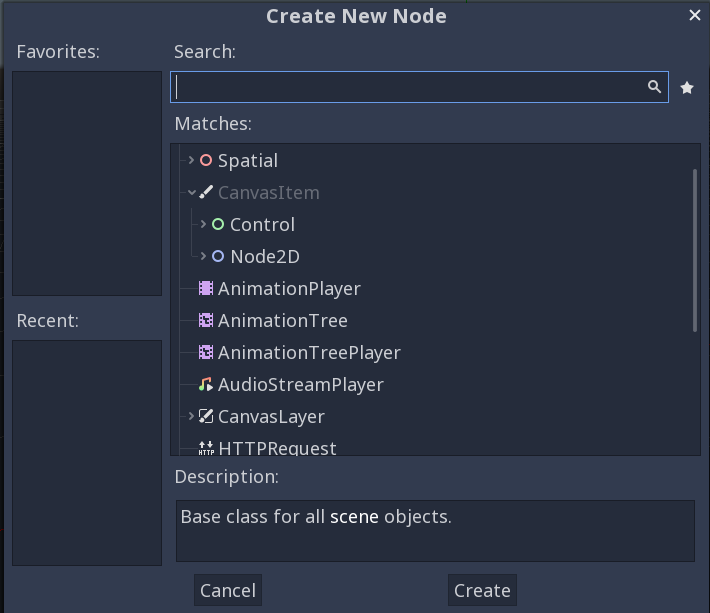
The list is long, and it would be frustrating to have to drill down every time to find the node you need. Instead, you can use the search function to find it using a small number of characters. We’re looking for the “Sprite” node, so I’ll just type “sp” and we’ll jump right to it. Click “Create” to add the node.
![]()
![]()
Now we have this Sprite node in our “Scene” dock. Make sure it’s selected, and then look at the Inspector dock on the right side. Over here, you’ll see all the properties of whatever node you have selected. Notice that the properties are organized by where they come from. The Sprite node inherits from Node2D, which inherits from CanvasItem, which inherits from the plain old Node.
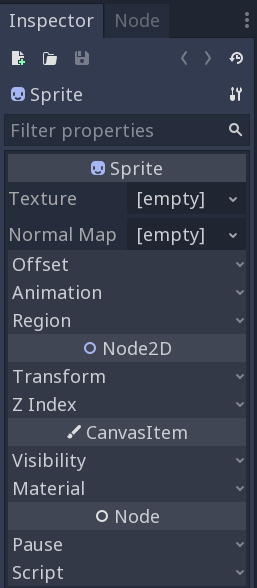
Over in the viewport, the sprite doesn’t look like much. A sprite’s purpose is to display an image, or texture. As you can see in the Inspector, the texture property is currently empty. Fortunately, every new Godot project comes with an image we can use: the Godot icon. Drag the icon from the Filesystem dock and drop it in the texture property.
In the Inspector, click to expand the “Transform” section, and type (50, 50) in the Position property.
![]()
![]()
You can also click and drag the sprite around in the viewport, and you’ll see the Position values changing as you move.
One important property of nodes is that they can be arranged in a parent-child hierarchy. Make sure you have the Sprite selected and press the add button again. Add another Sprite and also drag the icon into its texture.
This new sprite is a child of the first. This means that it’s “attached” to its parent. If the parent sprite moves, so will the child. Click on the child sprite and set its Position to (50, 50). Now click and drag the parent sprite to move it around the screen.
Notice that the Position of the parent is changing as you move it around. Now check the child: it’s still (50, 50). That’s because its “Transform” properties are relative to its parent.
![]()
![]()
Scenes
Grouping nodes together like this is a powerful tool, enabling you to construct complex objects out of node “building blocks”. For example, a “Player” node in your game might have many child nodes attached to it: a Sprite for display, an AnimationPlayer to animate it, a Camera to follow it around, and so on.
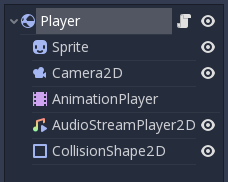
A group of nodes arranged in a “tree” structure like this is called a Scene. In the next part, we’ll look at how you can use scenes to organize your game’s objects into independent parts that all work together. You’ll see this in practice was you work through the examples in later lessons.