Minimap/radar
Problem
You want a minimap or radar-style UI item showing the locations of objects outside of the player’s view.
Solution
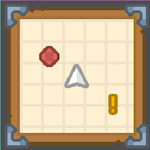
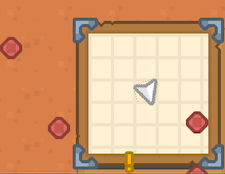
Here’s an example of what we are going for:
Project setup
To illustrate this feature, we’ll start with a simplified top-down game using the Autotile recipe and a player based on the Top-down character recipe. See the linked recipes for details on how these parts work.
The art in this project comes from kenney.nl, which you can download here: Topdown Shooter and Interface Pack.
Our main scene setup looks like this:
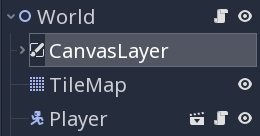
The CanvasLayer node is there to hold our UI, including the minimap/radar we’re making in this recipe.
UI Layout
The first step will be to create the layout for the minimap. In order to work with whatever other UI elements exist in the game, it must resize smoothly, and integrate well with a container-based layout.
Add a MarginContainer first. Set its Custom Constants all to 5. This control will hold the rest of the nodes and ensure it doesn’t bleed over into any other elements. Name it “MiniMap” and save the scene.
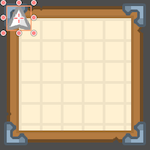
Next, add a NinePatchRect node. This node is similar to a TextureRect but handles resizing differently by not stretching the corners/edges. Drop the panel_woodDetail_blank.png image from the asset folder into the Texture property. This is a 128x128 image and if we scale the root MarginContainer, the image becomes stretched and ugly:
Using the NinePatchRects’s properties, we can ensure that the frame remains the same size when stretched. You can define these properties graphically in the “TextureRegion” panel, but it’s sometimes easier to enter the values directly. Set all four properties in the Patch Margin section to 64 and change the node’s name to “Frame”.
Now observe what happens when we change the size:
Next, we’d like to fill in the inner part of the frame with the grid pattern pattern_blueprintPaper.png:

However, we need it to tile automatically no matter what size we make the frame. Also, since this grid area is where our minimap markers will appear, we don’t want the grid extending past the edges of the frame.
As a child of the MiniMap (and a sibling of the Frame), add another MarginContainer. Set all four margin properties in Custom Constants to 20. As a child of this node, add a TextureRect and assign its Texture to the above image. Set its Stretch Mode to “Tile”. Name this node “Grid”.
Try changing the size of your root node to see the effect:
For now, let’s leave the minimap’s size at (200, 200) - you can check the root node’s Rect/Size property to confirm.
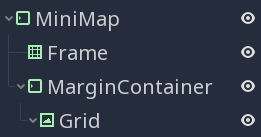
At this point, your scene tree should look like the following:
Map Markers
As a child of Grid, add a Sprite node named “PlayerMarker” and give it the minimapIcon_arrowA.png texture. Note the sprite’s Transform/Position property: (0, 0), which places it exactly in the top-left corner of the Grid:
If our Grid size is currently (150, 150) (you can check this in its Rect/Size property), then its center will be (75, 75). Put the PlayerMarker’s Position there:
Don’t worry, we’ll automate this later.
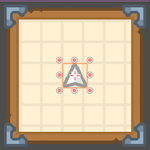
Add two more Sprite nodes: “MobMarker” and “AlertMarker”, using the minimapIcon_jewelRed.png and minimapIcon_exclamationYellow.png textures.
These will represent two different types of objects in the game world. Click the “Toggle Visibility” button next to each so that they won’t appear by default.
Scripting the map markers
At this point, we have some decisions to make. How we approach populating the minimap with the objects in the world has a lot to do with how the game is set up. Since this is a very minimal demonstration project, we’re going keep the process simple. In a larger game, you may need to use a more robust approach.
For this demo, we have two game objects: a Mob, which wanders around the map randomly, and a Crate, which the player can pick up. Many of these are scattered around the main scene. Each will need to be represented by one of the map markers we made.
Add each item that you want to appear on the minimap to a group named “minimap_objects”. In each object’s script, assign it a minimap_icon property:
# In the mob's script:
var minimap_icon = "mob"

# In the crate's script:
var minimap_icon = "alert"
Now we can begin adding a script to the MiniMap. First, a player reference that can be assigned in the Inspector when the minimap is added to the main scene and a zoom property to calibrate the scale - how far the minimap can “see”. We also have some onready variables to make it more convenient to access the nodes we need.
extends MarginContainer

export (NodePath) var player
export var zoom = 1.5

onready var grid = $MarginContainer/Grid
onready var player_marker = $MarginContainer/Grid/PlayerMarker
onready var mob_marker = $MarginContainer/Grid/MobMarker
onready var alert_marker = $MarginContainer/Grid/AlertMarker
Next, we’ll use a dictionary to map the minimap_icon tags we gave our units to the corresponding marker:
onready var icons = {"mob": mob_marker, "alert": alert_marker}
Then we need a variable to hold the calculated ratio of map size to world size. We’ll use another dictionary to assign active markers to each object. The key will be the object (ie the Mob or Crate instance) and the value the assigned marker.
var grid_scale
var markers = {}
In _ready() we’ll center the player’s marker at the center of the grid. and calculate the scale factor. (Note: you should connect the resized signal and do both of these things in the callback if you have a dynamically sized UI).
func _ready():
    player_marker.position = grid.rect_size / 2
    grid_scale = grid.rect_size / (get_viewport_rect().size * zoom)
We’ll also create markers for every game object (using the “minimap_objects” group) by duplicating the matching marker node and tying the marker to the object via the markers dictionary:
    var map_objects = get_tree().get_nodes_in_group("minimap_objects")
    for item in map_objects:
        var new_marker = icons[item.minimap_icon].duplicate()
        grid.add_child(new_marker)
        new_marker.show()
        markers[item] = new_marker
Now that we have created the markers and linked each one to an object, we can update their positions in _process(). If no player is assigned, we’ll do nothing:
func _process(delta):
    if !player:
        return
If there is a player, we’ll first rotate the player marker to match the player’s heading. Since our PlayerMarker sprite points upwards rather than along the x axis, we must add 90 degrees:
player_marker.rotation = get_node(player).rotation + PI/2
Next, we’ll find each object’s position relative to the player and use that to find the marker’s position (remembering to offset by grid.rect_size / 2 because the control’s origin is in the top left corner).
for item in markers:
    var obj_pos = (item.position - get_node(player).position) * grid_scale + grid.rect_size / 2
    markers[item].position = obj_pos
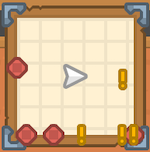
The problem with this is that markers can be placed outside the grid:
To fix this, after calculating obj_pos, but before setting the marker’s position, clamp it to the grid’s rectangle:
obj_pos.x = clamp(obj_pos.x, 0, grid.rect_size.x)
obj_pos.y = clamp(obj_pos.y, 0, grid.rect_size.y)
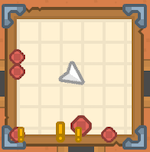
Next, we can decide what to do about markers that are “off-screen” - when they would be outside the grid’s rectangle. Choose one of the following options (do this also before using clamp()). The first option is to hide them:
if grid.get_rect().has_point(obj_pos + grid.rect_position):
    markers[item].hide()
else:
    markers[item].show()
The second is to change their appearance, in this case we’ll make them smaller to show they’re at a farther distance:
if grid.get_rect().has_point(obj_pos + grid.rect_position):
    markers[item].scale = Vector2(0.75, 0.75)
else:
    markers[item].scale = Vector2(1, 1)
Removing objects
If a mob gets killed or a crate picked up, the game will crash because the marker reference is no longer valid. We need a way to ensure markers are removed when the object is. Here’s a quick way to do this in our rudimentary demo setup:
Add signal removed to any object that you’ve put in the “minimap_objects” group. Emit this signal when the object is destroyed, along with a reference to itself so the map can identify it:
emit_signal("removed", self)
In the _ready() of the main script, connect these signals to the minimap:
func _ready():
    for object in get_tree().get_nodes_in_group("minimap_objects"):
        object.connect("removed", $CanvasLayer/MiniMap, "_on_object_removed")
Now add the receiving function to the minimap script to free the marker and remove the reference:
func _on_object_removed(object):
    if object in markers:
        markers[object].queue_free()
        markers.erase(object)
Adjusting zoom
If you’ve stuck with it this far, we have one more feature to add: adjustable zoom level. With this, scrolling the mouse wheel when hovering over the map will zoom its scale in and out.
First, add a setget to the zoom property:
export var zoom = 1.5 setget set_zoom

func set_zoom(value):
    zoom = clamp(value, 0.5, 5)
    grid_scale = grid.rect_size / (get_viewport_rect().size * zoom)
On the MiniMap node, connect the _gui_input signal in the Inspector so we can process the scroll wheel events:
func _on_MiniMap_gui_input(event):
    if event is InputEventMouseButton and event.pressed:
        if event.button_index == BUTTON_WHEEL_UP:
            self.zoom += 0.1
        if event.button_index == BUTTON_WHEEL_DOWN:
            self.zoom -= 0.1
That’s it - observe the effect of scrolling in and out:

Wrapping up
While this is a pretty big recipe, I’ve tried to make it flexible enough for you to incorporate into whatever project you’re working on.
Some other things you might want to add:
- More marker types for different game objects.
- Adding new units when they’re spawned (hint: use a signal just like we did for removing units).
- Clicking on a marker to get info about it.
- Use a picture of your map as the minimap background instead of the grid.