Character Controller
Problem
You’ve imported a rigged, animated 3D character in Godot and set up its animations using AnimationTree. Now you need to implement movement: you need a character controller.
Solution
In this recipe, we’ll assume you’ve already imported your character model and animations, and that you’re set up AnimationTree to handle transitioning and blending the animations. If you haven’t yet, see Importing Assets and Character Animation for details. As a reminder, we’re using the art packs linked in the section description.
Adding collision
We’ve chosen CharacterBody3D as the root node of the imported scene, and it’s complaining about a missing collision shape, so let’s fix that first. Add a CollisionShape3D child and choose CapsuleShape3D as its Shape property.
Size and position the capsule to enclose the character’s body. For reference, here are the values I used:
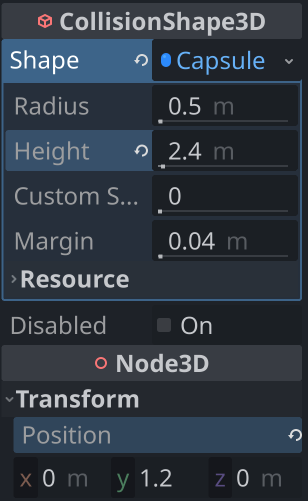
Note that the imported rig is positioned so that its feet are on the “ground”, ie at the body’s position. This will be helpful later, as the player’s position will represent its position on the ground, rather than floating in mid-air if it were at the center of its body.
If you’re familiar with Godot’s 3D orientation, you’ll also notice that the character is facing the +Z direction, which is backwards. Select the Skeleton3D node and set its Y Rotation to 180 to correct this.
Input actions
In the Input Map, we’re using the following inputs: forward, back, left, right, and jump. Assign them to whatever keys/buttons you prefer.
Camera
There are many ways to handle a 3D camera that follows the player. For this example, we’ll use a SpringArm3D as the camera “mount”.
The SpringArm3D node works by casting a ray and then moving its children to the collision point. Using this for a camera means nothing can get between the camera and the player, and we can implement zoom by varying this length.
Add one as a child of the root node, and then add a Camera3D as a child of that.
In the spring arm’s properties, set Spring Length to 5, the Margin to 0.1, and the Position to (0, 2.5, 0).
We don’t want the spring arm to collide with the player’s capsule shape, so in the root CharacterBody3D set the collision layer to 2. Since the spring arm is checking collision layer 1, that will prevent the camera hitting the player’s head.
Eventually, we’ll want to organize our collision layers for various game objects: player, environment, enemies, etc.
Movement
Now we are ready to add a script to the player. We’ll start with the variables we’ll need:
extends CharacterBody3D
class_name Knight

@export var speed = 5.0
@export var acceleration = 4.0
@export var jump_speed = 8.0

var gravity = ProjectSettings.get_setting("physics/3d/default_gravity")
var jumping = false
And then, some references to the nodes we’ll need to access:
@onready var spring_arm = $SpringArm3D
@onready var model = $Rig
@onready var anim_tree = $AnimationTree
@onready var anim_state = $AnimationTree.get("parameters/playback")
We’ll use the anim_tree reference to set the blend position for the Idle/Walk/Run blendspace and the trigger conditions for jumping. Select the AnimationTree and you can see these properties in the Inspector:
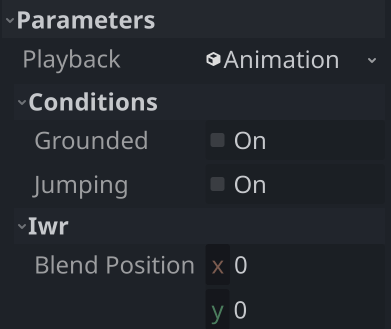
anim_state is a reference to the animation state machine, which we can use to call transitions between animations. See the Character Animation recipe for how we set these up.
Movement is a matter of getting the player’s input and calling move_and_slide():
func _physics_process(delta):
    velocity.y += -gravity * delta
    get_move_input(delta)

    move_and_slide()
The player’s input should be applied to the horizontal motion only (X and Z axes), since gravity is acting on the Y axis. For that reason, we’ll temporarily zero out the velocity.y, set the input, and then restore the value when we’re done.
Note that we’re rotating the input vector using the camera’s rotation - our character is going to move forward in whatever direction the camera is facing.
func get_move_input(delta):
    var vy = velocity.y
    velocity.y = 0
    var input = Input.get_vector("left", "right", "forward", "back")
    var dir = Vector3(input.x, 0, input.y).rotated(Vector3.UP, spring_arm.rotation.y)
    velocity = lerp(velocity, dir * speed, acceleration * delta)
    velocity.y = vy
Before we do anything else, this is a good point to test things out. You can make a quick test scene with a big StaticBody3D for the ground, or start making a scene using the dungeon pack assets.
You should be able to move forward/back/left/right (without any animations yet).
Camera Control
Now let’s get the camera working. We want to control the camera with mouse movement. We’ll add a variable that lets us adjust the sensitivity.
@export var mouse_sensitivity = 0.0015
Then, we want to detect mouse motion and rotate the spring arm accordingly. Rotating the arm around the X axis tilts it up and down (using the mouse’s y motion), and rotating it around Y changes its facing direction (using the mouse’s x motion). We also clamp the camera’s tilt so that it doesn’t go too far up/down.
func _unhandled_input(event):
    if event is InputEventMouseMotion:
        spring_arm.rotation.x -= event.relative.y * mouse_sensitivity
        spring_arm.rotation_degrees.x = clamp(spring_arm.rotation_degrees.x, -90.0, 30.0)
        spring_arm.rotation.y -= event.relative.x * mouse_sensitivity
Try it out and you should see when pressing “forward”, the character moves in the direction the camera faces.
Now we need to rotate the character so they face in the direction of movement.
We’ll add a variable for the rotation speed, so that we don’t snap instantly to the new heading.
@export var rotation_speed = 12.0
And then add this in _physics_process(), after move_and_slide():
    if velocity.length() > 1.0:
        model.rotation.y = lerp_angle(model.rotation.y, spring_arm.rotation.y, rotation_speed * delta)
Using lerp_angle() ensures we’ll always rotate the shortest direction to the new angle (rather than going the long way around from a 359° rotation to a 1° rotation, for example).
IWR Animations
Now that we have movement and rotation, we need to choose animations. The idea is to take the character’s horizontal velocity (the x/z movement) and use it to set the blend position in the IWR blendspace we created.
In get_move_input(), we’re setting the player’s velocity. Just after that, we can set the blend position:
    velocity = lerp(velocity, dir * speed, acceleration * delta)
    var vl = velocity * model.transform.basis
    anim_tree.set("parameters/IWR/blend_position", Vector2(vl.x, -vl.z) / speed)
Since velocity is in global space, but the character model is rotating, we need to transform velocity into model space using the model’s basis. Once we have that, we need to map that 3D vector to the 2D vector of the blend space, dividing by speed so that we’ll get values between -1 and 1. Also, -z is forward, but +y represents the blendspace forward animation, so we negate the value to make them match.
Note that you can get that parameter path by looking at the Inspector for the AnimationTree - you can even drag it into the script window to fill it in.
Attacks
We can handle attacks by first adding an input action called "attack", which I’ve assigned to the left mouse button.
Since we have 3 separate attacks in the AnimationTree, we’ll make a list of them:
var attacks = [
    "1h_slice_diagonal",
    "1h_slice_horizontal",
    "1h_attack_chop"
]
Then, in _unhandled_input(), pick a random animation from the list when the action is pressed:
    if event.is_action_pressed("attack"):
        anim_state.travel(attacks.pick_random())
Jumping
Jumping is a little bit more involved, because it involves three separate animations. As a reminder, this is how we set up the state machine:
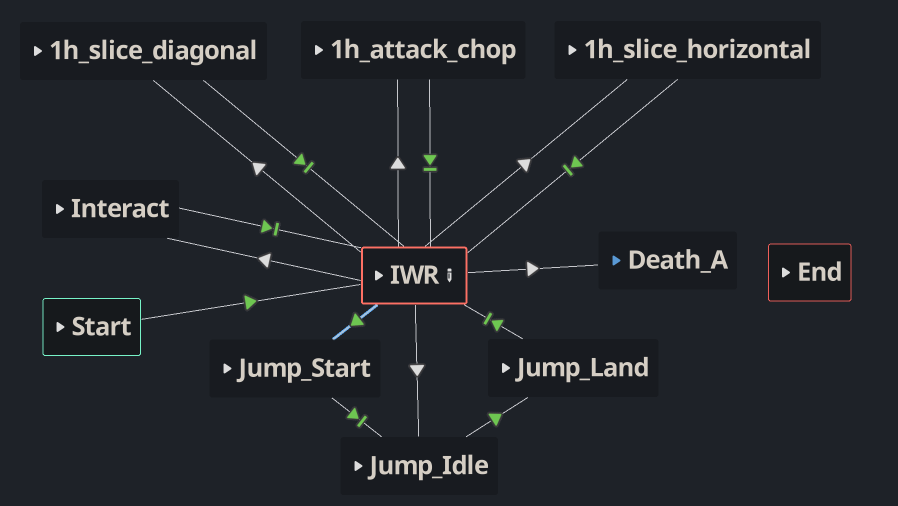
First, we want to transition to the “Jump_Start” animation by setting jumping = true. This triggers the transition in the state machine.
    if is_on_floor() and Input.is_action_just_pressed("jump"):
        velocity.y = jump_speed
        jumping = true
        anim_tree.set("parameters/conditions/grounded", false)
    anim_tree.set("parameters/conditions/jumping", jumping)
Next, we need to know when we touch the ground, so we can transition out of the “Jump_Idle” animation. To do this, we need to keep track of our grounded status by comparing it with the previous frame. Add a new variable at the top:
var last_floor = true
And then this if statement after the first one above:
    # We just hit the floor after being in the air
    if is_on_floor() and not last_floor:
        jumping = false
        anim_tree.set("parameters/conditions/grounded", true)
    last_floor = is_on_floor()
Finally, there’s the direct transition to “Jump_Idle” that happens if we step off a ledge:
    # We're in the air, but we didn't jump
    if not is_on_floor() and not jumping:
        anim_state.travel("Jump_Idle")
        anim_tree.set("parameters/conditions/grounded", false)
Wrapping up
We’ve now got a functional, controllable character with a chase camera and multiple animations. What’s next?
See the section description for more examples of working in 3D and for example Godot projects you can download.