3D Unit Healthbars
Problem
You want a floating “healthbar” for your 3D game objects (mobs, characters, etc.).
Solution
For this solution, we’re going to re-use a 2D healthbar based on a TextureProgressBar node. It’s already set up with textures and code for updating the value and color. If you already have something similar, feel free to use it here. In the example, we’ll name this scene “Healthbar2D”.

If you need some assets, here are the three images used in the bar:


Re-using existing objects can save you a lot of time. Don’t re-invent the wheel everytime you need a healthbar, camera, or other common object.
Project setup
For our example “mob”, we’ll start with a CharacterBody3D node. It’s programmed to spawn and travel in a straight line. It also has the following code to handle damage:
func _on_input_event(_camera, event, _position, _normal, _shape_idx):
    if event is InputEventMouseButton and event.button_index == MOUSE_BUTTON_LEFT and event.pressed:
        health -= 1
        if health <= 0:
            queue_free()
Clicking on a unit deals one damage. Do ten damage, and the unit is destroyed. Now we need a visual representation of that using our 2D bar.
2D in 3D
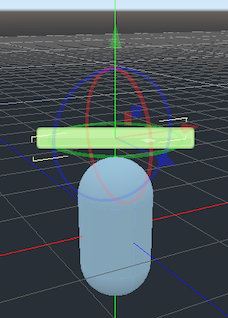
We can display a 2D image in 3D using a Sprite3D. Add one to a new scene and name it “Healthbar3D”. First, we’ll get it configured and sized, so set the Texture property to the green bar image.
The Sprite3D acts like any other 3D object - as we pan the camera around, our perspective on it changes. However, we want the healthbar to always “face” toward the camera so that we can see it.
In the Inspector, under Flags, set Billboard to “Enabled”.
Now try moving the camera to confirm that the texture is always facing you.
Add an instance of this scene to the Mob scene and position the bar above the mob’s body.
Viewport texture
We don’t want the Sprite3D to show a static texture - we want it to display the 2D TextureProgressBar. We can do that using a SubViewport node, which can export a texture.
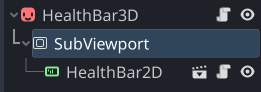
Add a SubViewport as a child of the Sprite3D. In the Inspector set Transparent BG to On.
We also need to set the size of the viewport to match the size of the healthbar texture, which is (200, 26).
Instance the HealthBar2D as a child of the Viewport. Your scene should look like this:
If the SubViewport were not a child of the Sprite3D, we could set it as the sprite’s texture directly in the Inspector. Since it’s a child, it won’t be ready at the right time, so we’ll need to set it in a script attached to the Sprite3D:
extends Sprite3D

func _ready():
    texture = $SubViewport.get_texture()
Connecting it all together
In the mob’s _on_input_event() method, add the following after reducing the health:
$HealthBar3D.update(health, max_health)
Add the following to HealthBar3D.gd:
func update_health(_value, _max_value):
    $SubViewport/HealthBar2D.update_health(_value, _max_value)
This calls the update method that already exists on the 2D bar, setting the progress bar’s value and selecting the bar color:
func update_health(_value, _max_value):
    value = _value
    if value < _max_value:
        show()
    texture_progress = bar_green
    if value < 0.75 * _max_value:
        texture_progress = bar_yellow
    if value < 0.45 * _max_value:
        texture_progress = bar_red
Click on the mobs to see the health bars change.
Wrapping up
You can use this technique to display any other Node2D or Control nodes, such as Label, VideoStreamPlayer, etc. You can even use the SubViewport to “project” an entire 2D game in 3D space.
Download This Project
Download the project code here: https://github.com/godotrecipes/3d_object_healthbars