Godot 101 - Part 13: KinematicBody2D Collisions Done Right
Sat, Jun 24, 2017![]()
This is part 13 of “Godot 101”. In this installment, we take a deeper look at how to handle KinematicBody2D collisions in a simple and accurate way, and how to avoid a few common mistakes. If you haven’t already read through the previous parts, please start with Part 1.
About this series
Godot 101 is an introduction to the Godot game engine and how it works. If you’ve never used a game engine before, or if you’re just new to Godot, this is the place to start. If you’re new here, a quick note about this website: we’re called KidsCanCode because we teach programming and game development to kids, but if you’re an adult you’re welcome here, too. We don’t believe in dumbing-down the material for kids, and game development is hard - so it will probably be challenging no matter what your age.
You can watch a video version of this lesson here:
Doing Collisions Right
We have seen before how the KinematicBody2D
node is perfect for implementing characters and other moving bodies that don’t need the full simulation of physics, but just need movement and collision detection. And while collision detection is very simple in Godot (the physics bodies just take care of it), we also need to understand how to make the bodies respond to collisions.
The basic structure of a KinematicBody2D scene is this:
-
KinematicBody2D-
Sprite -
CollisionShape2D
-
For the example in this demonstration, we’ll use a round image for the sprite, and a circular collision shape:

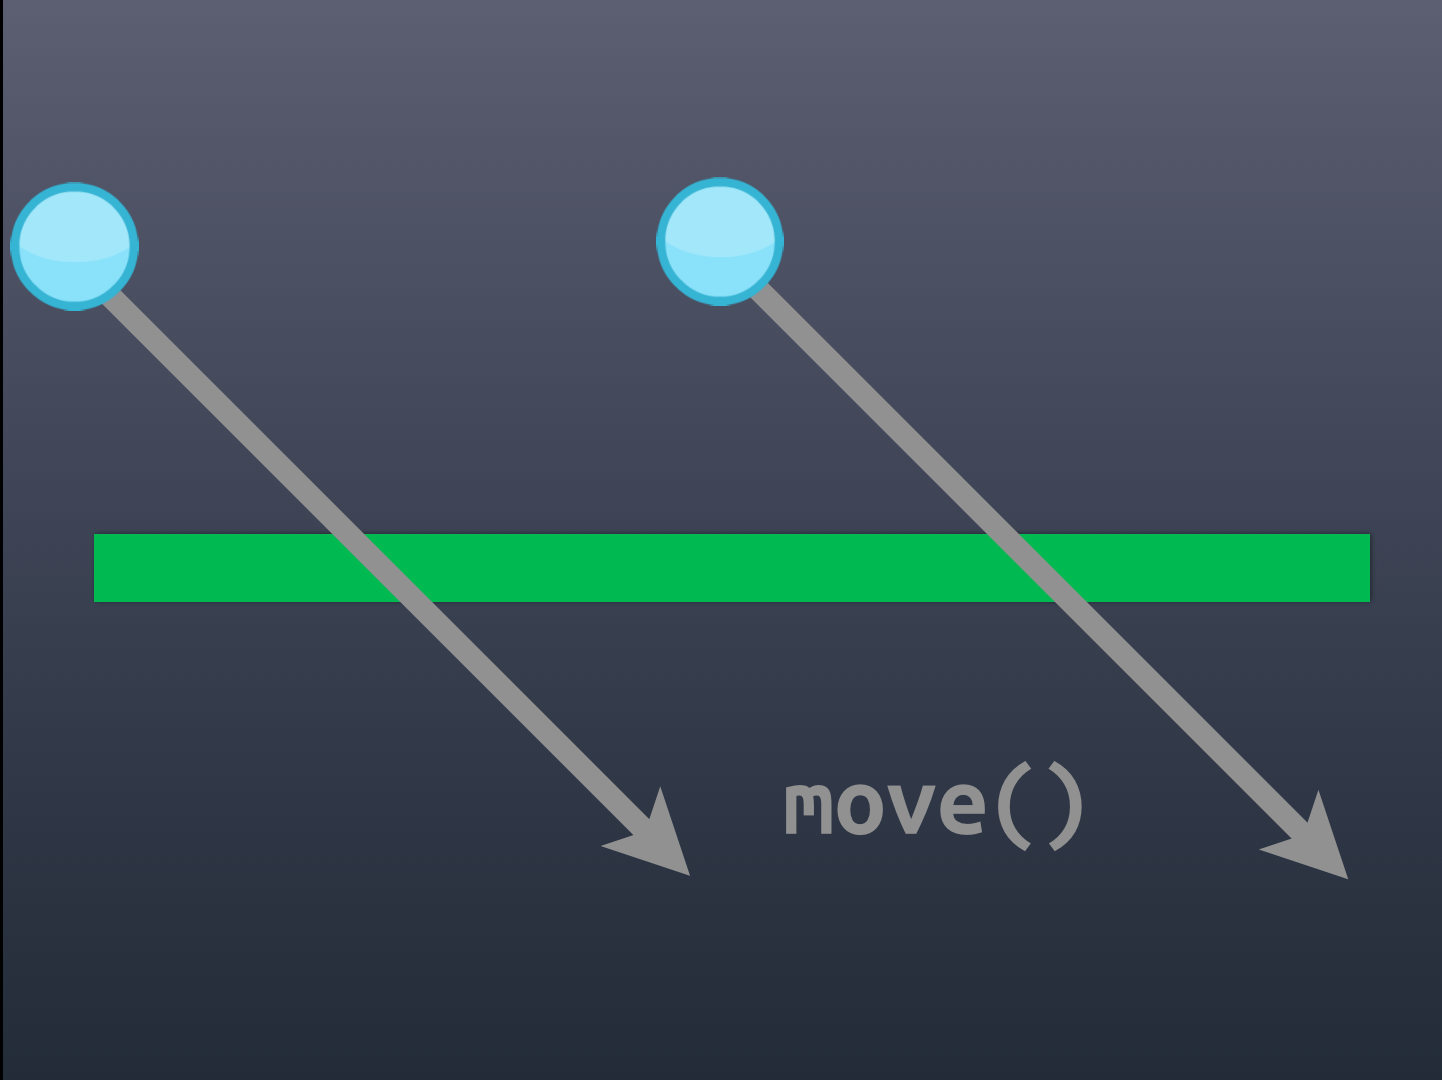
When using a KinematicBody2D, you must use the move() method to change its position. This method takes a Vector2 as its argument, which represents the distance & direction you wish to move the body. The method returns another Vector2 representing the motion remaining after a collision. We then have two choices of how to respond to this collision.
Let’s look at this process in more detail:
 Click to enlarge
Here we see the gray vector representing the desired movement, which we will pass to the move method. However, the green obstacle is in the way, so the move will stop when the collision occurs.
 Click to enlarge
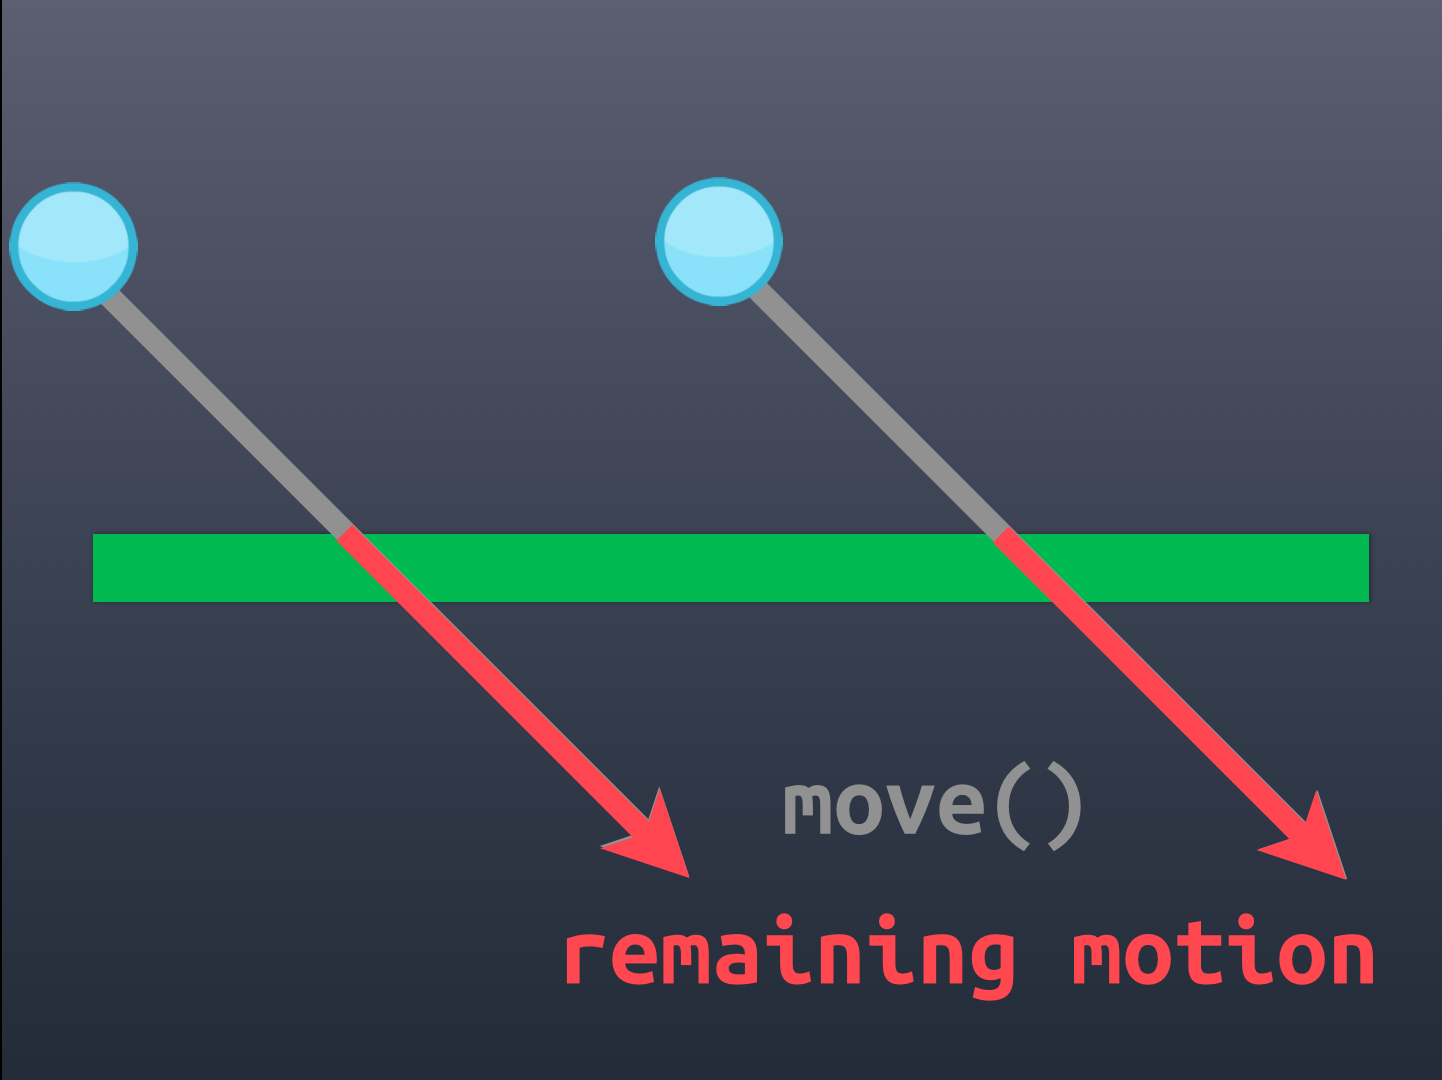
The red vector is the returned value of the move() method: representing the amount of the movement that was unable to be completed. Now we have a choice: to slide the body along the obstacle (as if it were sticky) or to reflect it off (i.e. bounce). In either case, we need to know the obstacle’s normal.
 Click to enlarge
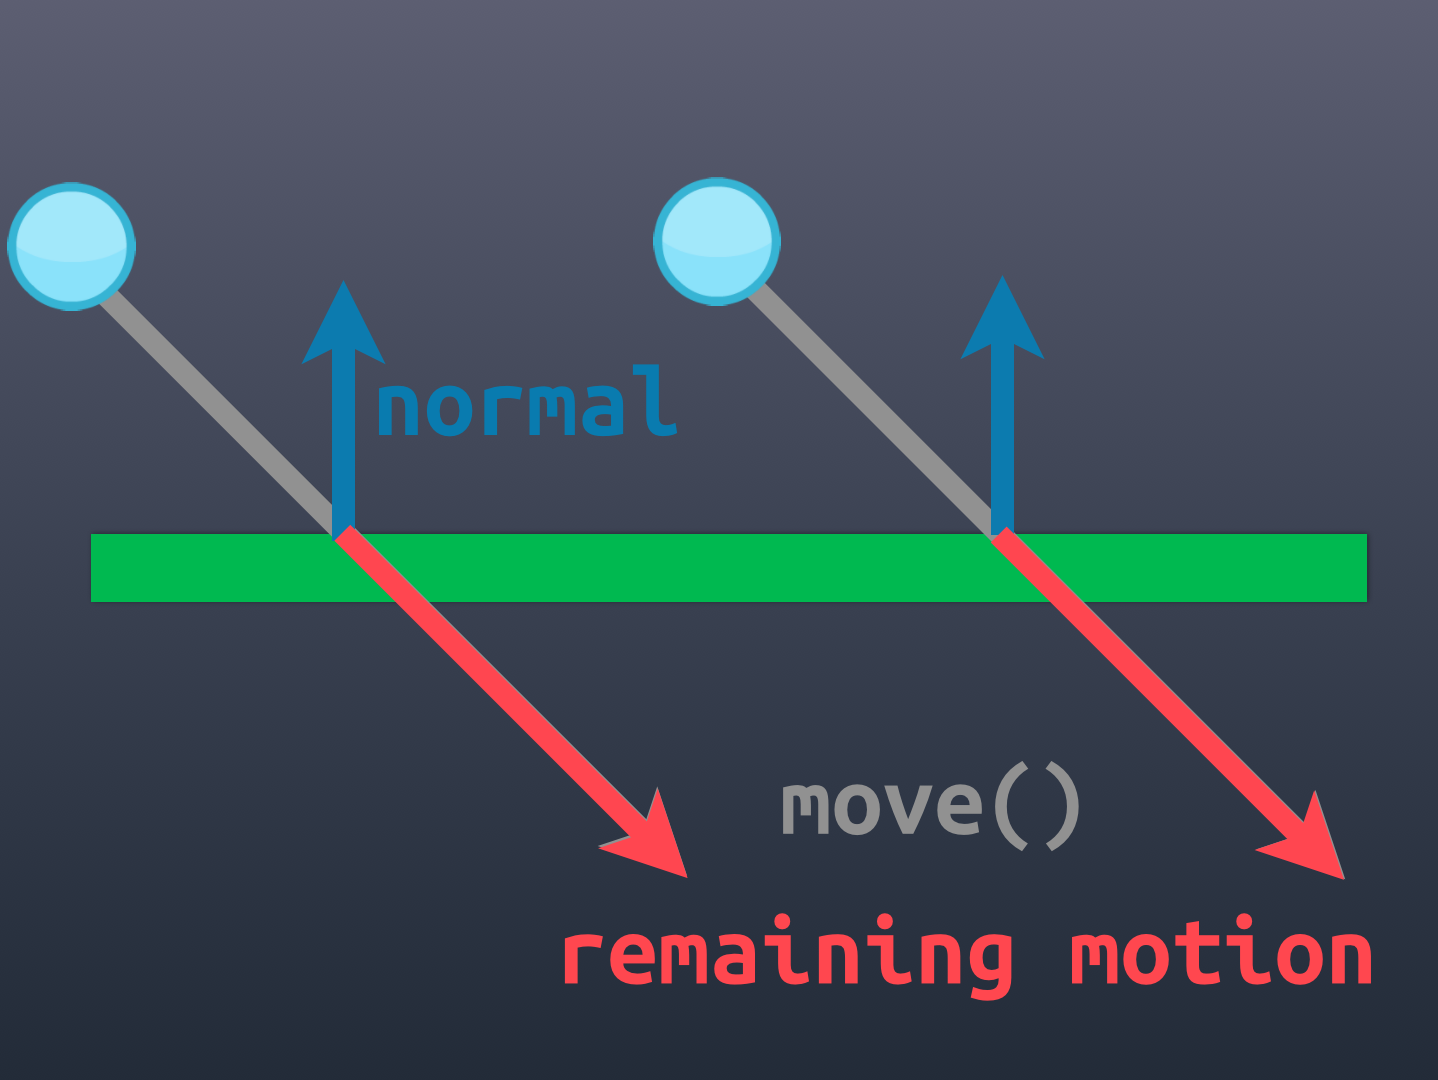
A normal vector is a unit-length vector pointing perpendicularly away from a surface. This vector tells us what direction the surface is facing (for example which edge of a shape was hit). Using this vector we can calculate the response.
 Click to enlarge
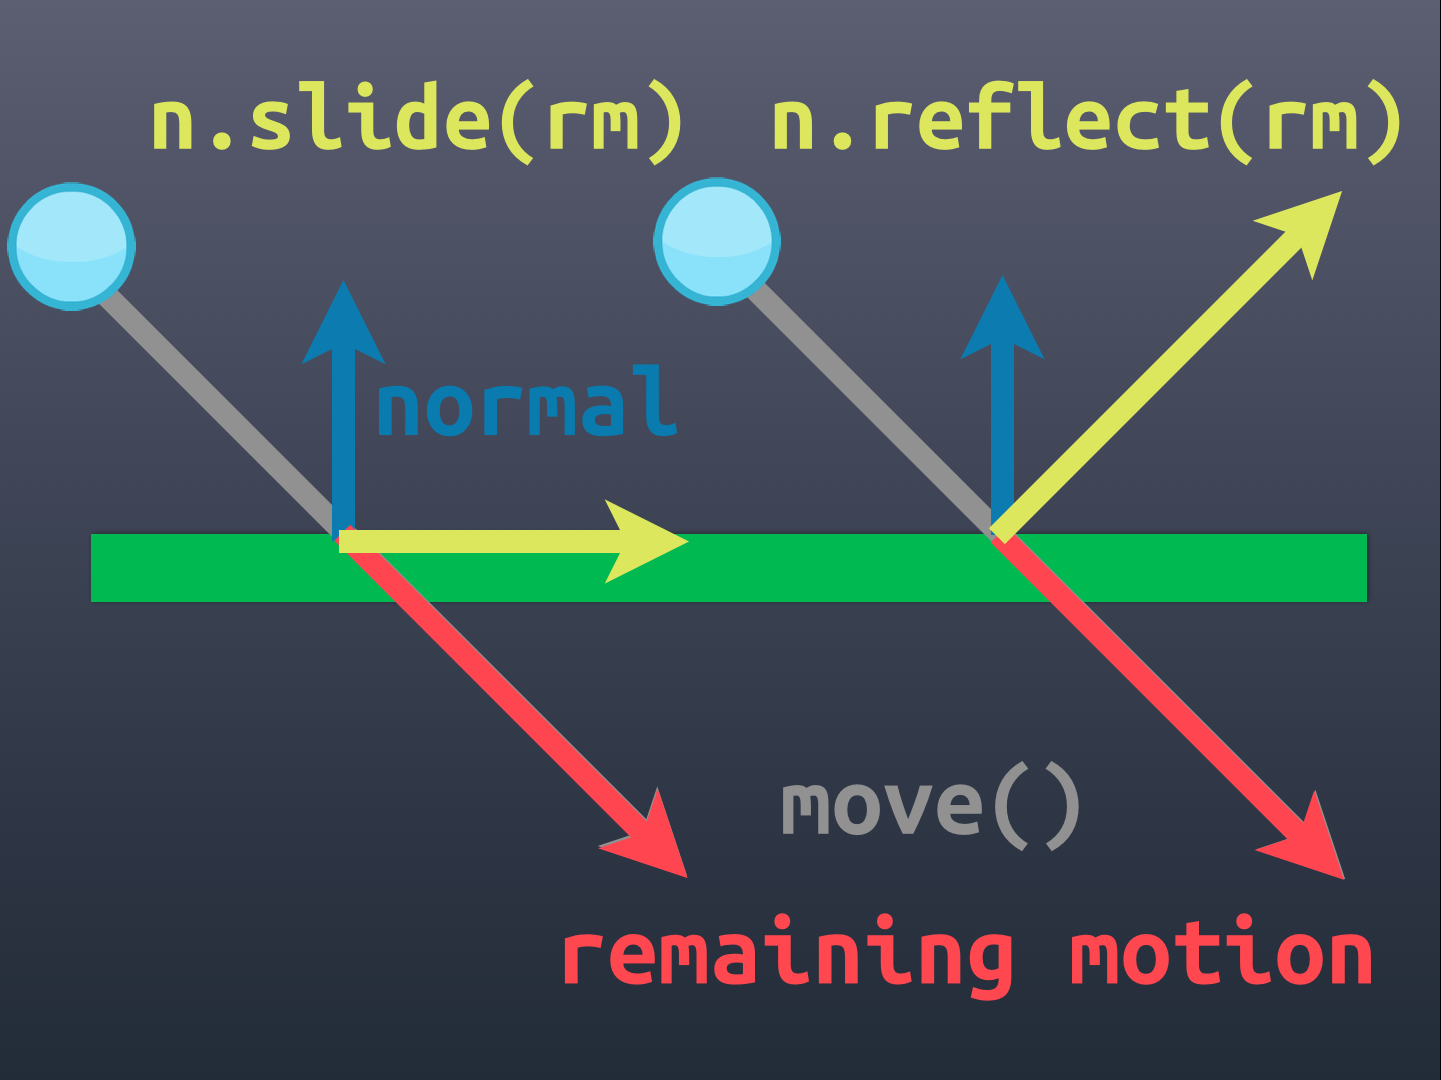
If we wish the body to slide along the object’s surface, we use n.slide() and if we want it to bounce, we use n.reflect(). Note that the length of the resulting vector when using slide() is only the component of the remaining motion in the desired direction.
Seeing it in action
Here is an example using the reflect() option:
 Click to enlarge
Note that not only flat surfaces have normals. Curved surfaces have a different normal at each point, resulting in a proper looking bounce off a round object:
 Click to enlarge
On the other hand, if we switch to slide mode, the result looks like this:
 Click to enlarge
Note how the velocity vectors are much shorter, especially if the collision angle is steep.
The code
Here is the code for the ball object, including both kinds of collision response:
extends KinematicBody2D

var speed = 200
var vel = Vector2() # pixels/sec

# set this to < 1.0 to demonstrate loss of energy
var bounce_coefficent = 1.0
# this toggles reflect or slide mode
var reflect = true

func _ready():
	randomize()
	# set start velocity towards mouse position
	vel = (get_global_mouse_pos()-get_pos()).normalized()*speed
	set_fixed_process(true)

func _fixed_process(delta):
	# move the body
	var motion = move(vel * delta)
	if is_colliding():
		# find the normal
		var n = get_collision_normal()
		if reflect:
			# reflect the motion *and* the velocity
			motion = n.reflect(motion)
			vel = n.reflect(vel) * bounce_coefficent
		else:
			# or slide them
			motion = n.slide(motion)
			vel = n.slide(vel)
		# remember to also move by the resulting motion
		move(motion)
This should be self-explanatory. Note that we reflect/slide both the remaining motion vector (so that the movement is continued) and the velocity vector (so that it is now moving in the proper direction).
IMPORTANT: Read this!
Are your collisions doing this?
 Click to enlarge
One of the most common mistakes we see among beginners when using physics bodies is incorrectly scaling the nodes. For example, when creating the circular collision shape for the ball, you must use the inner size handle to set the shape’s size. Never use the outer rectangle, or you will cause the node to be scaled.
If you have “glitchy” collisions, this is most likely the cause.
NEVER SCALE A PHYSICS BODY OR COLLISION SHAPE!
Always make sure that the KinematicBody2D and the CollisionShape2D have their scale property set to (1, 1). Always.
Wrapping up
Good collision response is easy if you follow a few simple rules, and take advantage of Godot’s built-in functions. If you’d like to experiment with the code used for the examples here, you can download the full project, or click the link below for the source code.