Godot - Animating Tiles Using Shaders
Sun, Aug 6, 2017![]()
You can watch a video version of this lesson here:
Animated Tiles
Our goal for this project is to create an animated tile that we can use in a Godot TileMap like this example:
It is possible to do this using an AnimationPlayer node (see this video for details). However, for this lesson, we are instead going to implement the tile animation using a Shader.
About Shaders
If you’ve never encountered shaders before, they can be very intimidating. This is not intended to be a comprehensive introduction to the subject, so here are a few links to get you started:
Creating a new shader
We will start with a regular TileSet, which is just a collection of Sprite nodes. You can use your own art, or download the example water pack.
Add a new Sprite and name it water shader. You can use any texture you like, as the image will be replaced when our shader is working.
Add a shader to the sprite by adding a new CanvasItemMaterial followed by a new CanvasItemShader like so:
 Click to enlarge
When you have done this, you will see a new pane open, with three tabs labeled Vertex, Fragment, and Lighting. We will be creating a “fragment” (aka pixel) shader, so make sure the correct tab is selected.
Shader code
Shader code uses syntax similar to C. We will start by defining our textures (the frames for the animation). There are 3 animations in the pack, each with 5 frames. We will focus on one to start with:
uniform texture frame1;
uniform texture frame2;
uniform texture frame3;
uniform texture frame4;
uniform texture frame5;
The uniform keyword will expose the variable so that it can be set in the Inspector (similar to export in GDScript). If you look at the CanvasItemMaterial now, you will see the 5 texture variables:
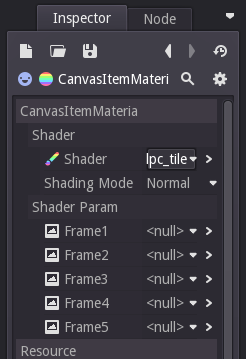 Click to enlarge
Drag the 5 textures into the 5 slots in the Inspector. Let’s test to see if it works:
COLOR = tex(frame1, UV);This just sets each pixel of the sprite to use the corresponding pixel of frame1. Change it to frame2 and observe the difference.
Incorporating time
Now we need that process to change with respect to time. In Godot, the TIME variable will contain the current time (in seconds). This value will steadily increase, but we are only interested in the fractional part, so we will use that:
float time = fract(TIME);
color col;

if (time < 0.5) {
	col = tex(frame1, UV);
}

COLOR = col;
We check if the time is less than 0.5 and then use the texture pixel as before. Now you should see texture #1 for half a second, and nothing for the other half. The only remaining thing is to break the second in to 5 parts and set the texture based on which fraction we are in. We will also add a speed uniform to allow easy adjustment of the animation speed. Here is the final shader code in full:
uniform texture frame1;
uniform texture frame2;
uniform texture frame3;
uniform texture frame4;
uniform texture frame5;
uniform float speed = 1.0;

color col;
float time = fract(TIME*speed);

if (time < 0.2) {
	col = tex(frame1, UV);
} else {
	if (time < 0.4) {
		col = tex(frame2, UV);
	} else {
		if (time < 0.6) {
			col = tex(frame3, UV);
		} else {
			if (time < 0.8) {
				col = tex(frame4, UV);
			} else {
				col = tex(frame5, UV);
			}
		}
	}
}

COLOR = col;
Creating the tileset
Now it just remains to save the sprites as a TileSet (Scene -> Convert To.. -> TileSet..) and load it in your TileMap. You can use the tile like any other, but when placed it will animate.
Wrapping up
Shaders are powerful, and this only scratches the surface of what you can do with them. To learn more, see the links below to resources where you can learn more about how to create your own shader effects.