Topdown Tank Battle: Part 4
Thu, Apr 19, 2018In this tutorial series, we’ll walk through the steps of building a 2D top-down tank game using Godot 3.0. The goal of the series is to introduce you to Godot’s workflow and show you various techniques that you can apply to your own projects.
This is Part 4: Player shooting
You can watch a video version of this lesson here:
Introduction
Physics Layers
As we add more objects to the game, the interactions between them are going to be more and more complex. We’ll use Godot’s physics layer system to organize what other objects can “see” and interact with.
To make it easier to track layers, you can assign names to them in Project Settings -> Layer Names:
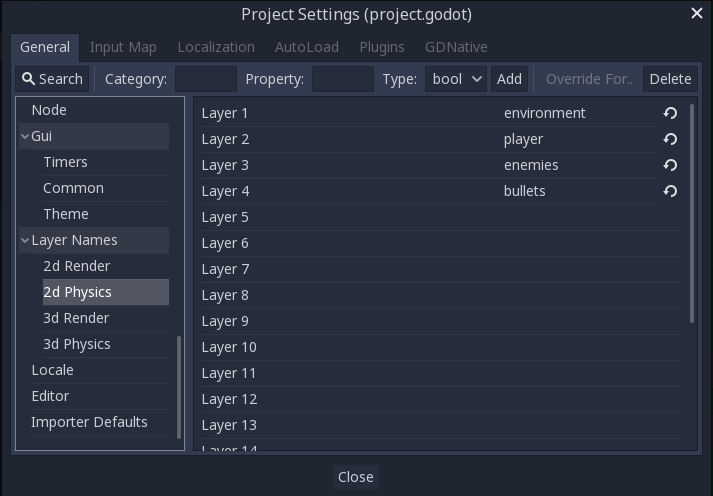
Screenshot: setting layers
Here are the layer settings you should use for the object’s we’ve made so far:
| Object | Layer(s) | Mask |
|---|---|---|
| Player | player |
environment, enemies |
| EnemyTank | enemies |
environment, player |
| Enemy DetectRadius | enemies |
player |
Note that we haven’t put enemies in the enemy tank’s mask. This way if we have
two enemy tanks that have overlapping paths, they’ll just drive through each other.
We may change this later, but for now, it’ll keep things simple.
Also, since we set the DetectRadius area’s mask to players it won’t “see” any
other objects. This means we can simplify the code a little bit, changing this:
func _on_DetectRadius_body_entered(body):
    if body.name == 'Player':
        target = body
to this:
func _on_DetectRadius_body_entered(body):
    target = body
Bullet Scene
As with the tanks, we’re going to make a master bullet scene that will be inherited by any bullet types we may make. Here’s the scene setup:
Area2Dnamed “Bullet”SpriteCollisionShape2DTimernamed “Lifetime”
Area2Ds are convenient for projectiles because they don’t need physics or collisions, they just need to detect contact. When the bullet contacts an object, it will explode and deal damage.
The “Lifetime” timer will be used to destroy the bullet after a given time.
Save the scene in a “bullets” folder, where we’ll also save the objects that inherit from it.
Bullet script
Attach a script, which will serve as the shared code for all projectiles.
extends Area2D

export (int) var speed
export (int) var damage
export (float) var lifetime

var velocity = Vector2()

func start(_position, _direction):
    position = _position
    rotation = _direction.angle()
    $Lifetime.wait_time = lifetime
    velocity = _direction * speed

func _process(delta):
    position += velocity * delta

func explode():
    queue_free()
Later we’ll give the bullet a fancy-looking explosion, but for now we’ll just delete it. We also need to attach two signals:
func _on_Bullet_body_entered(body):
    explode()
    if body.has_method('take_damage'):
        body.take_damage(damage)

func _on_Lifetime_timeout():
    explode()
The bullet might hit a variety of bodies. Some of them will take damage, and some
won’t. By using has_method() we can deal the bullet’s damage to any body that
accepts it.
Player Bullet
For the player bullet, create a new inherited scene and use one of the images from the spritesheet.
Note that most of the bullets in the spritesheet are drawn facing left. To correct this,
set the Sprite’s Rotation Degrees to 180 (alternatively, you can use Flip H).
Next, add a collision shape. You can use a rectangle or a capsule here - it won’t really make much difference as long as you don’t scale incorrectly.
Attach a script that extends from res://bullets/Bullet.gd, although we don’t have
anything extra to add to the player bullet right now. Don’t forget to set the Speed,
Damage, and Lifetime properties in the Inspector. I’m using 750, 10, and 0.5
respectively.
The next step is to make the “shoot” action instance a bullet.
Bullet Handling
This is where a lot of beginners run into trouble. If you instance a bullet and add it as a child of the player, you’ll see something odd. When you move or turn after firing, the bullet’s path changes too!
This is because a child node’s transform follows its parent’s. One common solution
is to make a “container” using a Node. Since Node has no 2d positional information,
its children will not inherit any transforms. However, the problem with this is that
since the bullets are still part of the object’s scene, if the object is deleted, so
are the bullets.
In order to avoid this, the bullet should be independent of the object that fired it. The tank should shoot, and then no longer have any responsibility for or knowledge of the bullet. We can accomplish this by using a signal, “emitting” the bullet, and letting some other node (our main scene in this case) take responsibility for managing the bullet.
We already made a Bullet export variable on the player, so drag the PlayerBullet
into this in the Inspector.
Since both the enemy and the player tank will be firing, we can add the shooting code to the generic Tank.gd script.
signal shoot

func shoot():
    if can_shoot:
        can_shoot = false
        $GunTimer.start()
        var dir = Vector2(1, 0).rotated($Turret.global_rotation)
        emit_signal('shoot', Bullet,
                $Turret/Muzzle.global_position, dir)
When the shoot function is triggered, it emits the shoot signal and passes
along the location and direction where the bullet needs to start.
Add this to the control() function of the Player.gd script:
if Input.is_action_just_pressed('click'):
    shoot()
Now if you run the game, clicking will emit the signal with the bullet. Even though we haven’t connected the signal to anything, the player doesn’t “know” there’s any problem. You can even run the player scene alone, so that it has no parent, and it will continue to function even though the bullets don’t actually appear.
Map script
In the map script, we need a function to handle the emitted bullets. This function doesn’t care whether it was the player or any other object that’s firing. It just needs to accept the incoming bullet and add it to the scene.
func _on_Tank_shoot(bullet, _position, _direction):
    var b = bullet.instance()
    add_child(b)
    b.start(_position, _direction)
Now in the map’s player instance, we can connect the shoot signal to this new
function.
Run the scene and you should be able to shoot as expected.
Conclusion
That’ll do it for Part 4 of this series. In the next part we’ll make the enemy tanks shoot as well, and create another enemy type: a machine-gun turret.
Please comment below with your questions and suggestions.