Topdown Tank Battle: Part 5
Thu, Apr 26, 2018In this tutorial series, we’ll walk through the steps of building a 2D top-down tank game using Godot 3.0. The goal of the series is to introduce you to Godot’s workflow and show you various techniques that you can apply to your own projects.
This is Part 5: Enemy shooting and improved enemy movement
You can watch a video version of this lesson here:
Introduction
In the last part, we added shooting to the player, so this time we need to do the same for the enemy tank. But first, there’s a small fix we need to make:
In the enemy tank’s Detect area, we attached a CollisionShape2D with a circle shape.
The problem is that when we instance the enemies, the shape is shared between them.
This means that when we set that shape’s radius in _ready() all the tanks wind
up with the same size, ignoring our detect_radius property.
To fix this, clear the shape from the CollisionShape2D in the scene, and change
the EnemyTank.gd code like so:
func _ready():
    var circle = CircleShape2D.new()
    $DetectRadius/CollisionShape2D.shape = circle
    $DetectRadius/CollisionShape2D.shape.radius = detect_radius
This ensures that each enemy gets its own unique shape resource, set to its desired size.
Enemy Bullets
First, we create a new EnemyBullet scene exactly like the player bullet we made
in the last part. The only difference should be which texture you use for the
appearance. Make sure you set the collision layer/mask properties. The enemy
bullet should be in the “bullets” layer, and its mask should see “environment”
and “player”.
After saving the scene, make sure to drop it in the EnemyTank’s Bullet property.
Aiming
We already have our enemy tank aiming its turret at the player. Now we want it to fire, but only when it’s pointing towards the player (i.e. the angle between the turret and the player is small).
In the enemy’s _process() function, we already have a direction vector pointing
at the player, target_dir, and one representing the turret’s direction, current_dir.
To check the angle between them, we can use the dot product.
Quick review of dot product:
The dot product of two unit vectors (vectors of length
1), is a number between-1and1.0means the two vectors are exactly 90 degrees apart, and1means they are pointing in the same direction. For a review of vector math, including dot product, see http://docs.godotengine.org/en/latest/tutorials/math/vector_math.html
If the dot product of the two vectors is close to 1 then the tank is aiming near
the player, and should attempt to shoot. Update the enemy tank’s code:
func _process(delta):
	if target:
		var target_dir = (target.global_position - global_position).normalized()
		var current_dir = Vector2(1, 0).rotated($Turret.global_rotation)
		$Turret.global_rotation = current_dir.linear_interpolate(target_dir, turret_speed * delta).angle()
		if target_dir.dot(current_dir) > 0.9:
			shoot()
We defined shoot() in the base Tank script, so the bullet will be emitted using
the shoot signal just like the player’s bullet.
The Main script already has a function, _on_Tank_shoot, that can receive an
emitted bullet. Connect each enemy instance’s shoot signal to that function.
Enemy movement
We can also make some improvements to the enemy’s movement. Right now, if we drive in front of the enemy, the collision is a bit glitchy as the two bodies try and slide around each other.
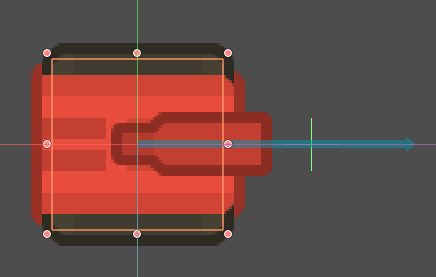
Instead, let’s make the enemy tank hit the brakes if there’s an obstacle in front
of it. We can accomplish this by adding a RayCast2D to the enemy tank scene.
Set the Enabled property to “On” (it’s off by default), and the “Cast To” to (100, 0)
so that it projects ahead of the tank.
The Collision Mask of the raycast should be set to “environment”, “enemies”, and “player”.
Now we also need the enemy to change its speed. In Tank.gd, change the speed
export variable to max_speed. Note: this means we need to change the variable name
in the player’s script too!
Add var speed to the top of the enemy script. This will now be our “current” speed,
which may change over time. If the raycast detects something, speed will ramp down
to 0 and if it doesn’t, it will ramp up to max_speed.
We can accomplish this “ramping” effect using GDScript’s linear interpolation function: lerp.
Update the enemy tank’s control() function:
func control(delta):
	if $LookAhead.is_colliding():
		speed = lerp(speed, 0, 0.1) # ramp speed down to 0
	else:
		speed = lerp(speed, max_speed, 0.05) # ramp speed up to max
	if parent is PathFollow2D:
		parent.set_offset(parent.get_offset() + speed * delta)
		position = Vector2()
	else:
		# other movement code
		pass
Run the scene and try it out. If you drive the player in front of the enemy tank, it should stop moving.
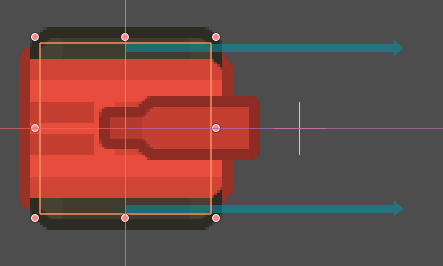
However, we still have a small problem: if the collision happens with an offset or around a corner, the ray may not “see” anything. We can improve the obstacle detection if we use two raycasts instead of one:
If you click on the LookAhead node and press Ctrl+D you can duplicate the node
with all of its settings. Adjust the Position of each so that one is shifted
30 pixels up and the other down.
Now we just need to make sure we check both of them:
if $LookAhead1.is_colliding() or $LookAhead2.is_colliding():Conclusion
That’ll do it for Part 5 of this series. In the next part we’ll continue to work on the shooting by adding some effects (explosions) and handle damage.
Please comment below with your questions and suggestions.


