Topdown Tank Battle: Part 6
Sun, May 6, 2018In this tutorial series, we’ll walk through the steps of building a 2D top-down tank game using Godot 3.0. The goal of the series is to introduce you to Godot’s workflow and show you various techniques that you can apply to your own projects.
This is Part 6: Tank damage and UI
You can watch a video version of this lesson here:
Introduction
In the last part, we added shooting, and the bullets are detecting contact with the tanks. Now we need them to deal damage.
Dealing damage
We’ll start with the Tank.gd script by changing the health export variable
to max_health. This will be the “full” value, which can be configured per tank.
Then, add a new var health which will track the current health value.
Add code to the _ready function to handle this. Note that when we emit the signal,
we’re passing a percentage rather than the raw health value:
func _ready():
    health = max_health
    emit_signal('health_changed', health * 100/max_health)
    $GunTimer.wait_time = gun_cooldown
Next, we add a method that will handle applying incoming damage:
func take_damage(amount):
    health -= amount
    emit_signal('health_changed', health * 100/max_health)
    if health <= 0:
        explode()

func explode():
    queue_free()
What we need to do now is make the bullet call that method when it collides.
In the Bullet.gd script, we already have code that applies damage if the colliding
body can accept it:
func _on_Bullet_body_entered(body):
    explode()
    if body.has_method('take_damage'):
        body.take_damage(damage)
Run the game and you should be able to destroy the enemy tanks if you hit them enough times, depending on what health & damage values you assigned in the Inspector.
UI Setup
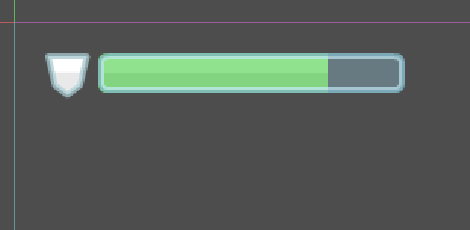
Now we need to display the player’s health, so we’ll create a HUD (“heads-up display”). This will eventually display a variety of game data, but we’ll start with a bar showing the player’s health.
Create a new scene with the following nodes and save it in a “ui” folder:
CanvasLayer(“HUD”)MarginContainer(“Margin”)HBoxContainer(“Container”)TextureRectTextureProgress(“HealthBar”)
The MarginContainer keeps its children from getting too close to the edges of the
screen. In the “Layout” menu set it to “Full Rect” and in the Inspector set all
four of its Custom Constants values to 20.
Drag the res://assets/shield_silver.png image into the Texture property of the
TextureRect.
The TextureProgress node will handle the health display. It works by displaying a
portion of a given texture, determined by the value property.
Drag res://assets/UI/barHorizontal_green_mid 200.png to the Texture/Progress property
and res://assets/UI/glassPanel_200.png to the Texture/Over property. Set the
Value to 75 to see a portion of the green bar displayed.
UI Script
Add a script to the HUD with a function that updates the bar’s value to the one given:
extends CanvasLayer

func update_healthbar(value):
    $Margin/Container/HealthBar.value = value
Now that method needs to be connected to the player’s health_changed signal.
Add an instance of the HUD scene to the map scene. Click on the Player instance and
connect health_changed to update_healthbar in the HUD.
Run the game and you should see the bar going down when bullets hit you.
Making it pretty
Now that we have the healthbar working, we’re going to add a little “juice” to make it look more appealing. We’ll add a few effects:
- Changing color from green -> yellow -> red as the value decreases
- A gradual animation when the value changes
- A flashing effect when hit
Changing color
The various colored bars are already in the assets folder, we just need to load
them and apply them to the bar’s texture_progress property. Add the following to
the hud script. Note: you can right-click on the file in the FileManager and choose
“Copy Path” rather than type out the file locations.
extends CanvasLayer

var bar_red = preload("res://assets/UI/barHorizontal_red_mid 200.png")
var bar_green = preload("res://assets/UI/barHorizontal_green_mid 200.png")
var bar_yellow = preload("res://assets/UI/barHorizontal_yellow_mid 200.png")
var bar_texture

func update_healthbar(value):
    bar_texture = bar_green
    if value < 60:
        bar_texture = bar_yellow
    if value < 25:
        bar_texture = bar_red
    $Margin/Container/HealthBar.texture_progress = bar_texture
    $Margin/Container/HealthBar.value = value
Try running and the bar’s color should change as the value decreases.
Gradually changing value
Next, we’re going to animate the change so that it doesn’t instantly jump to the
new value. We’ll do this with a Tween node. Add one as a child of the HealthBar.
We’ll use the Tween to interpolate the bar’s value from its current value to
the new value.
extends CanvasLayer

var bar_red = preload("res://assets/UI/barHorizontal_red_mid 200.png")
var bar_green = preload("res://assets/UI/barHorizontal_green_mid 200.png")
var bar_yellow = preload("res://assets/UI/barHorizontal_yellow_mid 200.png")
var bar_texture

func update_healthbar(value):
    bar_texture = bar_green
    if value < 60:
        bar_texture = bar_yellow
    if value < 25:
        bar_texture = bar_red
    $Margin/Container/HealthBar.texture_progress = bar_texture
    $Margin/Container/HealthBar/Tween.interpolate_property($Margin/Container/HealthBar,
            'value', $Margin/Container/HealthBar.value, value,
            0.2, Tween.TRANS_LINEAR, Tween.EASE_IN_OUT)
    $Margin/Container/HealthBar/Tween.start()
Note that we don’t have to explicitly set the node’s value because the tween
ends at the value we want.
Flashing the bar
For the flashing bar animation, we’ll use AnimationPlayer. Add one to the HUD and
create a new animation called “healthbar_flash”. Set the Length to 0.2 and the
Steps to 0.05.
This animation will affect the texture_progress property, so start by dragging the
red texture into that property and clicking the keyframe button. Now alternate keyframes
with the white and red textures until you reach the end of the 0.2 seconds.
After the animation plays, the bar will be left with the red texture, so we’ll
connect the AnimationPlayer’s animation_finished signal so that we can set the
bar back to its correct color.
extends CanvasLayer

var bar_red = preload("res://assets/UI/barHorizontal_red_mid 200.png")
var bar_green = preload("res://assets/UI/barHorizontal_green_mid 200.png")
var bar_yellow = preload("res://assets/UI/barHorizontal_yellow_mid 200.png")
var bar_texture

func update_healthbar(value):
    bar_texture = bar_green
    if value < 60:
        bar_texture = bar_yellow
    if value < 25:
        bar_texture = bar_red
    $Margin/Container/HealthBar.texture_progress = bar_texture
    $Margin/Container/HealthBar/Tween.interpolate_property($Margin/Container/HealthBar,
            'value', $Margin/Container/HealthBar.value, value,
            0.2, Tween.TRANS_LINEAR, Tween.EASE_IN_OUT)
    $Margin/Container/HealthBar/Tween.start()
    $AnimationPlayer.play("healthbar_flash")

func _on_AnimationPlayer_animation_finished(anim_name):
    if anim_name == 'healthbar_flash':
        $Margin/Container/HealthBar.texture_progress = bar_texture
Conclusion
That completes Part 6 of this series. In the next part we’ll continue adding visuals with individual unit healthbars on the enemy tanks and explosions for the bullets.
Please comment below with your questions and suggestions.

