Topdown Tank Battle: Part 7
Sun, May 13, 2018In this tutorial series, we’ll walk through the steps of building a 2D top-down tank game using Godot 3.0. The goal of the series is to introduce you to Godot’s workflow and show you various techniques that you can apply to your own projects.
This is Part 7: Enemy tank health and explosions
You can watch a video version of this lesson here:
Introduction
In the last part we added a healthbar for the player, so now we need to do the same for the enemies. We’re also going to make some explosions!
Unit health display
For the enemy units, we want the health to display as a small bar just above the unit, which moves with them. Since every enemy tank will have one, and possibly other things, we’re going to create this as a separate scene we can attach to any object.
Create a new scene with a Node2D named “UnitDisplay” as its root. We’ll use this
to display the health and any other enemy data (armor, invincibility, etc.) that we
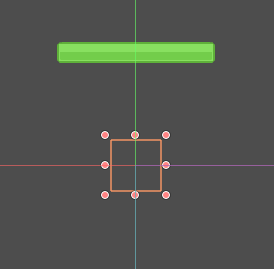
may add later in the game. Add a TextureProgress as its child.
Add the green bar texture to the Texture/Progress property and set Value to
100 so we can see it. Drag the bar so that it’s positioned above the (0, 0)
point of the parent node.
Set the Scale of the root node to (0.5, 0.5).
With this attached to the unit, it will follow the unit as it moves, but also rotate along with its parent, which we don’t want. However, we can take care of that in the script.
In the script, we want to have a lot of the same behavior from the player healthbar, such as changing color as it shrinks. Add a script and the code below, which is very similar to that in the UI scene.
We also want the bar to be hidden until the enemy first takes damage, so we’ll make all the display elements hidden to begin, and the healthbar will show if it drops below 100%.
extends Node2D

var bar_red = preload("res://assets/UI/barHorizontal_red_mid 200.png")
var bar_green = preload("res://assets/UI/barHorizontal_green_mid 200.png")
var bar_yellow = preload("res://assets/UI/barHorizontal_yellow_mid 200.png")

func _ready():
    for node in get_children():
        node.hide()

func update_healthbar(value):
    $HealthBar.texture_progress = bar_green
    if value < 60:
        $HealthBar.texture_progress = bar_yellow
    if value < 25:
        $HealthBar.texture_progress = bar_red
    if value < 100:
        $HealthBar.show()
    if value < 100:
        $HealthBar.show()
    $HealthBar.value = value
We also want the node to ignore its parent’s rotation, so add the following:
func _process(delta):
    global_rotation = 0
Now go to the EnemyTank scene and attach an instance of the unit display.
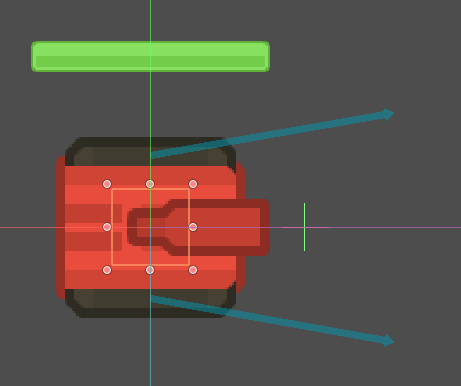
We are already emittting the health_changed signal in Tank.gd, which the enemy
tank inherits from, so we just need to connect that signal. Connect it to the
UnitDisplay update_healthbar() function.
Run the game and verify that when you shoot the enemy, the healthbar appears and reduces.
Explosions
Included in the tank art pack we’re using are two different styles of explosion animations. We’ll use them by creating a separate scene and attaching it to anything that needs to explode.
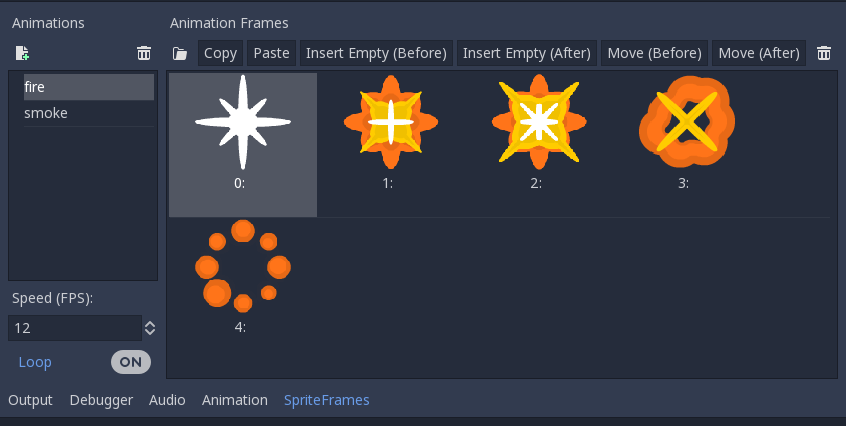
Create a new scene with an AnimatedSprite node and call it “Explosion”. Save it
in an “effects” folder. Add a new SpriteFrames resource and in the SpriteFrames
panel, create two animations: “smoke” and “fire”, containing the respective
images.
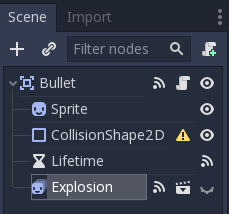
We’ll start by adding the explosion to the Bullet scene. Set its Scale to (0.5, 0.5)
and click the “eye” symbol to make it hidden.
We already created an explode() method on the bullet. Now we’ll change that to
play the animation.
We also need to connect the explosion’s animation_finished signal so that we can
remove the bullet.
func explode():
	velocity = Vector2()
	$Sprite.hide()
	$Explosion.show()
	$Explosion.play("smoke")

func _on_Explosion_animation_finished():
	queue_free()
Cursor
Finally, before we wrap up, let’s try using one of the custom cursor images from the UI pack:
![]()
To use it as our mouse cursor, add the following line to Map.gd:
Input.set_custom_mouse_cursor(load("res://assets/UI/crossair_black.png"),
        Input.CURSOR_ARROW, Vector2(16, 16))
Conclusion
That completes Part 7 of this series. In the next part we’ll start adding some obstacles and items to the game.
Please comment below with your questions and suggestions.