Topdown Tank Battle: Part 9
Thu, May 31, 2018In this tutorial series, we’ll walk through the steps of building a 2D top-down tank game using Godot 3.0. The goal of the series is to introduce you to Godot’s workflow and show you various techniques that you can apply to your own projects.
This is Part 9: Obstacles (and tool scripts)
You can watch a video version of this lesson here:
Introduction
In this part, we’re going to add obstacles to the world and begin to think about how levels are going to be designed.
Small additions
Before tackling the obstacles, a couple of small changes to the code.
First, we’re adding a machine gun turret, which is a stationary enemy. It inherits
from EnemyTank and has all the same features, but its speed is set to 0 so
that it doesn’t move.
Second, change the EnemyTank script so that it doesn’t use the LookAhead raycasts when it’s not a moving object:
func control(delta):
    if parent is PathFollow2D:
        if $LookAhead1.is_colliding() or $LookAhead2.is_colliding():
            speed = lerp(speed, 0, 0.1)
        else:
            speed = lerp(speed, max_speed, 0.05)
        parent.set_offset(parent.get_offset() + speed * delta)
        position = Vector2()
    else:
        # other movement code
        pass
Obstacles
In the art pack there are sandbags, trees, barriers, and many other useful objects to decorate the world and make it less empty. However, because they are not all the same size or shape, they will require different collision shapes. This means we can’t really use a TileMap to place them. In addition, we also want to be able to place them at any angle, not just the orthogonal rotations allowed in TileMaps.
So what approach should we use? We could make a bunch of different StaticBody objects, but that is going to be hard to manage with so many. Instead, we can make a single collision object that can be made to represent all of the possible obstacles. The idea is that as we get further into the project, we could turn this into a full level-design tool.
Obstacle scene
Create a new Obstacle scene with a StaticBody, Sprite, and CollisionShape2D, saving
it in a folder called “environment”. Drop the asset sheet into the Sprite’s Texture
and set its Region on.
Now, rather than selecting the region manually in the editor, we want to automatically grab all the obstacle images out of the sheet. Fortunately, when Kenney creates his art packs, he includes an xml file like the following along with the spritesheets. This file lists the coordinates of every image, making it easy to find them programmatically. Since we don’t need all of the objects, just the obstacles, we can create a new file listing just those objects:
<TextureAtlas imagePath="onlyObjects_retina.png">
        <SubTexture name="barrelBlack_side.png" x="652" y="532" width="40" height="56"/>
        <SubTexture name="barrelBlack_top.png" x="645" y="220" width="48" height="48"/>
        <SubTexture name="barrelGreen_side.png" x="652" y="476" width="40" height="56"/>
        <SubTexture name="barrelGreen_top.png" x="597" y="220" width="48" height="48"/>
        <SubTexture name="barrelRed_side.png" x="648" y="420" width="40" height="56"/>
        <SubTexture name="barrelRed_top.png" x="645" y="172" width="48" height="48"/>
        <SubTexture name="barrelRust_side.png" x="652" y="588" width="40" height="56"/>
        <SubTexture name="barrelRust_top.png" x="597" y="172" width="48" height="48"/>
        <SubTexture name="barricadeMetal.png" x="596" y="532" width="56" height="56"/>
        <SubTexture name="barricadeWood.png" x="596" y="72" width="56" height="56"/>
        <SubTexture name="fenceRed.png" x="243" y="336" width="96" height="32"/>
        <SubTexture name="fenceYellow.png" x="128" y="216" width="104" height="32"/>
        <SubTexture name="sandbagBeige.png" x="436" y="164" width="64" height="44"/>
        <SubTexture name="sandbagBeige_open.png" x="348" y="518" width="84" height="55"/>
        <SubTexture name="sandbagBrown.png" x="440" y="622" width="64" height="44"/>
        <SubTexture name="sandbagBrown_open.png" x="248" y="596" width="84" height="55"/>
        <SubTexture name="treeBrown_large.png" x="0" y="0" width="128" height="128"/>
        <SubTexture name="treeBrown_small.png" x="592" y="694" width="72" height="72"/>
        <SubTexture name="treeGreen_large.png" x="0" y="128" width="128" height="128"/>
        <SubTexture name="treeGreen_small.png" x="520" y="694" width="72" height="72"/>
</TextureAtlas>
Click here to download this file.
Rotating spritesheet coordinates
However, now we have a problem. At the beginning of the project we rotated the spritesheet by 90 degrees so that it was oriented pointing right to match Godot’s zero angle. That means that the coordinates in the xml file are no longer valid!
Fortunately, I have a Python script from a previoius project that parses the Kenney xml, so we can use that. Python is a great choice for tool scripts like this.
Once we’ve parsed the xml and extracted the x, y, width, and height values, we need to do a little math to transform them to the new orientation:
![]()
In this image, you can see how a point rotated 90 degrees counter-clockwise is
transformed. In addition to this, since Godot expects x & y to represent the
rectangle’s top-left corner, we also have to subtract h from y.
Here is the Python script to do all that:
# Extract sprite coordinates from rotated
# Kenney spritesheet
import xml.etree.ElementTree as ET

datafile = 'obstacles.xml'
enum_name = 'Items'
sheet_width = 782
sheet_height = 782

# parse Kenney XML file
tree = ET.parse(datafile)
rects = {}
for node in tree.iter():
    if node.attrib.get('name'):
        name = node.attrib.get('name').replace('.png', '')
        rects[name] = []
        rects[name].append(int(node.attrib.get('x')))
        rects[name].append(int(node.attrib.get('y')))
        rects[name].append(int(node.attrib.get('width')))
        rects[name].append(int(node.attrib.get('height')))

enum = 'enum Items {'
for name in rects:
    enum += name + ', '
enum += '}'
print(enum)
print()
print("var regions = {")
for name, rect in rects.items():
    x, y, w, h = rect
    # offset center
    x -= sheet_width//2
    y -= sheet_height//2
    # rotate 90deg counter-clockwise
    # and use new top-left corner
    x, y = y, -x
    w, h = h, w
    y -= h
    # remove offset
    x += sheet_width//2
    y += sheet_height//2
    print("\t%s.%s: Rect2(%s, %s, %s, %s)," % (enum_name, name, x, y, w, h))
print("}")
In addition to applying the transform, we’re also printing the result in a particular
format, so that we can use it in our GDScript code. We will be left with an enum
called Items listing the various obstacles and a dictionary called regions
containing the coordinates as Rect2 objects.
Obstacle Script
Paste the Python script’s output into the Obstacle script:
extends StaticBody2D

enum Items {barrelBlack_side, barrelBlack_top, barrelGreen_side,
            barrelGreen_top, barrelRed_side, barrelRed_top,
            barrelRust_side, barrelRust_top, barricadeMetal,
            barricadeWood, fenceRed, fenceYellow, sandbagBeige,
            sandbagBeige_open, sandbagBrown, sandbagBrown_open,
            treeBrown_large, treeBrown_small, treeGreen_large,
            treeGreen_small}

var regions = {
    Items.barrelBlack_side: Rect2(532, 90, 56, 40),
    Items.barrelBlack_top: Rect2(220, 89, 48, 48),
    Items.barrelGreen_side: Rect2(476, 90, 56, 40),
    Items.barrelGreen_top: Rect2(220, 137, 48, 48),
    Items.barrelRed_side: Rect2(420, 94, 56, 40),
    Items.barrelRed_top: Rect2(172, 89, 48, 48),
    Items.barrelRust_side: Rect2(588, 90, 56, 40),
    Items.barrelRust_top: Rect2(172, 137, 48, 48),
    Items.barricadeMetal: Rect2(532, 130, 56, 56),
    Items.barricadeWood: Rect2(72, 130, 56, 56),
    Items.fenceRed: Rect2(336, 443, 32, 96),
    Items.fenceYellow: Rect2(216, 550, 32, 104),
    Items.sandbagBeige: Rect2(164, 282, 44, 64),
    Items.sandbagBeige_open: Rect2(518, 350, 55, 84),
    Items.sandbagBrown: Rect2(622, 278, 44, 64),
    Items.sandbagBrown_open: Rect2(596, 450, 55, 84),
    Items.treeBrown_large: Rect2(0, 654, 128, 128),
    Items.treeBrown_small: Rect2(694, 118, 72, 72),
    Items.treeGreen_large: Rect2(128, 654, 128, 128),
    Items.treeGreen_small: Rect2(694, 190, 72, 72)
}
Next, we want to be able to choose the item from the Inspector, so we need to
export a variable that uses the Items enum:
export (Items) var type setget _updateSetting the type variable will trigger the _update() function, which sets
the Region and creates a correctly sized collision rectangle:
func _update(_type):
    type = _type
    $Sprite.region_rect = regions[type]
    var rect = RectangleShape2D.new()
    rect.extents = $Sprite.region_rect.size / 2
    $CollisionShape2D.shape = rect
We need this code to run when we’re in the editor, not when the game is running,
so add tool as the first line of the script. This tells Godot that we want the
code to run in the editor.
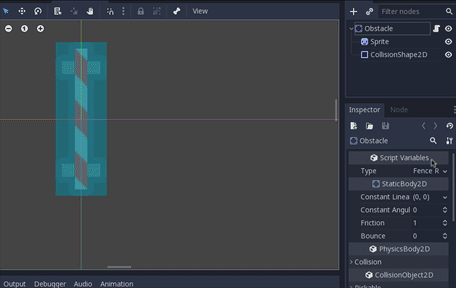
Adding Obstacles
Now add some obstacle instances to the map, choosing some different types and arranging them as you like. However, when you try and run the game, you’ll see an error message:
Invalid set index 'region_rect' (on base: 'null instance') with value of type 'Rect2'.
This happens because the setget is running before the Obstacle scene has
finished loading - specifically before its child node Sprite has loaded. We can
fix this by telling the node to wait until it’s ready when being run in the scene
tree (i.e. not in the editor):
func _update(_type):
    type = _type
    if !Engine.editor_hint:
        yield(self, 'tree_entered')
    $Sprite.region_rect = regions[type]
    var rect = RectangleShape2D.new()
    rect.extents = $Sprite.region_rect.size / 2
    $CollisionShape2D.shape = rect
Now you can run the game and test that the obstacles are working:

Conclusion
That completes Part 9 of this series. Still to come: pickup items (i.e. supplies, goals, etc.) and more weapon types.
Please comment below with your questions and suggestions.