Godot 3.0: Splitscreen Demo (Using Viewports)
Tue, Jul 10, 2018![]()
Introduction
In this demo, we’ll consider a local multiplayer game - a topdown-style maze game with two players (one using arrow keys and the other using WASD controls). This is not a problem if our game world all fits on one screen, but if the map is large, we’ll want to have a “split screen” view tracking the two players separately.
We’ll also look at a quick way to set up a minimap display.
You can watch a video version of this tutorial here:
Game setup
We won’t spend a lot of time on the setup of the game world. The two players are KinematicBody2D objects using no-frills 8-way movement.
If you need help setting up this part, see the following section in the official Godot docs: 2D Movement Overview
Each player has its input actions set up in the Project Settings -> Input Map section: “right_1” to Right Arrow, “right_2” to D, etc. Note that by naming them this way, we can save time in the code by using:
export var id = 0

func get_input():
    velocity = Vector2()
    if Input.is_action_pressed('right_%s' % id):
        velocity.x += 1
    # etc.
This way both characters can use the same script for movement. Just assign the
appropriate value to id for each player.
The two players are added to a “World” scene containing a TileMap:
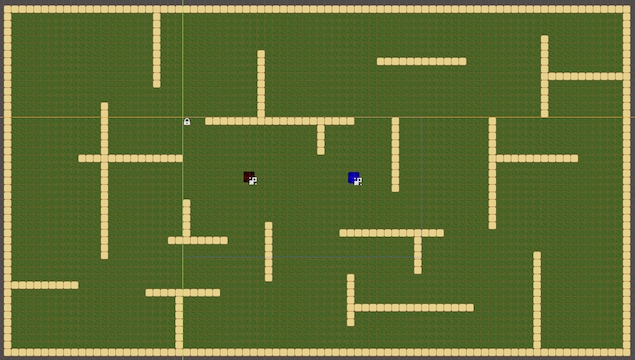
If you like, you can download the starting project, with the world already set up, here:
Note that the map is much larger than the game screen, but aside from that everything works as intended. Setting up your game “world” separately like this will make setting up the viewports much easier and more flexible.
Viewports, Cameras, and Worlds
We’re going to start with a new scene that’s going to contain our two viewports.
Create a node to serve as the root. I like to use Node since it has no properties
of its own - it’s just there to contain the rest of the scene.
By themselves, Viewport nodes don’t have position information (they don’t
inherit from Spatial or CanvasItem). We’re going to use ViewportContainer,
a Control node, to hold each viewport. To keep them arranged side-by-side, we’ll
use an HBoxContainer.
Set the HBoxContainer’s Alignment to “Center” and to have a small
gap between the two viewports, set Custom Constants/Separation to 5. In the
“Layout” menu, choose “Full Rect”.
Now add two ViewportContainers as children, naming them with a 2 and 1 (to
match the player they’ll display). Set the Size Flags on both to “Fill, Expand”
so that they will each expand to fill half of the screen. Also, check the Stretch
property so that the Viewport will automatically be set to the size of the
container.
Inside each of these containers add a Viewport. Note that if you set the viewport’s
Size property, it will be reset by the container.
In order for a Viewport to display anything, we’ll need a Camera2D which will render
onto the Viewport. Add one to each viewport. Don’t forget to check the Current
property to activate the camera. We can also set each camera’s Zoom to (0.75, 0.75)
to get a better view of the area around the player.
Your node setup should look like this:
 ┖╴Main (Node)
    ┖╴Viewports (HBoxContainer)
       ┠╴ViewportContainer2
       ┃  ┖╴Viewport2
       ┃    ┖╴Camera2D
       ┖╴ViewportContainer1
          ┖╴Viewport1
            ┖╴Camera2D
Note that we’ve put
ViewportContainer1second in the HBoxContainer. This will place it on the right side since Player 1 uses the arrow keys.
Adding the World
When we run the scene we won’t see anything because the viewports don’t have any
“world” to render. A viewport’s world (for 3D) or world_2d property represent
the source for the viewport’s environment and determine what will be rendered by
its camera. The world can be set in code, but for 2D it will also display any
child 2D nodes we add to it.
Let’s instance the “World” scene as a child of Viewport1. Now when we play the scene
we see the world inside the left viewport.
We also need to add a world to Viewport2, but we want it to use the same one.
We can handle this in code. Attach a script to Main and add the following:
extends Node

onready var viewport1 = $Viewports/ViewportContainer1/Viewport1
onready var viewport2 = $Viewports/ViewportContainer2/Viewport2
onready var camera1 = $Viewports/ViewportContainer1/Viewport1/Camera2D
onready var camera2 = $Viewports/ViewportContainer2/Viewport2/Camera2D
onready var world = $Viewports/ViewportContainer1/Viewport1/World

func _ready():
    viewport2.world_2d = viewport1.world_2d
The onready node references are for convenience - we’ll be using them as we move
forward. Remember that when you type “$” Godot will autosuggest node paths so you
don’t have to type them. You can also drag a node from the scene tree into the
script editor and you’ll get the node’s path.
When we run the scene now, we see the world rendered in both viewports. However, neither camera is moving so we only see a small part of the world.
Setting up the cameras
Attach the following script to each camera:
extends Camera2D

var target = null

func _physics_process(delta):
    if target:
        position = target.position
Now we can assign a target to each camera and it will follow that node’s position.
We’ll do that in the Main script:
func _ready():
    viewport2.world_2d = viewport1.world_2d
    camera1.target = world.get_node("Player_1")
    camera2.target = world.get_node("Player_2")
When we run the scene now, each player is centered in its viewport and our splitscreen setup works!
Note: I find it looks best if you disable the Drag Margin properties of the cameras.
Camera limits
Next, let’s add some limits to the player cameras so that they don’t scroll outside
the bounds of the map. Add this function to the main script and call it in _ready():
func set_camera_limits():
    var map_limits = world.get_used_rect()
    var map_cellsize = world.cell_size
    for cam in [camera1, camera2]:
        cam.limit_left = map_limits.position.x * map_cellsize.x
        cam.limit_right = map_limits.end.x * map_cellsize.x
        cam.limit_top = map_limits.position.y * map_cellsize.y
        cam.limit_bottom = map_limits.end.y * map_cellsize.y
Minimap
Let’s add one more fun feature: a minimap showing a zoomed-out view of the entire map so the players can orient themselves.
We’ll need another ViewportContainer, this one a child of Main. This time, we
don’t want to use Stretch. Add a Viewport and set its Size to (340, 200)
then add a Camera2D. We’ll set the Camera2D’s Position to (512, 300) to center
it on the screen. We’ll zoom out by setting Zoom to (9, 9). Don’t forget to
click Current on this camera as well.
In the _ready(), set the minimap to use the same world as the other two viewports:
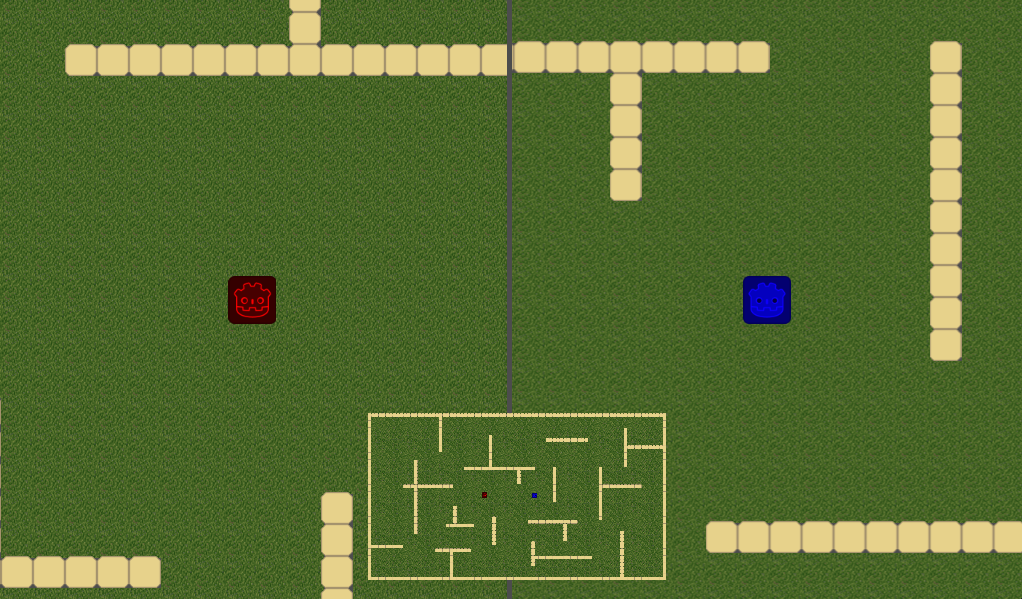
$Minimap/Viewport.world_2d = viewport1.world_2dUse the “Layout” menu to align the Minimap container at “Center Bottom”. Let’s see what it looks like:

We need to get rid of that grey area around the edges. We could find the precise zoom level that matches our desired minimap size, but instead, we’ll check the Transparent Bg on the Viewport. Now our non-map areas aren’t visible and the minimap appears floating directly on top of the main viewports.
Conclusion
Viewports can be very powerful, but also confusing. One way of managing them is to try to keep them separate from the game logic and only use them as displays.
This demo is only a small example of what’s possible with Viewports. More demos and examples are coming soon.
Please comment below with your questions and suggestions.