Procedural Generation in Godot - Part 3: Tile-based Infinite Worlds
Mon, Sep 24, 2018In this series, we’ll explore the applications of procedural generation to game development. While we’ll be using Godot 3.0 as our platform, much of the concepts and algorithms related to this subject are universal, and you can apply them to whatever platform you may be working on.
In the previous parts we looked at using maze generation algorithms. In this part, we’ll look at some other ways to generate a tile-based world.
You can watch a video version of this lesson here:
Project setup
In the starting project download you’ll find all the scenes and resources you’ll need to build the project below. Let’s review them briefly.
For this example, we’ll use an isometric TileMap using the Kenney road textures we used in the previous projects.
Note that this procedure will work in exactly the same way if you’re using standard orthogonal tiles.
Player Vehicle
We also have a scene for the vehicle the player will control (Truck.tscn).
Here’s a quick overview of how the truck is set up. An AnimatedSprite contains frames for each of the facing directions, and we’ll use a Tween to perform the movement from tile-to-tile.
First, the variables we’ll need - mapping the directions to the matching animations and direction vectors.
extends Area2D

const N = 0x1
const E = 0x2
const S = 0x4
const W = 0x8

var animations = {N: 'n',
                  S: 's',
                  E: 'e',
                  W: 'w'}
var moves = {N: Vector2(0, -1),
             S: Vector2(0, 1),
             E: Vector2(1, 0),
             W: Vector2(-1, 0)}

var map = null
var map_pos = Vector2()
var speed = 1 # time in seconds
var moving = false
Now we can capture the user’s input (arrow keys). Note that our movement vectors
are orthogonal (ie (0, 1)) even though we’re on an isometric map. That’s because
we’re only concerned with our tile position, not our screen position.
func _input(event):
    if moving:
        return
    if event.is_action_pressed('ui_up'):
        move(N)
    if event.is_action_pressed('ui_down'):
        move(S)
    if event.is_action_pressed('ui_right'):
        move(E)
    if event.is_action_pressed('ui_left'):
        move(W)
Next, we need a function to test if the move is possible. This will return
true if the move is legal:
func can_move(dir):
    var t = map.get_cellv(map_pos)
    # if there's a wall in the desired direction, no move
    if t & dir:
        return false
    else:
        return true
Finally, we have the move() function itself. We use the map_to_world() function
to let the TileMap handle the translation from map position to screen position.
If the tile we’re moving into has a value of -1 that means it’s unexplored. In
that case we tell the map to fill that tile using generate_tile() which we’ll
define in the next section.
Connect the Tween’s tween_completed signal so that the player will know it’s
ok to move again.
func move(dir):
    if not can_move(dir):
        return
    moving = true
    $AnimatedSprite.play(animations[dir])
    map_pos += moves[dir]
    if map.get_cellv(map_pos) == -1:
        get_parent().generate_tile(map_pos)
    var destination = map.map_to_world(map_pos) + Vector2(0, 20)
    $Tween.interpolate_property(self, 'position', position, destination, speed,
                                Tween.TRANS_QUAD, Tween.EASE_IN_OUT)
    $Tween.start()

func _on_Tween_tween_completed(object, key):
    moving = false
TileMap Scene
In this scene we have a TileMap node and an instance of the Truck.
extends Node2D

const N = 0x1
const E = 0x2
const S = 0x4
const W = 0x8

var cell_walls = {Vector2(0, -1): N, Vector2(1, 0): E,
                  Vector2(0, 1): S, Vector2(-1, 0): W}

onready var Map = $TileMap
First, we’ll initialize the Truck by passing it a reference to the TileMap
node and setting its position to the (0, 0) tile.
The generate_tile() function is called by the truck when it moves into an
empty tile.
func _ready():
        $Truck.map = Map
        $Truck.map_pos = Vector2(0, 0)
        $Truck.position = Map.map_to_world($Truck.map_pos) + Vector2(0, 20)

func generate_tile(cell):
        var cells = find_valid_tiles(cell)
        Map.set_cellv(cell, cells[randi() % cells.size()])
Here’s where the magic happens. We need to try each tile from the set, checking its walls against each of the target space’s neighbors. Any mismatch we find
means the tile is discarded. Any tiles that don’t conflict are added to the
valid_tiles array to be returned.
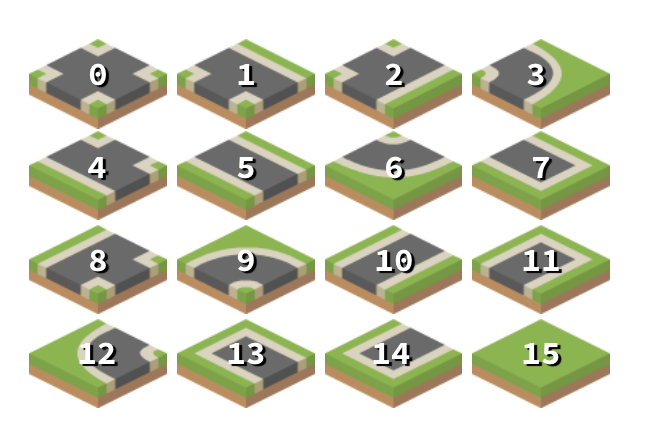
func find_valid_tiles(cell):
    var valid_tiles = []
    # check all possible tiles, 0 - 15
    for i in range(16):
        # check the target space's neighbors (if they exist)
        var is_match = false
        for n in cell_walls.keys():
            var neighbor_id = Map.get_cellv(cell + n)
            if neighbor_id >= 0:
                # id == -1 is a blank tile
                if (neighbor_id & cell_walls[-n])/cell_walls[-n] == (i & cell_walls[n])/cell_walls[n]:
                    is_match = true
                else:
                    is_match = false
                    # if we found a mismatch, we don't need to check the remaining sides
                    break
        if is_match and not i in valid_tiles:
            valid_tiles.append(i)
    return valid_tiles
Comparing walls
In reading the code above, you may find be confused by the wall comparison,
specifically the division: i & cell_walls[n])/cell_walls[n]. This is necessary
because of the way the & (bitwise and) operator works.
Say we have tile #15 (all walls solid). We can check if the E wall is
there by using 15 & E which returns 1. However, if we are checking the S
wall we use 15 & S which gives 2. Similarly, 15 & W == 4 and 15 % N == 8.
This is fine if we are just checking for the wall’s presence - the result is
either 0 or a number.
However, if we’re comparing two tiles for compatibility, we need to check the opposite walls:

In this case we need to see if the E wall of tile “7” matches the W wall of
tile “11”. 7 & E is 2 while 11 & W is 4. These values are not equal,
but if we divide each result by the wall value itself, we’ll “normalize” them
to 1:
(7 & E) / E == (11 & W) / W
Run the project and you can explore in any direction, expanding the world as you go.
Conclusion
Now that we have the basic functionality of our tile-exploration map, there are many things we could do to build on top of it. In the next video we’ll look at ways to expand it, as well as some of the issues to watch out for when using this technique.
Please comment below with your questions and suggestions.
Download the code for this lesson
Helpful Links
- Download Godot 3.0
- Support Me on Patreon
- Thanks to kenney.nl for the art!