Screen Shake
Problem
You want to create a “screen shake” effect.
Solution
The “screen shake” effect is a popular way to add a dynamic feel to your game. When used well, it adds a lot of appeal. When misused, players hate it. Keep this in mind when adding it to your game and use wisely.
The effect is quite simple: when an event occurs - an explosion, a heavy object hitting an obstacle, etc. - we want to rapidly displace the camera in small increments for a brief time.
There are many ways to implement this effect. For this recipe, we’ll be emulating the technique outlined in the following GDC talk:
To summarize, the camera will have a trauma property, measuring how much the camera is shaking. Every time something happens that should shake the camera, we’ll add a bit more trauma - a large amount for big events or a little for small ones. Over time, the trauma decreases.
Trauma
We’ll start by implementing the camera. Make a new scene with a Camera2D node, name it ShakeCamera2D, and attach a script.
First, define the parameters that control the shake behavior:
extends Camera2D

export var decay = 0.8  # How quickly the shaking stops [0, 1].
export var max_offset = Vector2(100, 75)  # Maximum hor/ver shake in pixels.
export var max_roll = 0.1  # Maximum rotation in radians (use sparingly).
export (NodePath) var target  # Assign the node this camera will follow.

var trauma = 0.0  # Current shake strength.
var trauma_power = 2  # Trauma exponent. Use [2, 3].
trauma_power is the relationship between trauma and the actual movement of the camera (ie amount = trauma * trauma). A square (2) or cube (3) relationship is typically the best, but feel free to experiment.
We’ve also added a target variable so that you can place an instance of this camera anywhere you like and set the target node it will follow.
func _ready():
    randomize()

func add_trauma(amount):
    trauma = min(trauma + amount, 1.0)
The add_trauma() function is what we call to start or increase shaking. Pass it a value from 0 to 1.
func _process(delta):
    if target:
        global_position = get_node(target).global_position
    if trauma:
        trauma = max(trauma - decay * delta, 0)
        shake()
In process() we’ll move the camera to track its target. If there is any trauma, we’ll use decay to reduce it and then call shake() to move the camera.
Random displacement
The shake() function applies a random movement to the camera based on the current trauma level (raised to the given power). In 2D, we have two translational and one rotational movement to calculate. Picking a random number between -1 and 1 is an easy way to get a movement in either direction.
func shake():
    var amount = pow(trauma, trauma_power)
    rotation = max_roll * amount * rand_range(-1, 1)
    offset.x = max_offset.x * amount * rand_range(-1, 1)
    offset.y = max_offset.y * amount * rand_range(-1, 1)
This looks OK, but we can make it look better.
Using noise
The drawback with using rand_range() for the movement is that it can change greatly from frame to frame, making for a rather erratic feel. To get a more “smooth” randomness, we can turn to something called noise.
Noise, or more specifically gradient noise is a method for generating more natural-looking “random” patterns. To do this, Godot provides the OpenSimplexNoise class.
Probably the most well-known gradient noise algorithm is called Perlin noise. Because it and its successor, simplex noise, are protected by patents, Godot uses an algorithm called OpenSimplex to generate noise.
OpenSimplexNoise works by generating a 3D “cloud” of points. Each point has a value ranging from -1 to 1. Below are two examples of noise generated by OpenSimplexNoise. In the images, each pixel’s white value is mapped to the noise value at that point.
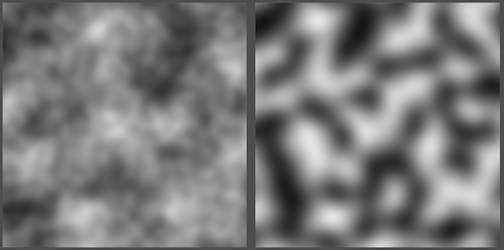
As you can see, while “noisy”, if you pick a particular pixel, adjacent pixels may vary unpredictably, but won’t suddenly swing wildly from one extreme to another. The behavior can be adjusted to suit your needs, but we won’t go into the details of configuring OpenSimplexNoise here. See the related recipes section below for links to more information.
Add the following code at the top of the script:
onready var noise = OpenSimplexNoise.new()
var noise_y = 0

func _ready():
	randomize()
	noise.seed = randi()
	noise.period = 4
	noise.octaves = 2
Then, in the shake() function:
noise_y += 1
rotation = max_roll * amount * noise.get_noise_2d(noise.seed, noise_y)
offset.x = max_offset.x * amount * noise.get_noise_2d(noise.seed*2, noise_y)
offset.y = max_offset.y * amount * noise.get_noise_2d(noise.seed*3, noise_y)
get_noise_2d() returns the noise value at a given (x, y) coordinate. We don’t want to use the same noise value for all three offsets, so we’re arbitrarily choosing three different (but distant) x values in the noise, and then using the steadily increasing noise_y value to “move” along the gradient at each point.