Drawing Vectors in 3D
Problem
You’d like visual debug information in your 3D game: a way to see vectors representing velocity, position, etc.
Solution
Debug drawing in 2D is quite convenient. CanvasItem provides a range of primitive drawing methods to use in the _draw() callback. In 3D, things are not quite so simple. One solution is to use ImmediateGeometry to manually create meshes, but this is very cumbersome and inconvenient for quick debugging.
A better solution is to stick with the CanvasItem draw methods. To do so, we need to project the positions in 3D space onto the 2D viewport. Fortunately, Camera can do this for us using its unproject_position() method.
Setting up
For the display layer, add a CanvasLayer containing a Control to your 3D scene and add a script to the Control.

As an example, let’s assume this drawing control has a reference to the player node, and we want to draw the node’s velocity vector. We also have a reference to the Camera node. More about how we’ll add those references later.
var player
var camera

func _draw():
    var color = Color(0, 1, 0)
    var start = camera.unproject_position(player.global_transform.origin)
    var end = camera.unproject_position(player.global_transform.origin + player.velocity)
    node.draw_line(start, end, color, width)
    node.draw_triangle(end, start.direction_to(end), width*2, color)

func draw_triangle(pos, dir, size, color):
    var a = pos + dir * size
    var b = pos + dir.rotated(2*PI/3) * size
    var c = pos + dir.rotated(4*PI/3) * size
    var points = PoolVector2Array([a, b, c])
    draw_polygon(points, PoolColorArray([color]))
We use unproject_position() to find the start and end points of the vector we want to draw. draw_triangle() is there to give us a nice pointed arrow appearance.
Easy access from game objects
Now let’s make this more functional. Your game might have many objects you want to draw debug vectors for. An enemy’s facing direction, an acceleration vector, a destination, etc. We need an easy way to register any object to the debug drawing layer.
Add the DebugOverlay as an autoload and set it as a singleton. This way we can access it from any node. Add this script to it:
extends CanvasLayer

onready var draw = $DebugDraw3D

func _ready():
    if not InputMap.has_action("toggle_debug"):
        InputMap.add_action("toggle_debug")
        var ev = InputEventKey.new()
        ev.scancode = KEY_BACKSLASH
        InputMap.action_add_event("toggle_debug", ev)

func _input(event):
    if event.is_action_pressed("toggle_debug"):
        for n in get_children():
            n.visible = not n.visible
I’ve included the code to add an input action to toggle visibility. This makes it convenient to drop this into any project without needing to edit the Input Map. We can now reference the drawing layer with DebugOverlay.draw.
You can add other debug layers here too. For example, one that displays properties as text.
We’ll start by defining a custom object to hold all the information for the debug value we want to display.
extends Control

class Vector:
    var object  # The node to follow
    var property  # The property to draw
    var scale  # Scale factor
    var width  # Line width
    var color  # Draw color

    func _init(_object, _property, _scale, _width, _color):
        object = _object
        value = _property
        scale = _scale
        width = _width
        color = _color

    func draw(node, camera):
        var start = camera.unproject_position(object.global_transform.origin)
        var end = camera.unproject_position(object.global_transform.origin + object.get(property) * scale)
        node.draw_line(start, end, color, width)
        node.draw_triangle(end, start.direction_to(end), width*2, color)

var vectors = []  # Array to hold all registered values.
This object encapsulates all the functionality for each vector we want to display, including the drawing code we saw earlier. In _process(), we can then draw them, making sure to get the current active camera:
func _process(delta):
    if not visible:
        return
    update()

func _draw():
    var camera = get_viewport().get_camera()
    for vector in vectors:
        vector.draw(self, camera)
And finally, we can add a function to register a new vector to follow:
func add_vector(object, property, scale, width, color):
    vectors.append(Vector.new(object, property, scale, width, color))
Now any object in the game can add a debug vector with the following:
DebugOverlay.draw.add_vector(self, "velocity", 1, 4, Color(0,1,0, 0.5))
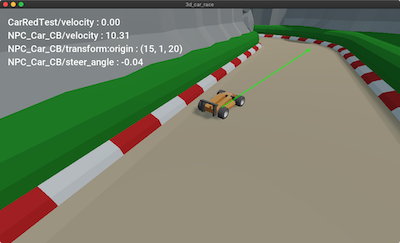
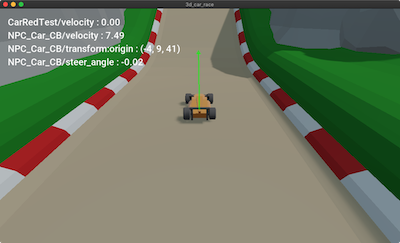
Here’s an example of an AI car displaying its raycasts and steering direction: