3D Kinematic Car: Base
Problem
You’re looking to make a 3D driving or racing game and don’t know where to start.
Solution
Even in 3D, cars tend to remain on the ground. For this reason, movement can (mostly) be treated as if it were 2D. Much of the car’s movement code will be very much like the 2D: Car Steering recipe. It’s recommended that you review that recipe before proceeding with this one.
Godot does provide a VehicleBody node, which is based on RigidBody and includes a complex simulation of engine, braking, suspension, etc. However, this introduces a lot of complexity and tends to be overkill for most casual racing/driving games. For that reason, we’re going with a KinematicBody based solution here.
If you’re interested in how to work with VehicleBody, I highly recommend this series by Bastiaan Olij.
Setting up the car
Before we start coding, we need to find a 3D model of a car and import it to Godot.
Importing the Model
Here’s the car model we’ll use for this demonstration:
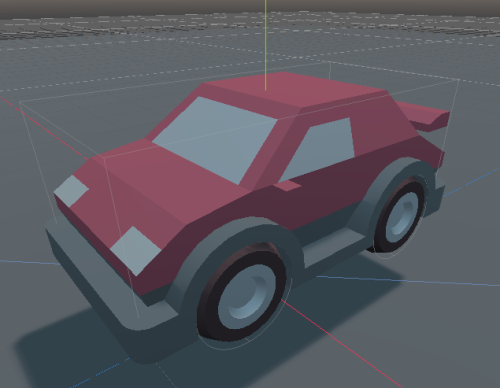
You can find this and other car models in Kenney’s “Car Kit”, available here: https://kenney.nl/assets/car-kit. Download the whole kit, you can use some of the other cars later.
To import the car, find the model in the "Models/GLTF format" folder. In our case, we want the sedanSports.glb. Drop this file in your new Godot project, preferably in a separate folder such as res://assets/cars/.
Select the file in Godot and go to the “Import” tab. Change the Root Type to “KinematicBody” and click “Reimport”. Now we’re ready to use this car.
Setting up the KinematicBody
Double-click on the sedanSports.glb file and choose “New Inherited”. You’ll have a new scene that looks like this:
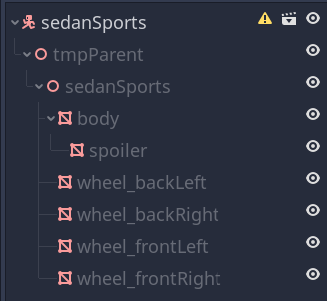
Note the individual meshes for each of the car’s parts. There’s also a stray “tmpParent” Spatial node, but we can ignore that.
The KinematicBody has a warning about missing collision shapes, so we’ll need to fix that first. We’re going to add 3 CollisionShapes: a BoxShape for the car’s body, and a CylinderShape for each of the front and rear axles.
Once the shapes are set up they should look something like this:
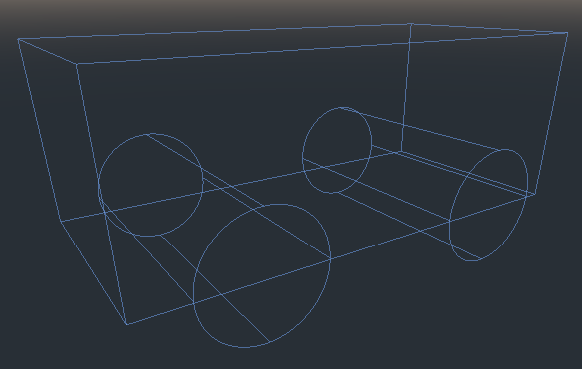
To ensure the front and rear shapes match, just create and size one of them, then duplicate it. It is also a good idea to name the CollisionShape nodes to help keep track of them - CollisionBody, CollisionWheelsFront, and CollisionWheelsRear would be a good example.
Base script
We want to be able to make cars that can be driven by human or AI control. In either case, most of the movement code will be the same - it’s really just the input that will be different. For this reason, we can use a base car script that can be shared between them.
Make a new script called car_base.gd. We’ll start with our variables: some exports to allow for adjusting the car’s behavior, and some others to track its state.
extends KinematicBody

# Car behavior parameters, adjust as needed
export var gravity = -20.0
export var wheel_base = 0.6  # distance between front/rear axles
export var steering_limit = 10.0  # front wheel max turning angle (deg)
export var engine_power = 6.0
export var braking = -9.0
export var friction = -2.0
export var drag = -2.0
export var max_speed_reverse = 3.0

# Car state properties
var acceleration = Vector3.ZERO  # current acceleration
var velocity = Vector3.ZERO  # current velocity
var steer_angle = 0.0  # current wheel angle
Note that rather than using a
gravityvariable you can set the global value in “Project Settings”. Having it separate does allow for different behavior for different game objects. It’s up to you, use whichever works best for your game.engine_powerandbrakingwill apply for accelerating and decelerating the car.dragandfrictionare explained here.
The rest of the script will be very similar to the 2D version, which a few changes to work correctly with Spatials and Transforms.
We’ll start with _physics_process().
Here we check if the car is on the ground before applying controls - you can’t steer in mid-air! Then we apply the standard movement equations.
Note that we’re using move_and_slide_with_snap(), which will keep the car from coming off slopes (if your track has them). We’re also using the car’s local down vector as the snap - again, to handle slopes correctly.
func _physics_process(delta):
    if is_on_floor():
        get_input()
        apply_friction(delta)
        calculate_steering(delta)
    acceleration.y = gravity
    velocity += acceleration * delta
    velocity = move_and_slide_with_snap(velocity, -transform.basis.y, Vector3.UP, true)
This function applies friction (proportional to the car’s velocity) and drag (proportional to the velocity squared). This will not only slow the car when not applying power, but it will also determine the car’s maximum speed.
func apply_friction(delta):
    if velocity.length() < 0.2 and acceleration.length() == 0:
        velocity.x = 0
        velocity.z = 0
    var friction_force = velocity * friction * delta
    var drag_force = velocity * velocity.length() * drag * delta
    acceleration += drag_force + friction_force
Finally, we need to calculate turning, using the same simplified “bicycle” model we used in the 2D car. Once the new velocity is found, look_at() rotates the body to point in the correct direction. We’re not including drifting/traction here - that will come later.
We can also handle reverse by checking the dot product of the new heading (the direction the car is facing) with the velocity.
func calculate_steering(delta):
    var rear_wheel = transform.origin + transform.basis.z * wheel_base / 2.0
    var front_wheel = transform.origin - transform.basis.z * wheel_base / 2.0
    rear_wheel += velocity * delta
    front_wheel += velocity.rotated(transform.basis.y, steer_angle) * delta
    var new_heading = rear_wheel.direction_to(front_wheel)

    var d = new_heading.dot(velocity.normalized())
    if d > 0:
        velocity = new_heading * velocity.length()
    if d < 0:
        velocity = -new_heading * min(velocity.length(), max_speed_reverse)
    look_at(transform.origin + new_heading, transform.basis.y)
Finally, we’ll have a function to “decide” how the car is controlled. We’ll override this in the individual cars - with key/gamepad input for player-controlled cars, and with AI decision-making in computer-controlled ones.
func get_input():
    # Override this in inherited scripts for controls
    pass
Player controls
Now we’re ready to add some player controls. Here’s the InputMap setup:
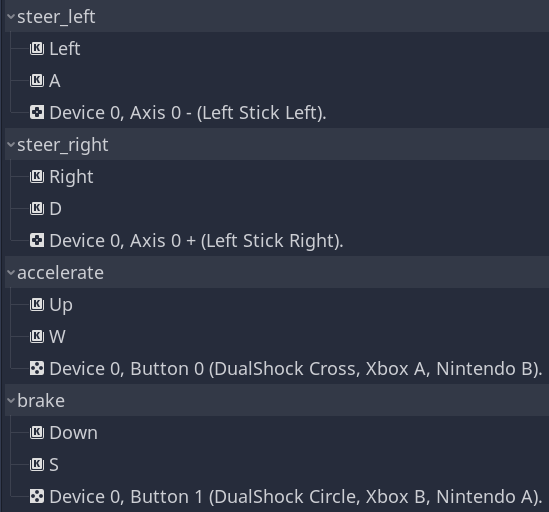
If you have a gamepad with an analog stick, it’s highly recommended you use it. With keyboard controls, which can only be pressed or not, you can only turn the “steering wheel” to the maximum value. An analog stick allows for a much better experience. We’ll make sure the code works with both.
Here’s the script to attach to the car KinematicBody:
extends "res://cars/car_base.gd"

func get_input():
    var turn = Input.get_action_strength("steer_left")
    turn -= Input.get_action_strength("steer_right")
    steer_angle = turn * deg2rad(steering_limit)
    $tmpParent/sedanSports/wheel_frontRight.rotation.y = steer_angle*2
    $tmpParent/sedanSports/wheel_frontLeft.rotation.y = steer_angle*2
    acceleration = Vector3.ZERO
    if Input.is_action_pressed("accelerate"):
        acceleration = -transform.basis.z * engine_power
    if Input.is_action_pressed("brake"):
        acceleration = -transform.basis.z * braking
First, we get the input action for steering, which results in a value between -1 and 1. Then we convert that to an angle in radians based on the maximum allowed angle.
The next step rotates the wheel meshes to give some visual feedback of the steering. Note that we’re multiplying it by 2 to make it more exaggerated, since you’ll typically be looking at the car from some distance.
After steering, we check the accelerate/brake inputs to set the car’s acceleration.
Wrapping up
That’s the bare-bones car controller. Feel free to use this as a starter for your game. If you’re looking to add more, here are some of the topics we’ll address in follow-up recipes:
- Traction and drifting
- Chase camera and camera control
- AI/NPC control (steering, obstacle avoidance, track following)
- Slopes and ramps
Download the project file here: https://github.com/kidscancode/3d_car_tutorial/releases