Controlling animation states
Problem
A common situation: you have a large number of animations, and it’s becoming difficult to manage transitions between them. Your code has become full of if statements, and every time you change something, it all breaks.
Solution
Use an AnimationTree to create an animation state machine. This will allow us to organize our animations and most importantly, control the transitions between them.
Getting started
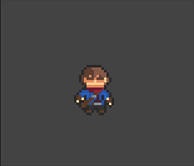
For this demo, we’ll be using the excellent “Adventurer” sprite by Elthen. You can get this and lots of other great art at https://elthen.itch.io/.
![]()
![]()
We’ll also assume you’ve already set up the character’s animations using AnimationPlayer. Using the above spritesheet, we have the following animations: “idle”, “run”, “attack1”, “attack2”, “hurt”, and “die”.
AnimationTree
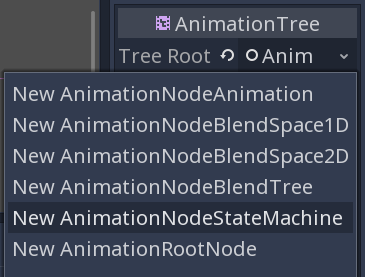
Add an AnimationTree node to the scene. In its Tree Root property, choose “New AnimationNodeStateMachine”.
An AnimationTree is a node that controls animations created in AnimationPlayer. To let it access the existing animations, click “Assign” in the Anim Player property and select your animation node.
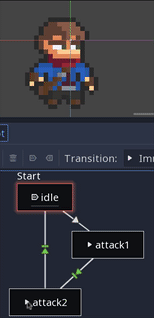
Now we can begin to set up our state machine in the AnimationTree panel:

Note the warning. Set the Active property to “On” in the Inspector.
Right-click and choose “Add Animation”. Choose “idle”, and you’ll see a small box representing that animation. Press its “Play” button and you should see the animation play. Do the same to add boxes for the other animations.
Now we can add connections. Click the “Connect nodes” button and drag between nodes to connect them.
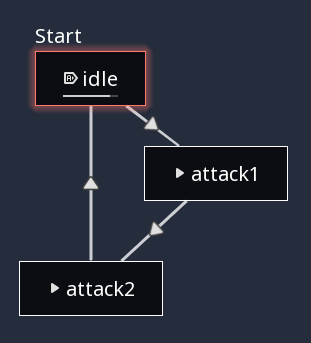
When you select an animation, the tree will follow the connected path from the current node to the destination. However, in the configuration above, if you play “attack2” you won’t see “attack1” along the way. That’s because the default “switch mode” for a connection is “Immediate”. Click the “Move/select” button and then click on the connection from “attack1” to “attack2”. In the Inspector, change Switch Mode to “AtEnd”. Do the same with “attack2” to “idle”. The connection icon changes from to .
Now, with “idle” playing, if you click “attack2”, you’ll see the two attacks play in sequence.
But now the animation stops on “attack2”. On its connection, set the Auto Advance property to “On”. This will make the tree go back to “idle” after playing both animations. Note that the connection icon turns green to show this.
Calling states in code
Here is the full tree for all of the animations:
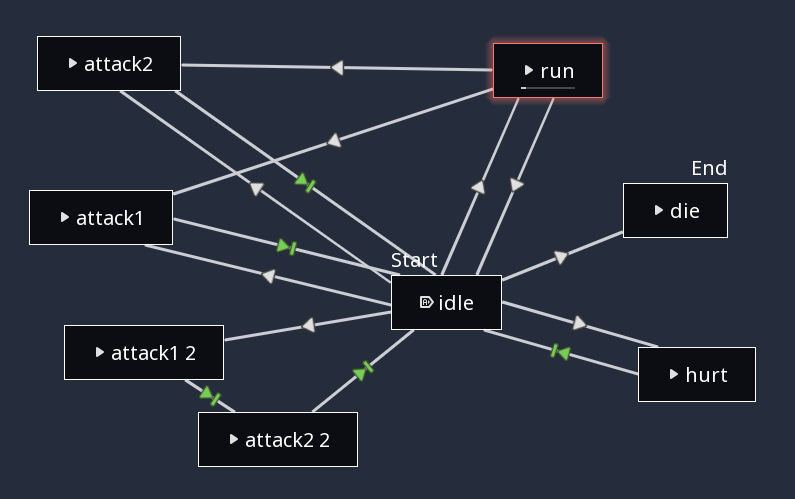
We’ve set the “die” node as the end, so when that one is reached, there will be no further animation. In the bottom-left, we have a double-attack sequence.
Now let’s set up the character to use these animations in a script.
extends KinematicBody2D

var state_machine
var run_speed = 80
var attacks = ["attack1", "attack2"]
var velocity = Vector2.ZERO

func _ready():
    state_machine = $AnimationTree.get("parameters/playback")
state_machine holds a reference to the state machine, which is an AnimationNodeStateMachinePlayback. To call a specific animation, you use travel(), which will follow the connections to the given animation.
func _physics_process(delta):
    get_input()
    velocity = move_and_slide(velocity)

func hurt():
    state_machine.travel("hurt")

func die():
    state_machine.travel("die")
    set_physics_process(false)
Here we have examples of functions we would call if the player is hurt or killed. For the other animations (running, attacking, etc.), we’ll need to combine them with our input and movement code. velocity determines whether we should be showing “run” or “idle”.
func get_input():
    var current = state_machine.get_current_node()
    velocity = Vector2.ZERO
    if Input.is_action_just_pressed("big_attack"):
        state_machine.travel("attack1 2")
        return
    if Input.is_action_just_pressed("attack"):
        state_machine.travel(attacks[randi() % 2])
        return
    if Input.is_action_pressed("move_right"):
        velocity.x += 1
        $Sprite.scale.x = 1
    if Input.is_action_pressed("move_left"):
        velocity.x -= 1
        $Sprite.scale.x = -1
    if Input.is_action_pressed("move_up"):
        velocity.y -= 1
    if Input.is_action_pressed("move_down"):
        velocity.y += 1
    velocity = velocity.normalized() * run_speed
    if velocity.length() != 0:
        state_machine.travel("run")
    if velocity.length() == 0:
        state_machine.travel("idle")
Note that we’re using return after traveling to the attack animations. This is so that we won’t instead travel to the “run” or “idle” animations further down in the function.