Node communication (the right way)
Many thanks to @TheDuriel on the Godot Discord for the original diagram that inspired this article. Save this and keep it handy.
Problem
Your project has started getting complex. You have multiple scenes, instances, and a lot of nodes. You’ve probably found yourself writing code like the following:
get_node("../../SomeNode/SomeOtherNode")
get_parent().get_parent().get_node("SomeNode")
get_tree().get_root().get_node("SomeNode/SomeOtherNode")
If you do this, you’ll soon find that node references like this break easily. As soon as you change one thing about your scene tree, none of those references may be valid anymore.
Communication between nodes and scenes doesn’t have to be complicated. There is a better way.
Solution
As a general rule, nodes should manage their children, not the other way around. If you’re using get_parent() or get_node(".."), then you’re probably headed for trouble. Node paths like this are brittle, meaning they can break easily. The three main problems with this arrangement:
You can’t test a scene independently. If you run the scene by itself or in a test scene that doesn’t have the exact same node setup,
get_node()will cause a crash.You can’t change things easily. If you decide to rearrange or redesign your tree, paths will no longer be valid.
Ready order is children-first, parent-last. This means that trying to access a parent’s property in a node’s
_ready()can fail because the parent isn’t ready yet.
See Understanding tree order for an explanation of how nodes enter the tree and become ready.
Generally speaking, a node or scene should be able to be instanced anywhere in your game, and it should make no assumptions about what its parent is going to be.
We’ll go into detailed examples later in this tutorial, but for now, here’s the “golden rule” of node communication:
Call down, signal up.
If a node is calling a child (i.e. going “down” the tree), then get_node() is appropriate.
If a node needs to communicate “up” the tree, it should probably use a signal.
If you keep this rule in mind when designing your scene setup, you’ll be well on your way to a maintainable, well-organized project. And you’ll avoid using the cumbersome node paths that lead to problems.
Now, let’s look at each of these strategies along with some examples.
1. Using get_node()
get_node() traverses the scene tree using a given path to find the named node.
See Understanding node paths for a more detailed explanation of node paths.
get_node() example
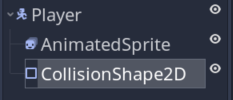
Let’s consider the following common configuration:
The script in the Player node needs to notify the AnimatedSprite which animation to play, based on the player’s movement. In this situation, get_node() works well:
extends KinematicBody2D

func _process(delta):
    if speed > 0:
        get_node("AnimatedSprite").play("run")
    else:
        get_node("AnimatedSprite").play("idle")
In GDScript you can use $ as a shorthand for get_node(), writing $AnimatedSprite instead.
2. Using signals
Signals should be used to call functions on nodes that are higher in the tree or at the same level (i.e. “siblings”).
You can connect a signal in the editor (most often for nodes that exist before the game starts) or in code (for nodes that you’re instancing at runtime). The syntax for connecting a signal is:
source_node.connect("<signal_name>", target_node, "<target_function">)
Looking at this, you may be thinking “Wait, if I’m connecting to a sibling, won’t I need a node paths like ../Sibling?”. While you could do this, it breaks our rule above. The answer to this puzzle is to make sure that connections are made by the common parent.
Following the rule of calling down the tree, a node that’s a common parent to the signaling and receiving nodes will by definition know where they are and be ready after both of them.
Signal example
A very common use case for signals is updating your UI. Whenever the player’s health variable changes, you want to update a Label or ProgressBar display. However, your UI nodes are completely separated from your player (as they should be). The player knows nothing about where those nodes are and how to find them.
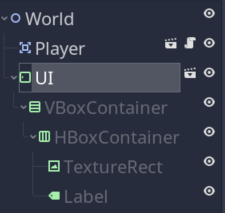
Here’s our example setup:
Note that the UI is an instanced scene, we’re just showing the contained nodes. This is where you often see things like get_node("../UI/VBoxContainer/HBoxContainer/Label).text = str(health), which is what we want to avoid.
Instead the player emits a health_changed signal whenever it adds/loses health. We need to send that signal to the UI’s update_health() function, which handles setting the Label value. In the Player script we use this code whenever the player’s health is changed:
emit_signal("health_changed", health)
In the UI script we have:
onready var label = $VBoxContainer/HBoxContainer/Label

func update_health(value):
    label.text = str(value)
Now we just need to connect the signal to the function. The perfect place to do that is in World, which is the common parent, and knows where both nodes are:
func _ready():
    $Player.connect("health_changed", $UI, "update_health")
3. Using groups
Groups are another way to decouple, especially when you have a lot of similar objects that need to do the same thing. A node can be added to any number of groups and membership can be changed dynamically at any time with add_to_group() and remove_from_group().
A common misconception about groups is that they are some kind of object or array that “contains” node references. Groups are a tagging system. A node is “in” a group if it has that tag assigned from it. The SceneTree keeps track of the tags and has functions like get_nodes_in_group() to help you find all nodes with a particular tag.
Group example
Let’s consider a Galaga-style space shooter where you have a lots of enemies flying around. These enemies may have different types and behaviors. You’d like to add a “smart bomb” upgrade that, when activated, destroys all enemies on the screen. Using groups, you can implement this with a minimal amount of code.
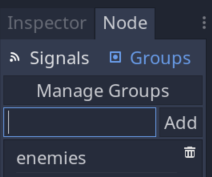
First, add all enemies to an “enemies” group. You can do this in the editor using the “Node” tab:
You can also add nodes to the group in your script:
func _ready():
    add_to_group("enemies")
Let’s assume every enemy has an explode() function that handles what happens when it dies (playing an animation, spawning dropped items, etc). Now that every enemy is in the group, we can implement our smart bomb function like this:
func activate_smart_bomb():
    get_tree().call_group("enemies", "explode")
4. Using owner
owner is a Node property that’s set automatically when you save a scene. Every node in that scene will have its owner set to the scene’s root node. This makes for a convenient way to connect child signals up to the main node.
owner example
In a complex UI, you often find yourself with a very deep, nested hierarchy of containers and controls. Nodes that the user interacts with, such as Button, emit signals, and you may want to connect those signals to the script on the UI’s root node.
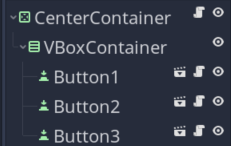
Here’s an example setup:
The script on the root CenterContainer has the following function, which we want to call whenever any button is pressed:
extends CenterContainer

func _on_button_pressed(button_name):
    print(button_name, " was pressed")
The buttons here are instances of a Button scene, representing an object which may contain dynamic code that sets the button’s text or other properties. Or perhaps you have buttons that are dynamically added/removed from the container depending on the game state. Regardless, all we need to connect the button’s signal is the following:
extends Button

func _ready():
    connect("pressed", owner, "_on_button_pressed", [name])
No matter where you place the buttons in the tree - if you add more containers, for example - the CenterContainer remains the owner.


