Edge Detection & Mouse Capture
In the last part, we learned how to use Area nodes to detect contact between objects, making coin, bullet, and spike objects for our character to interact with. In this part, we’ll look at a few small improvements: capturing the mouse, animating the coins, and detecting edges so our character doesn’t fall.
Capturing the Mouse
One issue with our mouse-based controls is that as you move the mouse from side to side, it eventually moves out of the game window and hits the edge of your screen. To solve this, we need to “capture” the mouse. However, if we do that, we won’t be able to close the window or anything else - our mouse will be gone! We’ll need a way to release the mouse again.
First, to capture the mouse, add the following to the main scene:
func _ready():
    Input.set_mouse_mode(Input.MOUSE_MODE_CAPTURED)
This takes care of the first part: the mouse will now be captured by our game window. Now we need it to be released when we press the “Escape” key. Let’s put this in the main script as well:
func _input(event):
    if event.is_action_pressed("ui_cancel"):
        Input.set_mouse_mode(Input.MOUSE_MODE_VISIBLE)
Run the game and try it out.
Let’s also ignore mouse motion when it’s not captured. In the character script,
change this line in _unhandled_input():
if event is InputEventMouseMotion and Input.get_mouse_mode() == Input.MOUSE_MODE_CAPTURED:Now we have another issue: once you’ve pressed “Escape”, we don’t have a way to go back to being captured. Let’s do that if we click on the window:
func _input(event):
    if event.is_action_pressed("ui_cancel"):
        Input.set_mouse_mode(Input.MOUSE_MODE_VISIBLE)
    if event.is_action_pressed("shoot"):
        if Input.get_mouse_mode() == Input.MOUSE_MODE_VISIBLE:
            Input.set_mouse_mode(Input.MOUSE_MODE_CAPTURED)
This works OK, but when we click to recapture the mouse, we also fire a bullet, since the mouse click does that as well. We can solve this by marking the input as “handled”, so that Godot won’t send it on to any other nodes:
if event.is_action_pressed("shoot"):
    if Input.get_mouse_mode() == Input.MOUSE_MODE_VISIBLE:
        Input.set_mouse_mode(Input.MOUSE_MODE_CAPTURED)
        get_tree().set_input_as_handled()
Now that first click capturing the mouse won’t also fire a bullet.
Animated Coins
Now we’re going to make the coins from the last part a bit more dynamic and
appealing. Open Coin.tscn and add an AnimationPlayer to the scene.
Click the “Animation” button and select “New” to create a new animation called “bounce”. A duration of 1 second is fine, but make sure to enable looping.
We’re going to animate two properties of the coin: position (on the Y axis,
up and down) and rotation. Ensure the scrubber is at time 0 and add a keyframe
for both Translation and Rotation Degrees.
Move the scrubber to the 0.5 second mark, change the Y component of the
translation to 0.3, and click the keyframe button. Then move the scrubber
all the way to 1.0 and keyframe the rotation at 180 degrees in Y.
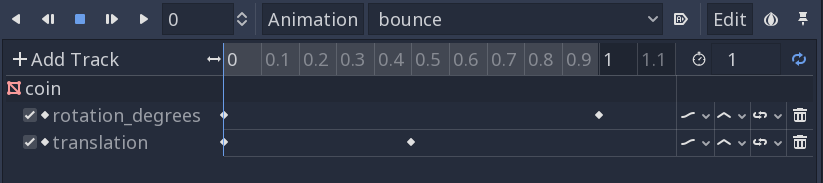
Press “Play” to see how your animation looks. Try clicking on the individual translation keyframes and adjusting the Easing value.
Finally, click the “Autoplay” button to ensure the animation will automatically start when the game is run.
Edge Detection
Finally, let’s see if we can keep our character from running off a cliff and falling to its death.
Start by adding a RayCast node to the player. It appears as a thin blue
line. By default, its Cast To property is set to (0, -1, 0), which is
pointing down. This is good, but we also need to move it forward so that it’s
pointing down at the front of the character:
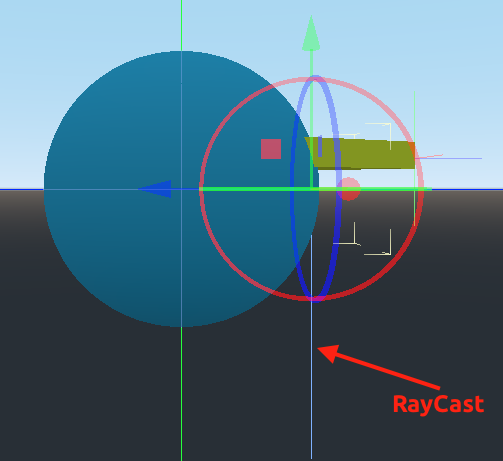
Also, make sure to check the Enabled property, or the RayCast won’t work.
Now, in our character script, we need to check that when moving forward, if the RayCast is colliding, it’s safe to move.
Right now, we have the following:
if Input.is_action_pressed("move_forward"):
    velocity += -transform.basis.z * speed
Let’s try only adding to the velocity if the ray is colliding:
if Input.is_action_pressed("move_forward") and $RayCast.is_colliding():
    velocity += -transform.basis.z * speed
Try it out. When you run up to an edge, you’ll stop. But wait - have you tried jumping forward? Our forward movement is now canceled when we’re in the air! Back to the drawing board.
Now we need to also check if we’re on the ground, so that if we walk forward and the ray stops colliding, we do nothing. Otherwise, we move as normal:
if Input.is_action_pressed("move_forward"):
    if is_on_floor() and !$RayCast.is_colliding():
        pass
    else:
velocity += -transform.basis.z * speedYou may be wondering why I wrote it this way. Keep reading, there’s a reason!
This works, but something feels off about the code. We have a conditional statement that does nothing. Surely we can simplify this. We can, with a little bit of Boolean Algebra.
Our conditional statement is essentially this:
if A:
    do_nothing
else:
    do_something
Which is equivalent to:
if not A:
    do_something
So what we really need to do is convert our conditional statement to:
if !(is_on_floor() and !$RayCast.is_colliding())This works, but it’s hard to read. Can it be simplified? It can, using a Boolean Algebra method called “De Morgan’s Law”. De Morgan’s Law states that
not (A and B) = not A or not BSo we can apply that here and we get the following:
    if Input.is_action_pressed("move_forward"):
        if !is_on_floor() or $RayCast.is_colliding():
            velocity += -transform.basis.z * speed
In English:
“If we’re not on the floor or there is floor in front of us, move forward.”
This is a very simplistic implementation - you can still walk sideways or backwards off the edge, for example. Feel free to take this idea and run with it to make improvements. Some games let you fall if you move off the edge slowly, but stop you if you’re moving fast.
Wrapping Up
In this tutorial, we added a few small improvements to the game. Capturing the mouse is useful in many types of 3D games (first-person, for example), and RayCasts have a wide range of uses - we only touched on one here. The animation we added was very small, but a good start - we’ll be using them for many things as we move forward.
In the next part: Using Constructed Solid Geometry (CSG).
You can also find a video version of this lesson here: