Inheritance
In this tutorial, we’ll explore how inheritance works in Godot. You can use inheritance in Godot to reuse code and create powerful hierarchies of object and scenes in your game.
We’ll imagine we’re making a classic top-down RPG and use Godot’s inheritance capabilities to create two different kinds of characters in the game.
Introduction
In object oriented programming (OOP), inheritance is a powerful tool. Put briefly, you can define a class that inherits from another class. An object created using the first class will contain the methods and member variables of the “master” class as well as its own.
Godot is strongly object-oriented, and offers the opportunity to use inheritance not just with objects (scripts) but also with scenes.
Here’s a preview of what we’re making:
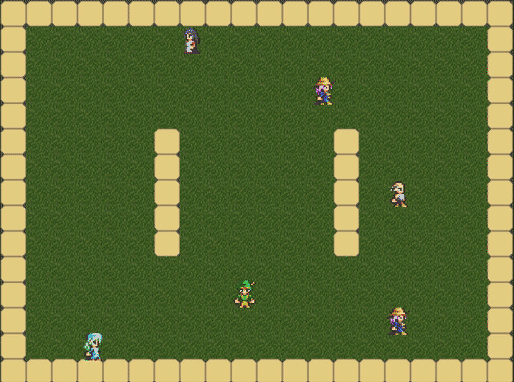
The green character is controlled by the player, and the other characters are NPCs, walking around the tile-based map semi-randomly.
Project setup
In Project Settings create four new input actions called “left”, “right”, “up”, and “down” and assign each of them to the matching arrow key. We’ll be using those names as dictionary keys, so make sure to note the spelling and capitalization.
Set the display Width and Height to 640 by 480 (we’re using 32x32 tiles, so we don’t need much screen space for this demo).
Download the art (character spritesheets) and unzip it in the project folder.
Creating Characters
Both kinds of characters share a number of properties and functions:
- A spritesheet containing the 4-directional movement animations
- An AnimationPlayer to play the movement animations
- Grid-based movement (the character can only move one full “square” at a time)
- Collision detection with walls
We’ll start by creating a scene that will contain all of the above. Start with an Area2D and name it “Character”. Give it the following children:
SpriteCollisionShape2DTween(namedMoveTween)AnimationPlayer
We’ll leave the Sprite without a texture for now, but in the Inspector set its Vframes and Hframes properties to 4 and 3 respectively.
Next, create a RectangleShape2D in the collision shape and set its Extents property in the Inspector to (10, 18).
NOTE: Because all the characters are drawn to the same scale, we can be confident that the same sized collision shape will work for all characters. If this isn’t the case with the art you’re using, you can skip setting the collision shape here and configure it later for the inherited scenes.
Animations
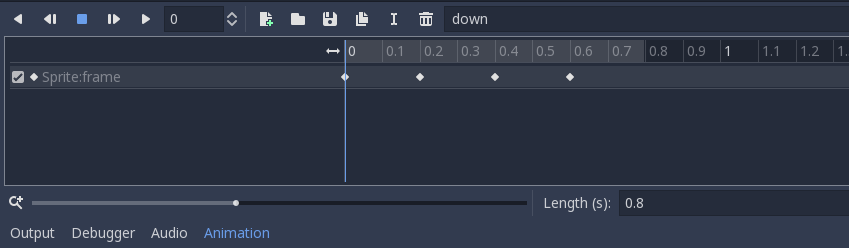
Create four animations in the AnimationPlayer node. Name them to match the four directions we used in the input actions. For each animation, we’re going to set the length to 0.8 and add a track for the Sprite’s Frame property.
The pattern for each direction is listed below. See the screenshot for an example of the end result.
| direction | frames |
|---|---|
| left | 9, 10, 11, 10 |
| down | 6, 7, 8, 7 |
| right | 3, 4, 5, 4 |
| up | 0, 1, 2, 1 |
Collision Detection
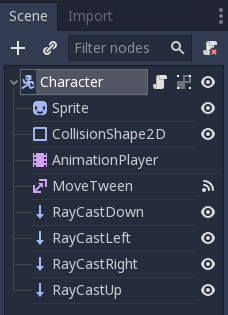
Because the characters are moving on a grid, they will either move the full amount to the next tile or not at all. This means that before moving, the character needs to check if the move is possible. Add four RayCast2D nodes and set their names and Cast To properties as follows:
| Name | Cast To |
|---|---|
| RayCastRight | (32, 0) |
| RayCastLeft | (-32, 0) |
| RayCastDown | (0, 32) |
| RayCastUp | (0, -32) |
Make sure to set the Enabled property on each one (RayCast2Ds are disabled by default). Your final node setup should look something like this:
Character Script
Now add a script to the Character node (it will automatically be named “Character.gd”).
First, we’ll define our class variables:
extends Area2D

var tile_size = 32
var can_move = true
var facing = 'right'
var moves = {'right': Vector2(1, 0),
             'left': Vector2(-1, 0),
             'up': Vector2(0, -1),
             'down': Vector2(0, 1)}
var raycasts = {'right': 'RayCastRight',
                'left': 'RayCastLeft',
                'up': 'RayCastUp',
                'down': 'RayCastDown'}
can_move is a flag that will track whether the character can move. It will be false while a movement is already underway. facing is the current direction of movement. Note that the moves and raycasts dictionaries’ keys match the input actions we created.
Next is the code that will execute a movement from one square to another:
func move(dir):
    if get_node(raycasts[facing]).is_colliding():
        return
    facing = dir
    can_move = false
    $AnimationPlayer.play(facing)
    $MoveTween.interpolate_property(self, "position", position,
                      position + moves[facing] * tile_size, 0.8,
                      Tween.TRANS_SINE, Tween.EASE_IN_OUT)
    $MoveTween.start()
    return true
We pass a direction to move(). If the RayCast2D for that direction detects a collision, the move is canceled. Otherwise, we change facing to that direction, disable movement, and start playing the matching animation. To actually execute the movement, we use the Tween node to interpolate the position property from its current value to its current value plus a 32-pixel movement in the given direction. The duration is set to 0.8 which matches the animation length.
Note: See the Tween documentation for details on how the
interpolate_property()method works.
Finally, to enable movement again, we need to reset can_move when the movement has finished. Connect the tween_completed signal from MoveTween and add the following:
func _on_MoveTween_tween_completed( object, key ):
    can_move = true
Implementing the Player
The player character needs to inherit all the properties we gave to Character as well as adding keyboard controlled movement.
We’ll start by making a new scene. However, instead of making a new empty scene,
click on Scene -> New Inherited Scene in the menu. Select the Character.tscn. Rename the root node from “Character” to “Player” and save the new scene.
All we need to do for the Sprite is set the texture, so choose a character you like from the “res://art/rpgsprites1” folder and drag it to the Texture property.
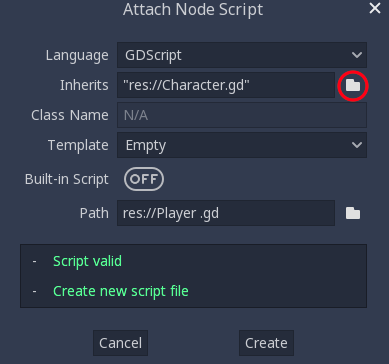
Next, we need a new script for the player, so remove the attached one (“Character.gd”) and attach a new one. In the “Attach Node Script” dialog, click the folder icon next to the Inherits option and choose “Character.gd”.
Here’s our player script (note that it extends the character script):
extends "res://Character.gd"

func _process(delta):
    if can_move:
        for dir in moves.keys():
            if Input.is_action_pressed(dir):
                move(dir)
Because we’ve inherited all the behavior from “Character.gd”, we only need to worry about control. Here, we’re using the _process() function to check the keystate each frame. However, only if can_move allows it do we actually check the keys and call move().
Run the scene and try it out.
NPC characters
Hopefully you’re seeing how inheritance works by now, but let’s make another type of character: an NPC that will wander around the screen randomly. Make another scene inheriting from “Character.tscn” and name it NPC.
This time, leave the sprite’s Texture blank and add a new script, again inheriting from “Character.gd”.
extends "res://Character.gd"

var textures = ['mage_f.png', 'mage_m.png',
                'healer_f.png', 'healer_m.png',
                'townfolk1_f.png', 'townfolk1_m.png']

func _ready():
    randomize()
    var texture = textures[randi() % textures.size()]
    texture = load("res://art/rpgsprites1/%s" % texture)
    $Sprite.texture = texture
    facing = moves.keys()[randi() % 4]

func _process(delta):
    if can_move:
        if not move(facing) or randi() % 10 > 5:
            facing = moves.keys()[randi() % 4]
This time, we’re using _ready() to select a random texture and assign it. We’re also choosing a random starting direction.
As with the player, we’ll use _process() to trigger the movement, but this time we’ll use the fact that the move() function returns true if it successfully executes (if the raycast detects an obstacle, it returns false). So if the NPC can’t move, it will pick a new random direction. For variety, we also add a 50% chance that it will change direction anyway.
Run the scene and observe the NPC wandering randomly around the screen.
Testing Collisions
Finally, to confirm that the collision detection is working, let’s create a small scene for the characters to wander around in. We’ll use a TileMap to quickly draw our map.
Note: See my Tilemap tutorial for details on using TileMaps in Godot.
There are two tiles (“grass.png” and “stone.png”) in the art folder. There is also a TileSet called “tiles.tres” to save you the step of making your own. In it, only the stone tile has a collision shape, so it will be our obstacle.
Create a new “Main” scene (I usually like to use a plain Node as the root). Add a TileMap and drag “tileset.tres” into its Tile Set property. Also don’t forget to change the Size to (32, 32).
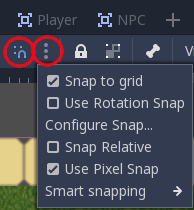
Draw some walls as you like, and then add a Player instance and a few instances of NPC. Remember, the characters won’t know anything about the map - they just know if they can move one tile or not. If you want them to line up properly, you need to make sure the characters’ starting positions are centered on a tile. This is easy to do if you turn on “Snap to Grid”. Click the “Use Snap” button and then open the grid menu by clicking on the three dots next to it:
Under “Configure Snap…” set the Grid Step and Grid Offset:
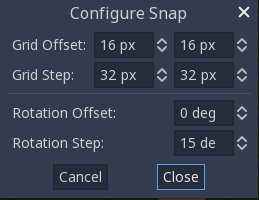
Now you can drag the instanced characters around and they’ll always snap to the center of a tile.
Conclusion
Imagine we had built this project without using inheritance. The Player and NPC would each have their own scene setup and individual scripts. If we decided to change how we wanted movement to work, we would have to change everything twice. If we added more character types (Monsters, Pets, etc.) the duplicated code would multiply and quickly become unmanageable. With the setup we created above, everything is in one place, and any change to the character automatically propagates to everything that extends it.
As you’re working on your own projects, look for opportunities to consolidate code and use inheritance for your scenes and/or scripts. As your projects grow in size and complexity, it will quickly become a lifesaver.