Arcade-style Car
Problem
You want to make an arcade-style car game, so you’re looking for simplicity over realistic physics. In this recipe, you’ll learn how to make a fun, driveable car using a rolling sphere.
Solution
There are a lot of ways to make a driving game. Different games need different levels of realism. If you’re trying to make a light, arcade-style car, you don’t need all of the features that Godot’s VehicleBody3D node provides, such as supension, independently modeled wheels, etc.
Instead, we’re going to use a single RigidBody3D sphere to handle the driving physics. The sphere will be invisible, and the car mesh will be placed at the sphere’s location, making it look like it’s the car that’s driving.
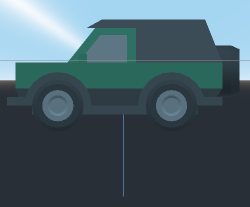
As you can see in the preview clip above, the result looks remarkably good (and feels great to play!). Read on, and you’ll see that the amount of code required is also surprisingly small.
Inputs
For control, we’re going to add four inputs to the Input Map:
acceleratebrakesteer_leftsteer_right
You can use keyboard input, game controller, or both. However, we recommend going with the analog stick for better steering.
Node setup
The car is made with two main nodes: a RigidBody3D sphere for the physics, and a MeshInstance3D to display the car body. Here’s the scene layout:
 RigidBody3D (Car)
      CollisionShape3D (Sphere)
      CarMesh (Imported model)
Here’s how these nodes will interact: pressing “accelerate” will apply a force on the RigidBody3D in the direction the CarMesh is facing, while the turning inputs will rotate the CarMesh. As the ball rolls, it will carry the car mesh along with it (we’ll ignore the ball’s rotation).
CarMesh
Here’s the car model we’ll use:
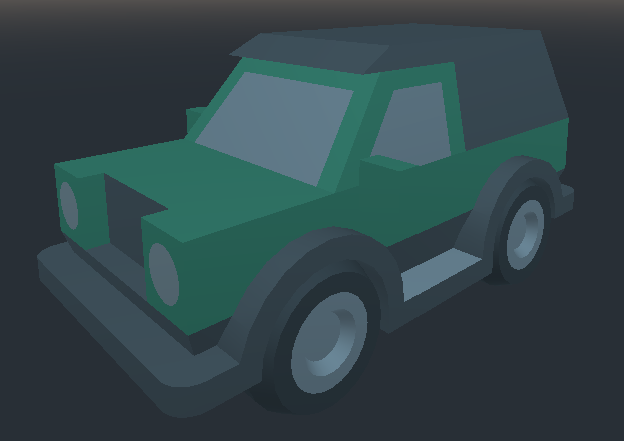
You can find this and other car models in Kenney’s “Car Kit”, available here: https://kenney.nl/assets/car-kit. Download the whole kit; you can use any of them that you choose. Note that this kit includes the models in multiple formats - you won’t need all of them for your project. GLTF is the recommended format for use with Godot.
If you use the GLTF models, you shouldn’t have adjust anything in the import settings.
Here’s what the node tree looks like when importing the “suv” model:
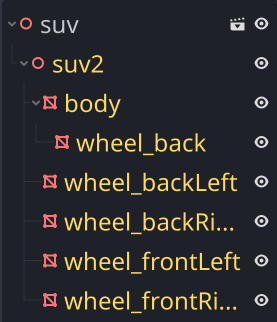
Note that the wheels & body are separate meshes. This will make it easy to add some visual appeal - like turning the wheels when steering.
Ball
Add a sphere shape to the CollisionShape3D. We’re using a radius of 1 here, but you’ll want to experiment with the size of the ball to get different driving behaviors.
Here’s how to adjust the settings on the body:
- Angular Damp:
10- this property will have a huge effect on the driving feel. A higher value will bring the car to a stop much faster. - Gravity Scale:
5- Default gravity in Godot (9.8) feels a bit floaty, especially when going for an action feel. This will really matter if you plan to have jumps, hills, etc. in your world. You can set this globally in the Project Settings instead, if you prefer. - Physics Material/Bounce:
0.1- Playing around with this value can be a lot of fun. Be careful going above 0.5, though!
For the demo, we’ve also added a spherical mesh to the collision shape for debugging purposes. You don’t need this, but it helps when troubleshooting to have a visual of the ball rolling.
RayCast
Finally, add a RayCast3D node as a child of the CarMesh. Set its Target Position to (0, -1, 0).
We’re going to use this for ground detection. When the car’s in the air, steering and acceleration won’t work. We can also use it to align the car mesh to a slope (if your game’s track isn’t flat).
Now we’re ready to start coding.
Script
We’ll begin the script with some node references we’ll need:
extends RigidBody3D

@onready var car_mesh = $CarMesh
@onready var body_mesh = $CarMesh/suv2
@onready var ground_ray = $CarMesh/RayCast3D
@onready var right_wheel = $CarMesh/suv2/wheel_frontRight
@onready var left_wheel = $CarMesh/suv2/wheel_frontLeft
Next, some variables configuring the car’s behavior. See the comments describing each one’s purpose.
# Where to place the car mesh relative to the sphere
var sphere_offset = Vector3.DOWN
# Engine power
var acceleration = 35.0
# Turn amount, in degrees
var steering = 18.0
# How quickly the car turns
var turn_speed = 4.0
# Below this speed, the car doesn't turn
var turn_stop_limit = 0.75

# Variables for input values
var speed_input = 0
var turn_input = 0
You can @export these if you’d like to adjust them from the Inspector.
In _physics_process() we add a force to the body based on the direction the car is pointing, as well as keeping the car mesh positioned at the ball’s position:
func _physics_process(delta):
    car_mesh.position = position + sphere_offset
    if ground_ray.is_colliding():
        apply_central_force(-car_mesh.global_transform.basis.z * speed_input)
The next step is to get the inputs, but we’ll also check if the ray is colliding with the ground first:
func _process(delta):
    if not ground_ray.is_colliding():
        return
    speed_input = Input.get_axis("brake", "accelerate") * acceleration
    turn_input = Input.get_axis("steer_right", "steer_left") * deg_to_rad(steering)
    right_wheel.rotation.y = turn_input
    left_wheel.rotation.y = turn_input
At this point, you can try it out. You should be able to accelerate forward and back (but not steer yet).
Next, still in the _process() function, we’ll rotate the car mesh based on the rotation input. We’ll use slerp() (spherical linear interpolation) to do this smoothly:
# rotate car mesh
if linear_velocity.length() > turn_stop_limit:
    var new_basis = car_mesh.global_transform.basis.rotated(car_mesh.global_transform.basis.y, turn_input)
    car_mesh.global_transform.basis = car_mesh.global_transform.basis.slerp(new_basis, turn_speed * delta)
    car_mesh.global_transform = car_mesh.global_transform.orthonormalized()
Because of floating point imprecision, repeatedly rotating a transform will eventually cause it to become distorted. The scale can drift or the axes can become no-perpendicular. In any script where you’re regularly rotating a transform, it’s a good idea to use orthonormalized() to correct any error before it accumulates.
You should try playing again at this point. You’ll be able to control the car and drive around, and everything works pretty much as expected. However, there are a few more things to add that will improve the “feel” of the driving.
Final touches
1. Align with slopes
FIX THIS
If you’ve tried driving on a slope, you’ve seen that the car mesh doesn’t tilt at all, it always remains level. That looks unnatural, so let’s use the process described in KinematicBody: Align with Surface to fix that.
Add this code after rotating the mesh in _process():
if ground_ray.is_colliding():
    var n = ground_ray.get_collision_normal()
    var xform = align_with_y(car_mesh.global_transform, n)
    car_mesh.global_transform = car_mesh.global_transform.interpolate_with(xform, 10.0 * delta)
And the align function (notice how we’re using orthonormalized() again?):
func align_with_y(xform, new_y):
    xform.basis.y = new_y
    xform.basis.x = -xform.basis.z.cross(new_y)
    xform.basis = xform.basis.orthonormalized()
    return xform.orthonormalized()
2. Turn the wheels
It looks nice if the front wheels turn when you steer. Add some references to the front wheel meshes at the top of the script:
@onready var right_wheel = $CarMesh/suv2/wheel_frontRight
@onready var left_wheel = $CarMesh/suv2/wheel_frontLeft
And right after getting input, add the following:
    # rotate wheels for effect
    right_wheel.rotation.y = rotate_input
    left_wheel.rotation.y = rotate_input
3. Tilt the body
This one adds lots of visual appeal. We’re going to tilt the car’s body based on the speed of the turn. Add a variable at the top of the script:
var body_tilt = 35
The smaller this number, the more extreme the tilt effect will be. Between 35 and 40 works well for the SUV model.
Now add the following right after rotating the car mesh (in the if statement):
# tilt body for effect
var t = -rotate_input * ball.linear_velocity.length() / body_tilt
body_mesh.rotation.z = lerp(body_mesh.rotation.z, t, 10 * delta)
Observe the difference:
Credits
The demo project seen here uses the following open-source/creative commons assets:
- Cars: Kenney Car Kit by Kenney
- Track: Modular Racekart Track by Keith at Fertile Soil Productions
Download This Project
Download the project code here: https://github.com/godotrecipes/3d_car_sphere