Character Animation
Problem
You’ve got a rigged, animated 3D character (either made by you or downloaded from a third party) and you want to set up its animations in Godot.
Solution
In this recipe, we’ll assume you’ve already imported your character model and animations. If you haven’t yet, see Importing Assets for details. As a reminder, we’re using the art packs linked in the section description.
Prepping the character
We’ve chosen CharacterBody3D for our character, so your scene should look like this (I’ve collapsed the Rig node since the mesh list is so long):
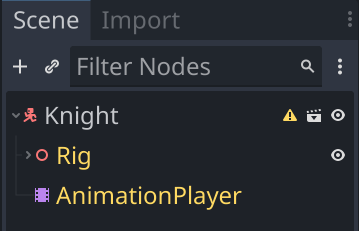
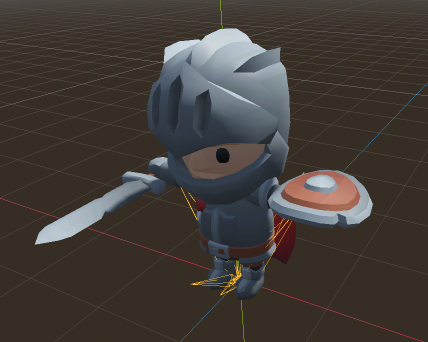
The first thing you probably noticed is that the character’s hands are full! The artist has helpfully provided all the weapons & shields attached and oriented at the correct points. You can go down the list and hide the ones you don’t want to see.
About the AnimationTree
With all of the animations we have available, it’s going to quickly get very complicated to handle all of them in code. Think about how many if statement’s we’d need to decide which animation to play at which time, depending on what the player is doing. While this is not bad if you only have a few animations, it quickly gets out of hand and becomes impractical.
Also, consider when the character is standing still: it should be playing the “Idle” animation. When the player presses “forward”, the character should move and switch to playing the “Walking” animation. This sudden transition is going to look jarring, so we’d prefer if the two animations can be “blended” into a smoother transition.
The solution to these complex animation issues is to use the AnimationTree node. This node is designed to control an AnimationPlayer and has functionality to control how animations transition and blend together.
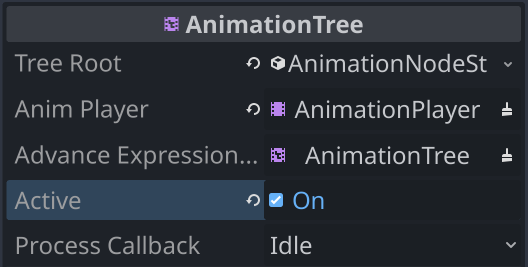
Add an AnimationTree to the scene. In the Inspector, set Tree Root to a new AnimationNodeStateMachine, in Anim Player select the character’s AnimationPlayer node, and check the box next to Active.
You may notice that when the AnimationTree is active, you can’t choose animations in the AnimationPlayer. If you need to make any changes or test the animations, uncheck the tree’s Active property while doing so.
The Idle/Walk/Run Cycle
There are a lot of animations provided with these models. For this example, we’re going to focus on the idle-walk-run cycle, jumping, and attacking. If you want to include other animations, they’ll be handled in a similar way.
In the AnimationPlayer, find the “Idle”, “Running_A”, “Walking_Backwards”, and “Running_Strafe_Left”/“Running_Strafe_Right” animations. Make sure they’re all set to loop - you can test them by pressing the “Play” button: (▶). If any of them are not, reimport the character after setting them (see Importing Assets).
Select the AnimationTree node and you’ll see the panel open at the bottom of the window:
![]()
![]()
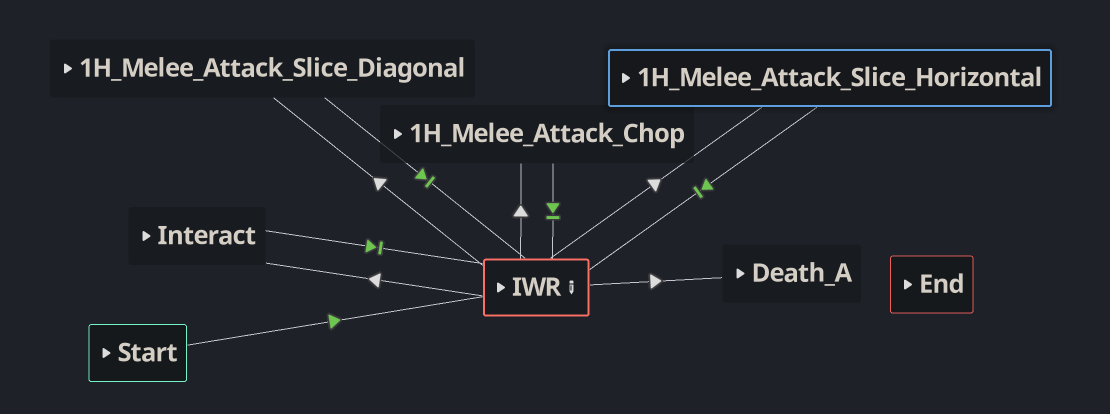
As an example, right-click in the empty space and choose Add Animation → Idle, then add the “1H_Melee_Attack_Chop” animation as well.
Select the Connect Nodes button and draw a connection from Start to Idle. You should immediately see the “Idle” animation playing.
Now, we want to be able to transition from idle to attack and then back to idle when the attack animation finishes. Draw two more connection arrows to and from the attack. It won’t quite work, however, you’ll just be rapidly flickering between the two animations, because both are set to immediately transition.
To change the transition conditions, change to Select mode using the icon and then click on one of the connections. In the Inspector, you’ll see the connection properties. For the connection from idle to attack, we want Advance/Mode to be “Enabled” (not “Auto”). This means it happens only when told to. Notice that the icon on the connection line changes color.
For the connection from attack to idle, set Switch Mode to “At End” and Advance Mode to “Auto”.
Now, when you press the ▶ button on the attack node, it will play and then transition back to idle as soon as it completes.
This gives you an idea how to set up different animations and transition between them. However, we want to do a little more here, so delete the two animations using the trash can icon, and let’s set up a blendspace.
Blendspaces
Right-click in the empty space to create a new BlendSpace2D. Click on its name to rename it to IWR (for idle-walk-run). Add a transition from Start so that the blendspace will start playing automatically.
Click the pencil icon to edit the blend space.
![]()
![]()
This 2D space represents the character’s horizontal movement vector. When standing still that’s (0, 0), so click the Create Points button and click in the center of the grid to Add Animation → Idle.
At the center-top, add the “Running_A” animation, and center-bottom, “Walking_Backwards”. At the two horizontal ends, add the strafe animations.
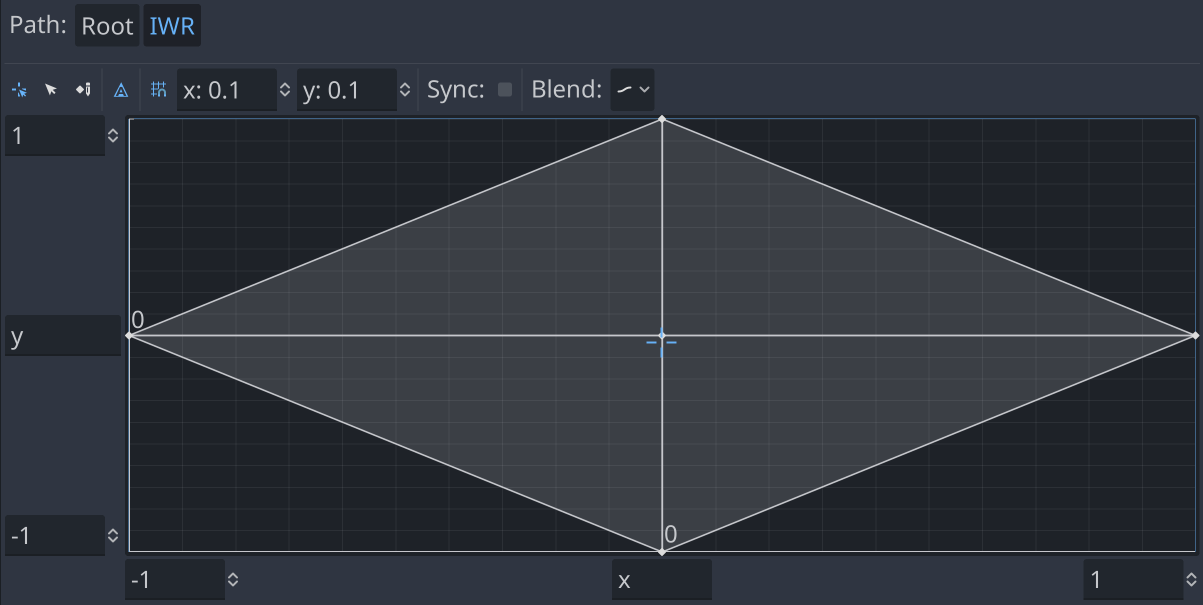
Now click the crosshair button to set the blend position and click to drag it around the grid. You should see the animations transition smoothly between the extremes.
When you’re done experimenting with the blendspace, click “Root” in the Path at the top of the panel to return to the root of the tree.
Setting up the state machine
The IWR looping animations can be thought of as the “heart” of the animation tree. The character will spend most of its time playing these animations. Any other animations will branch off from it (like we did earlier with the attack).
In the image below, I’ve done that with several other animations. Note the transition properties are set as we did in the example above.
You can also click to change the names the animations, as some of them are quite long.
The one animation that’s different is jumping. The jump animation is split into three parts: “start"and “land”, which are played when the character starts jumping, and when the jump ends. The “idle” portion of the jump is a looping animation that plays as long as the character is in the air - if they fall a long way, for example.
Add the three jumping animations and link them like this:
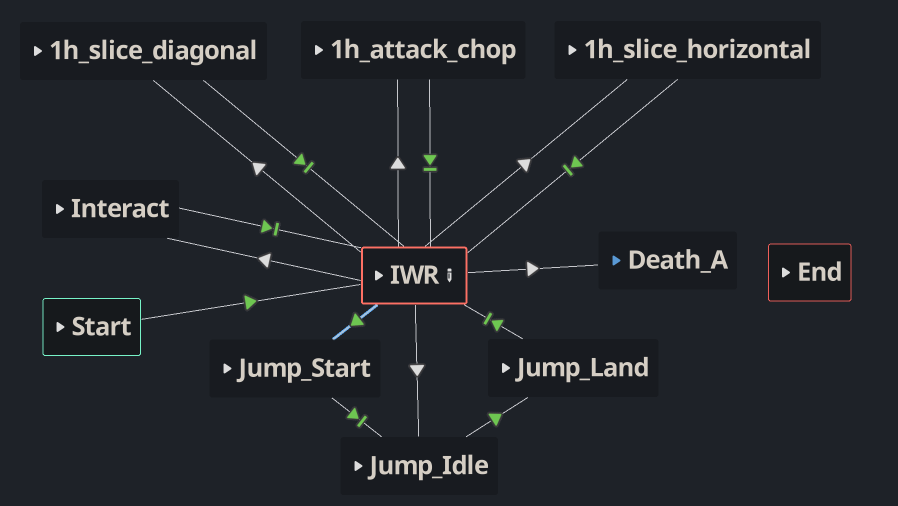
We need to be able to go straight from IWR to Jump_Idle in the event of falling off a ledge, but if pressing “jump”, we’ll go through Jump_Start first.
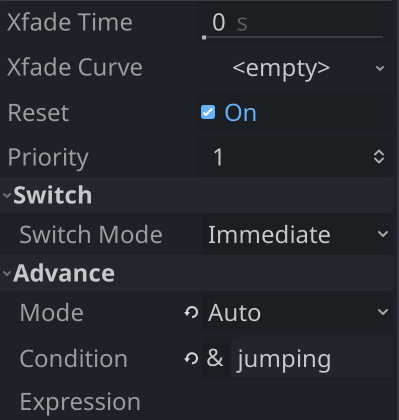
In addition, we’ve left the transition from IWR to Jump_Start as “Auto”. Instead of changing it to “Enabled”, we’ve added a Condition of jumping to the transition:
Similarly, the transition between Jump_Idle and Jump_Land has a condition of grounded.
We’ll be able to set these conditions in code to trigger the transition.
Finally, if you’re looking closely, you may notice that the transition from Jump_Land to IWR does not look smooth, because the last frame and first frame of the two animations don’t quite match up. We can solve this by selecting the transition between them and setting a small Xfade Time of 0.1, which will smooth it out nicely.
Wrapping up
We’ve now set up our 3D character’s animations and they’re ready to use. By setting up the AnimationTree, it will now be much easier to select and transition between animations in the character’s movement code.
See the section description for more examples of working in 3D and for example Godot projects you can download.