Coding the Player
In the last section, we configured the project and downloaded the game art. Now we’re ready to start coding - starting with the player-controlled ship.
Adding a script
Writing scripts and attaching them to nodes and other objects is how you build behavior and game mechanics into your game. Our Player scene displays the ship, defines its collision hitbox, etc., but it can’t move, and nothing would happen if it collided. We’ll write code to add this functionality to the ship.
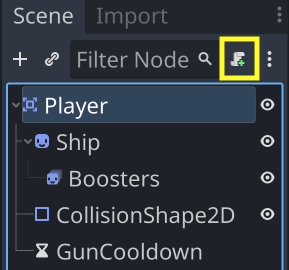
Select the Player node and click the Attach script button:
You don’t need to change any of the options on the Attach Node Script window, so just click Create and you’ll be taken to the script editor.
Let’s look at the first line of the script, which has automatically been added.
extends Area2D
This line defines what type of object this script should be attached to. It means that the script will have access to all the functionality that an Area2D provides.
Your extends line should always match the type of node the script is attached to.
A script on its own doesn’t do much of anything. Scripts define additional functionality for whatever object they’re attached to. You will never be accessing a variable in some script, you’ll be accessing a property of an object, which is defined by that script. This is a very important distinction.
Movement
We’ll start by making the ship move around the screen. Let’s start with some code that does the following:
- Detect what input(s) the player is pressing
- Move the ship in the direction of the input
@export var speed = 150

func _process(delta):
    var input = Input.get_vector("left", "right", "up", "down")
    position += input * speed * delta
Let’s break this down line-by-line:
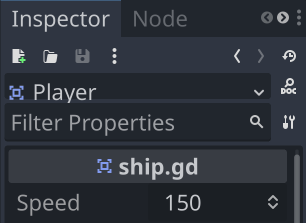
- Adding
@exportin front of a variable allows you to adjust its value in the Inspector.
- The
_process()function is called once every frame by the engine. Any code we place in this function will be executed every frame. Input.get_vector()checks the pressed state of the four given inputs and produces a vector pointing in that direction.- Finally, we move the ship’s
positionby adding that input vector, scaling it to the desired speed, and multipling bydelta.
Run the scene by clicking the Run Current Scene button, and try moving around.

Staying on screen
One problem we have is that if you keep moving, you’ll go off the screen. We need to lock the player’s position property inside the bounds of the screen rectangle. Add this line at the top of the script:
@onready var screensize = get_viewport_rect().size
The @onready here tells Godot not to set the value of the screensize variable until the Player node has entered the scene tree. Effectively, it means “wait until the game starts”, because there’s no window to get the size of until the game is running.
The next step is to clamp the position within the bounds of that screensize rectangle. Vector2, which is what position is, has a clamp() method we can use. Put this line right after setting the position:
func _process(delta):
    var input = Input.get_vector("left", "right", "up", "down")
    position += input * speed * delta
    position = position.clamp(Vector2.ZERO, screensize)
Run the scene again and try moving off the edges. You’ll notice that half of the ship still goes off screen. This is because the ship’s position is the center of the Sprite2D. Since we know our ship is 16x16, we can change the clamp() to include 8 extra pixels:
position = position.clamp(Vector2(8, 8), screensize - Vector2(8, 8))
Matching animation to direction
Now that the ship is moving, we can choose the “tilted” ship images when moving left or right, as well as the matching “Booster” animation.
To tell which direction we’re moving, we can check the x value of the input vector. Depending on whether it’s positive (right), negative (left), or zero (not moving), we can choose the frame value of the Sprite2D and the animation of the AnimatedSprite2D.
func _process(delta):
    var input = Input.get_vector("left", "right", "up", "down")
    if input.x > 0:
        $Ship.frame = 2
        $Ship/Boosters.animation = "right"
    elif input.x < 0:
        $Ship.frame = 0
        $Ship/Boosters.animation = "left"
    else:
        $Ship.frame = 1
        $Ship/Boosters.animation = "forward"
    position += input * speed * delta
    position = position.clamp(Vector2(8, 8), screensize-Vector2(8, 8))
Once again, play the scene and verify that the images change when moving left/right. Verify that everything works as intended before moving to the next step.
The next step will be to create the Bullet scene and let the player shoot.
| Prev | Next |
|---|