Main Scene
Before we can make enemies, powerups, or any other game objects, we need a place where they can all exist together with the player. In most games, this would be called a “level” or “main” scene, and that’s what we’ll call it here.
Start the scene with a Node2D called “Main” and save it.
Creating the background
Add a Sprite2D child. Name this sprite “Background” and add the Space_BG (2 frames) (64 x 64).png as its texture.
This image has two frames, each 64x64 pixels in size. We’d like the image to tile across the full size of the screen, so start with the following settings:
Under Offset set Centered to “off”. This makes the image’s top left corner start at the origin rather than its center.
Under Region, turn Enabled “on”, and then set the Rect to a width of
240and a height of320. This makes the image stretch to the size of the screen.Under Texture change Repeat to
Enabled. This causes the image to repeat over the full size of the screen.
Now add the player to the scene by selecting the Main node and clicking the Instantiate Child Scene button.
Animating the background
We can make the scene more dynamic by animating the background. While we could do this in code by changing the region_rect property every frame, we’ll use an AnimationPlayer node instead; add one as a child of Main.
At the bottom of the editor window, you’ll see the Animation panel. There’s a lot of information there, so let’s look at how it’s laid out:
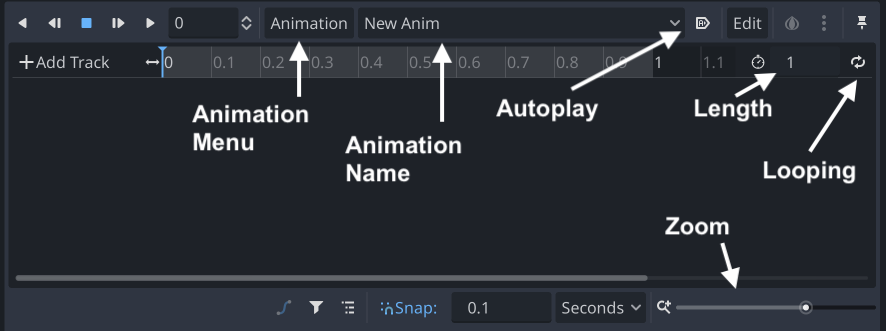
Click the Animation button and choose New Animation. You can name the new animation scroll. Set its Length to 2 and toggle the Looping and Autoplay buttons.
Animations work by adding tracks that represent properties that you want the AnimationPlayer to control. In the timeline of the player, you’ll add keyframes that define what value you want the property to have at that particular time.
We can add keyframes to the animation by clicking the key icon that now appears next to every property in the Inspector. Make sure the scrubber (the blue indicator on the timeline) is at time 0, then select the Background and click the key next to Region/Rect. You’ll be asked if you want to create a new track and then you’ll see the new track added to the animation panel, with a small dot representing the keyframe you’ve just added. Drag the scrubber to time 2 and then change the y value of the Region/Rect property to 64. Click the key to add another keyframe.
Now when you press Play on the animation, you should see the background slowly scrolling behind the player.
Next steps
The main scene is now ready for us to add enemies. In the next step we’ll make a single enemy scene, as we did with the bullets, and then instantiate that multiple times.
| Prev | Next |
|---|