Enemies
Now that our player can shoot, let’s give them something to shoot at.
Setting up the scene
We’ll use an Area2D for the enemy, since we need it to detect overlap - either with the player’s bullets, or with the player itself.
Here’s are the nodes we’ll need:
Enemy:  Area2D
     Sprite2D
     CollisionShape2D
     AnimationPlayer
    MoveTimer:  Timer
    ShootTimer:  Timer
Select the area node and click the Node tab next to the Inspector. Under Groups, type “enemies” an click Add. Remember the code we wrote on the bullet? It looks for objects in the “enemies” group.
In the sprite’s Texture, add Bon_Bon (16 x 16).png and set its Animation/Hframes to 4.
As you’ve done before, add a rectangular collision shape and size it to fit. Enable One Shot on both timer nodes.
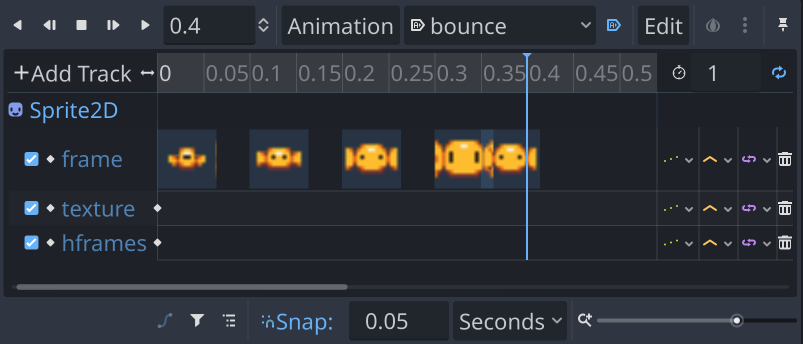
In the AnimationPlayer, add an animation called “bounce” and set it to looping and autoplay. Set the Snap at the bottom of the animation panel to 0.05.
Select the sprite node and press the key icons next to Texture and Hframes to create tracks for them. We’re doing this because later we’ll add an “explosion” animation that will use different values for these properties.
Now we’ll key the individual Frames values we want. Start with keying Frames each .1 seconds to values in this order2, 1, 0, 3. Finally, key 0 again and put it immediately after. This will make a “pulsing” animation where the sprite grows and then bounces a little at the end. The animation setup should look like this:
Press the play button to see it in action. Feel free to adjust it if you’d like.
Now add another animation called “explode”. Set its length to 0.4 seconds.
Change the sprite’s Texture to Explosion (16 x 16).png and keyframe that property. Since this image has a different number of frames than the enemy image, we also need to change Hframes to 6 and keyframe that.
Now keyframe Frame to 0 at time 0 and to 5 at time 0.4. Play the animation to see it in action.
Enemy script
The enemies will spawn at the top of the screen in a grid. After a random amount of time, they’ll descend toward the player and then return to the top if they weren’t destroyed. Periodically, they’ll also shoot at the player.
Add a script, and start with the variables:
extends Area2D

var start_pos = Vector2.ZERO
var speed = 0

@onready var screensize  = get_viewport_rect().size
The start_pos variable is going to keep track of the enemy’s starting position so that after it moves, it can return to its original location. We’ll set it when the enemy is spawned and we call its start() function.
func start(pos):
    speed = 0
    position = Vector2(pos.x, -pos.y)
    start_pos = pos
    await get_tree().create_timer(randf_range(0.25, 0.55)).timeout
    var tween = create_tween().set_trans(Tween.TRANS_BACK)
    tween.tween_property(self, "position:y", start_pos.y, 1.4)
    await tween.finished
    $MoveTimer.wait_time = randf_range(5, 20)
    $MoveTimer.start()
    $ShootTimer.wait_time = randf_range(4, 20)
    $ShootTimer.start()
When we spawn our enemies we’ll call this function and pass it a position vector representing where on the screen the enemy should go. Note that we actually spawn it above the top of the screen (negative y value). This is so that we can animate it coming onto the screen using a tween. We also randomize the two timers so that all enemies won’t be moving and shooting at the same time.
Connect both of the timers’ timeout signals.
func _on_timer_timeout():
    speed = randf_range(75, 100)

func _on_shoot_timer_timeout():
    $ShootTimer.wait_time = randf_range(4, 20)
    $ShootTimer.start()
We can start moving when the timer runs out, and we’ll also shoot, but we haven’t made a bullet yet, so that part will come later. Now that we’re changing the speed, we can move using it.
func _process(delta):
    position.y += speed * delta
    if position.y > screensize.y + 32:
        start(start_pos)
Now if the speed isn’t 0, we’ll see the enemy move down the screen. When it goes off the bottom, we start it all over again.
We’ve already written the code in the bullet scene that calls explode() on the enemies it hits, so let’s add that too.
func explode():
    speed = 0
    $AnimationPlayer.play("explode")
    set_deferred("monitoring", false)
    died.emit(5)
    await $AnimationPlayer.animation_finished
    queue_free()
In this function, we stop moving, play the explosion animation, and then delete the enemy when it’s finished. The set_deferred() call makes sure to turn off monitoring on the enemy. This is so that while the enemy is exploding, another bullet can’t hit it again.
Add the died signal at the top of the script:
signal died
We’ll use that signal to let the main scene know that the player just earned some points.
Spawning enemies
Now let’s go to the Main scene and add these enemies to the game. Add a script to Main and start by loading the enemy scene:
extends Node2D

var enemy = preload("res://enemy.tscn")
var score = 0
Spawning enemies ordinarily won’t happen until we’ve pressed the “Start” button to begin the game, but since we haven’t made that yet, we’ll just spawn them immediately:
func _ready():
    spawn_enemies()

func spawn_enemies():
    for x in range(9):
        for y in range(3):
            var e = enemy.instantiate()
            var pos = Vector2(x * (16 + 8) + 24, 16 * 4 + y * 16)
            add_child(e)
            e.start(pos)
            e.died.connect(_on_enemy_died)
This makes 27 enemies and positions them in a grid in the top half of the screen. We also make sure to connect the died signal of each, so we need to create that function:
func _on_enemy_died(value):
    score += value
We don’t have a way to display the score yet, but we’ll get to that soon.
Play the scene and you should see a bunch of enemies appear at the top and periodically fall down the screen. Next, we’ll make them shoot.
| Prev | Next |
|---|
