Cooldown Button
Problem
You want to make RPG-style ability buttons, including a cooldown effect.
Solution
If you need art for your buttons, you can find a wide variety of well-designed buttons at Game-icons.net. We’ll be using a few from there for this recipe.
Node setup
The scene for our ability button will need the following nodes:
AbilityButton:  TextureButton
   Sweep:  TextureProgress
    Timer
   Counter:  MarginContainer
      Value:  Label
Drop your chosen icon into the Textures/Normal property of the AbilityButton.
On the Sweep node, choose “Full Rect” from the Presets menu. Set the Fill Mode to “Counter Clockwise”.
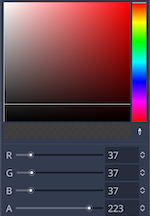
We also want our cooldown “radial wipe” to darken the button, so set the Modulate property to a dark gray with some transparency:
The Timer node should be set to “One Shot”.
Counter is a container to hold and align the text. Set its layout to “Bottom Wide”, and in its Theme Overrides/Constants, both Margin Right and Margin Left to 5.
Finally, on the Value label, set Horizontal Alignment to “Right” and Clip Text to “On”. Add a font to the Theme Overrides/Font. Put a value like 0.0 in the Text field to check how it works. Since our icon is black and white, it also helps to add a Theme Overrides/Constants/Outline Size_ of 1.
Script
Add a script to the AbilityButton. Connect the Timer’s timeout signal and the AbilityButton’s pressed signal.
extends TextureButton
class_name AbilityButton

@onready var time_label = $Counter/Value

@export var cooldown = 1.0


func _ready():
    time_label.hide()
    $Sweep.value = 0
    $Sweep.texture_progress = texture_normal
    $Timer.wait_time = cooldown
    set_process(false)
We start by exporting a cooldown variable for the length of our ability’s cooldown. Then, in the _ready() method, we can set the Timer to use that value. Then we hide the label, because we only want to display it during the countdown.
Next, we need a texture to assign to the TextureProgress display. In this case, we’ll copy the texture from the button - you could also use a different texture if you like.
Finally, we make sure the sweep’s value is at 0, and set the node’s processing to false. We’ll do the animation in _process() so we don’t need it running when we’re not in cooldown mode.
func _process(delta):
    time_label.text = "%3.1f" % $Timer.time_left
    $Sweep.value = int(($Timer.time_left / cooldown) * 100)
In _process() we use the time_left on the timer to set the label’s text and the sweep’s value.
func _on_AbilityButton_pressed():
    disabled = true
    set_process(true)
    $Timer.start()
    time_label.show()
When the button is clicked, everything gets started.
func _on_Timer_timeout():
    print("ability ready")
    $Sweep.value = 0
    disabled = false
    time_label.hide()
    set_process(false)
And everything is reset when the timer runs out. Put several buttons in an HBoxContainer and you’ve got an action bar:
Download This Project
Download the project’s example code here: https://github.com/godotrecipes/ui_cooldown_button


