Level Select Menu
Problem
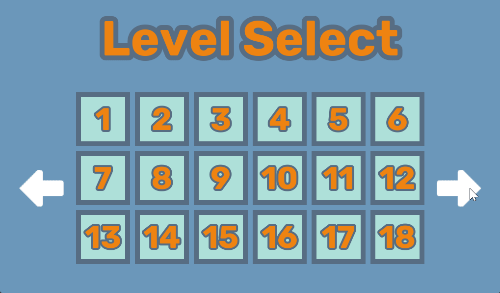
Your game needs a “level select” menu, where the user can choose from a grid of options.
Solution
As shown in the example above, we’ll make a scrolling grid of level “boxes” that the player can choose from. Let’s start with the individual level boxes:
1: Level box
Here’s the node setup:
LevelBox:  PanelContainer
     Label
     MarginContainer
         TextureRect
The TextureRect is for displaying the lock icon, and the Label for displaying the level number. When one is showing, the other is hidden.
You can style these as you like, here’s an example:

Make sure to set the LevelBox’s Custom Minimum Size in the Inspector. We’re using (110, 110) in the example, but it depends on what size layout you’re going for.
Now add a script and connect the gui_input signal.
@tool
extends PanelContainer

signal level_selected

@export var locked = true:
    set = set_locked
@export var level_num = 1:
    set = set_level

@onready var lock = $MarginContainer/Lock
@onready var label = $Label

func set_locked(value):
    locked = value
    if not is_inside_tree():
        await ready
    lock.visible = value
    label.visible = not value

func set_level(value):
    level_num = value
    if not is_inside_tree():
        await ready
    label.text = str(level_num)


func _on_gui_input(event):
    if locked:
        return
    if event is InputEventMouseButton and event.pressed:
        level_selected.emit(level_num)
        print("Clicked level ", level_num)
We’re using @tool here so that we can make changes to the properties in the inspector and see them right away, without running the scene. Go ahead and try clicking the Locked property and verify that you see the lock appear/disappear.
Since we don’t have actual levels to load in this project, the print() statement can help test that the click is being detected.
2: Grid
Once you have the box scene completed, add a new scene with a GridContainer. Add any number of LevelBox instances under it, making sure to set the Columns value. Here’s one with 6 columns:

In this example Theme Overrides/Constants/H Separation and V Separation are set to 10.
Save this scene as LevelGrid. In the menu, we’ll use multiple instances to display the desired number of levels.
3: Menu screen
Now we can put together the final menu.
Here’s the basic layout we’re going for:
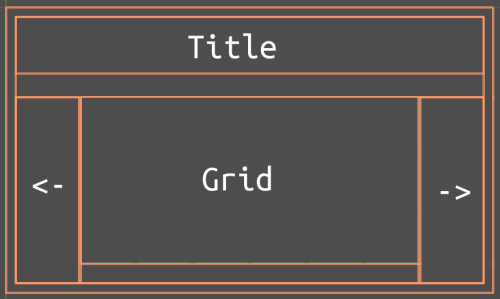
We’ll create it with these nodes:
LevelMenu: MarginContainer
     VBoxContainer
        Title:  Label
         HBoxContainer
            BackButton:  TextureButton
            ClipControl:  Control
            NextButton:  TextureButton
Adjust the node properties:
LevelMenu- Theme Overrides/Constants/Margins:
20
- Theme Overrides/Constants/Margins:
-
VBoxContainer- Theme Overrides/Constants/Separation:
50
- Theme Overrides/Constants/Separation:
-
Title- Style the font however you like
-
BackButton/NextButton- Ignore Texture Size:
On - Stretch Mode:
Keep Centered - Layout/Container Sizing/Horizontal/Expand:
On
- Ignore Texture Size:
-
ClipControl- Layout/Clip Contents:
On - Layout/Custom Minimum Size:
(710, 350)(size of theLevelGrid)
- Layout/Clip Contents:
The ClipControl node is where the grid goes. Enabling Clip Contents means that if the contents are larger than the control, they’ll be cropped. That will allow us to make a horizontally scrolling set of grids. Add an HBoxContainer called GridBox to ClipControl, and instance 3 (or more) LevelGrids inside it.
Make sure to set Theme Overrides/Constants/Separation to 0.
Your layout should look something like this (we’ve disabled Clip Contents in order to show what’s happening):
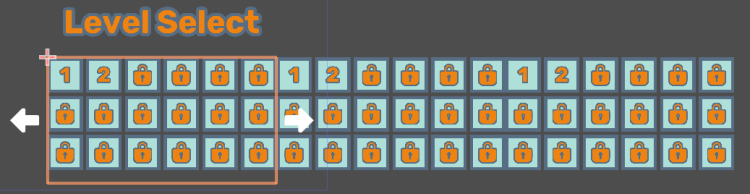
With Clip Content, the three grids are all there, but the ClipControl only shows one at a time.
Now, to scroll the menu, we need to shift the GridBox by 710 pixels to the left/right.
110 (width of each LevelBox)
    * 6 (grid columns)
    + 10 (grid spacing) * 5
    == 710
You may be wondering why we’re not using a ScrollContainer here. You certainly can, but we don’t want continuous scrolling, and we don’t want to see a scrollbar.
Add a script to the LevelMenu and connect the pressed signals of the two buttons.
extends MarginContainer

var num_grids = 1
var current_grid = 1
var grid_width = 710

@onready var gridbox = $VBoxContainer/HBoxContainer/ClipControl/GridBox

func _ready():
    # Number all the level boxes and unlock them
    # Replace with your game's level/unlocks/etc.
    # You can also connect the "level_selected" signals here
    num_grids = gridbox.get_child_count()
    for grid in gridbox.get_children():
        for box in grid.get_children():
            var num = box.get_position_in_parent() + 1 + 18 * grid.get_position_in_parent()
            box.level_num = num
            box.locked = false

func _on_BackButton_pressed():
    if current_grid > 1:
        current_grid -= 1
        gridbox.rect_position.x += grid_width

func _on_NextButton_pressed():
    if current_grid < num_grids:
        current_grid += 1
        gridbox.rect_position.x -= grid_width
When you run the scene, try clicking the “Next” and “Back” buttons and verify that it’s scrolling as expected. Clicking the individual level boxes should print to the console.
Download the example project to see the whole thing in action, including some tweens for the scrolling action (because tweens make everything better).
Download This Project
Download the project code here: https://github.com/godotrecipes/ui_level_select