Pygame Lesson 1-2: Working with Sprites
Mon, Aug 15, 2016This is part 2 of our tutorial series, “Game Development with Pygame”. It is intended for beginner/intermediate programmers who are interested in game development and improving their Python coding skills. You should start with Part 1: Getting Started
You can watch a video version of this lesson here:
What is a sprite?
A sprite is a computer graphics term for any object on the screen that can move around. When you play any 2D game, all the objects you see on the screen are sprites. Sprites can be animated, they can be controlled by the player, and they can even interact with each other.
We will take care of updating and drawing our sprites in the UPDATE and DRAW sections of our game loop. But you can probably imagine, if your game has a large number of sprites then these sections of your game loop could get very long and complicated. Fortunately, Pygame has a good solution for this: the sprite group.
A sprite group is just a collection of sprites that you can act on all at the same time. Let’s make a sprite group to hold all the sprites in our game:
 clock = pygame.time.Clock()
 all_sprites = pygame.sprite.Group()
Now we can take advantage of the group by adding the following in our loop:
    # Update
    all_sprites.update()

    # Draw / render
    screen.fill(BLACK)
    all_sprites.draw(screen)
Now for every sprite that we create we just make sure we add it to the all_sprites group, and it will automatically be drawn on the screen and updated each time through the loop.
Creating a sprite
Now we’re ready to make our first sprite. In Pygame, sprites are objects. If you haven’t worked with objects in Python before, they are a convenient way of grouping data and code into a single entity. It may be a little confusing at first, but fortunately, Pygame sprites are a good way to practice with objects and get used to how they work.
We start by defining our new sprite:
class Player(pygame.sprite.Sprite):
class tells Python we’re defining a new object, which is going to be our player sprite, and its type is pygame.sprite.Sprite, which means it will be based on Pygame’s pre-defined Sprite class.
The first bit of code we need in a class definition, is the special __init__() function, which defines what code will run whenever a new object of this type is created. There are also two properties that every Pygame sprite must have: an image and a rect:
class Player(pygame.sprite.Sprite):
    def __init__(self):
        pygame.sprite.Sprite.__init__(self)
        self.image = pygame.Surface((50, 50))
        self.image.fill(GREEN)
        self.rect = self.image.get_rect()
The first line, pygame.sprite.Sprite.__init__(self) is required by Pygame - it runs the built-in Sprite classes initializer. Next, we define the image property - in this case, we’re just creating a simple 50 x 50 square and filling it with the color GREEN. Later we’ll learn how to make the sprite’s image be something fancier, like a character or spaceship, but a solid square is good enough for now.
Next, we must define the sprite’s rect, which is short for “rectangle”. Rectangles are used all over the place in Pygame to keep track of an object’s coordinates. the get_rect() command just looks at the image and calculates the rectangle that will enclose it.
We can use the rect to put the sprite wherever we want it on the screen. Let’s start with the sprite in the center:
class Player(pygame.sprite.Sprite):
    def __init__(self):
        pygame.sprite.Sprite.__init__(self)
        self.image = pygame.Surface((50, 50))
        self.image.fill(GREEN)
        self.rect = self.image.get_rect()
        self.rect.center = (WIDTH / 2, HEIGHT / 2)
Now that we’ve defined our Player sprite, we need to “spawn” (meaning create) it by making an instance of the Player class. We also need to make sure we add the sprite to the all_sprites group:
all_sprites = pygame.sprite.Group()
player = Player()
all_sprites.add(player)
Now, if you run your program, you’ll see the green square at the center of the screen. Go ahead and increase the WIDTH and HEIGHT settings of your program so that you will have plenty of space for the sprite to move around in the next step.
![]()
Sprite movement
Remember, in the game loop, we have the all_sprites.update(). This means that for every sprite in the group, Pygame will look for an update() function and run it. So to get our sprite to move, we just need to define its update rules:
class Player(pygame.sprite.Sprite):
    def __init__(self):
        pygame.sprite.Sprite.__init__(self)
        self.image = pygame.Surface((50, 50))
        self.image.fill(GREEN)
        self.rect = self.image.get_rect()
        self.rect.center = (WIDTH / 2, HEIGHT / 2)

    def update(self):
        self.rect.x += 5
This means that every time through the game loop, we increase the x coordinate of the sprite by 5 pixels. Go ahead and run it and you’ll see the sprite head off the right side of the screen:
![]()
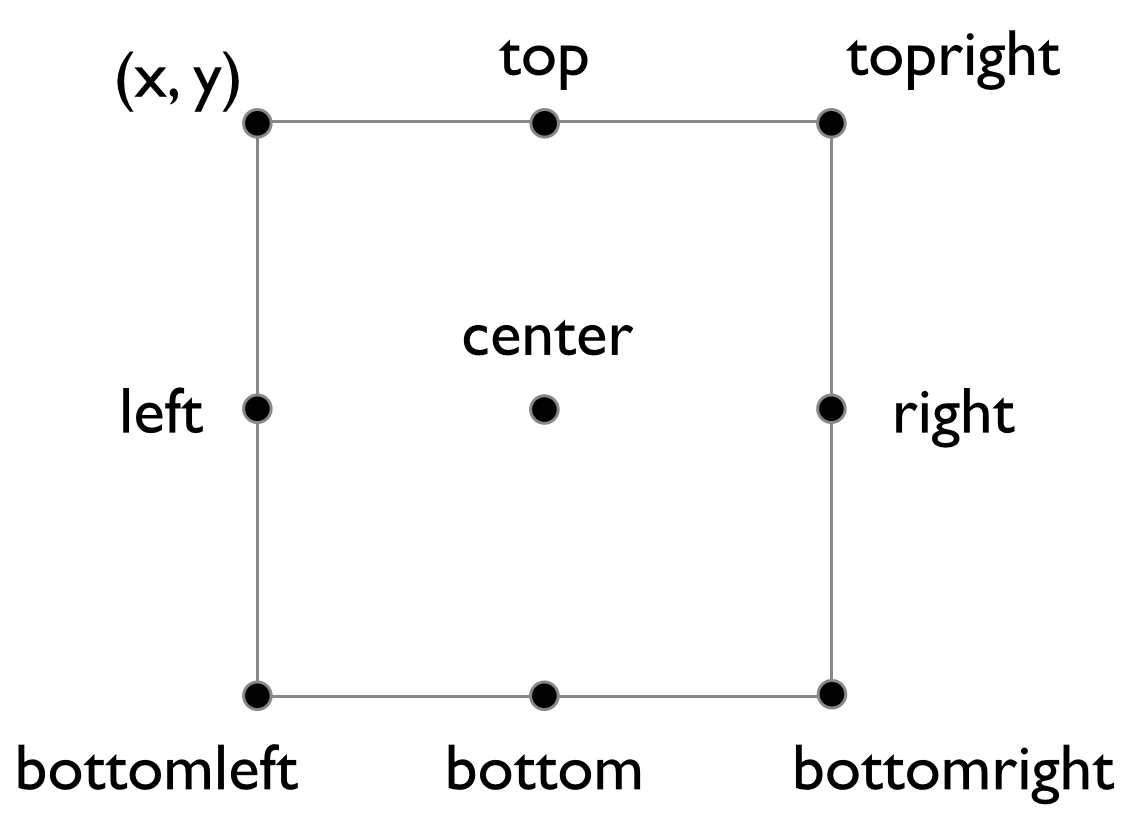
Let’s fix that by making the sprite wrap around - whenever it reaches the right side of the screen, we will move it to the left side. We can do this easily by using one of the convenient “handles” on the sprite’s rect:

So if the left edge of the rect goes off the screen, we’ll set the right edge to 0:
class Player(pygame.sprite.Sprite):
    def __init__(self):
        pygame.sprite.Sprite.__init__(self)
        self.image = pygame.Surface((50, 50))
        self.image.fill(GREEN)
        self.rect = self.image.get_rect()
        self.rect.center = (WIDTH / 2, HEIGHT / 2)

    def update(self):
        self.rect.x += 5
        if self.rect.left > WIDTH:
            self.rect.right = 0
And now we can see the sprite will appear to wrap around the screen:
![]()
That will do it for this lesson. Go ahead and experiment - notice that anything you put in the update() method of the sprite will happen every frame. Try making the sprite move up and down (change the y coordinate) or making it bounce off the wall (reverse the direction when the rect reaches the edge).
In the next tutorial, we’ll show you how to use art for your sprite - changing it from a plain square into an animated character.
