Godot 101 - Part 7: Using Signals
Wed, Mar 1, 2017![]()
This is part 7 of “Godot 101”. In this installment, we’ll learn how properly communicate between nodes, using a Godot feature called a signal. If you haven’t already read through the previous parts, please start with Part 1.
About this series
Godot 101 is an introduction to the Godot game engine and how it works. If you’ve never used a game engine before, or if you’re just new to Godot, this is the place to start. If you’re new here, a quick note about this website: we’re called KidsCanCode because we teach programming and game development to kids, but if you’re an adult you’re welcome here, too. We don’t believe in dumbing-down the material for kids, and game development is hard - so it will probably be challenging no matter what your age.
You can watch a video version of this lesson here:
Communicating between scenes
In the last part, we caused the gems to disappear when they are touched by the player. Now, we want something to happen when the gems are collected - specifically, we want to increase the player’s score. The problem we have is that score is a variable in the main scene’s script, but the gem collection happens on the gem’s script. Put another way, we need a way for the gem’s script to change a variable on main. The tree looks like this:
 Click to enlarge
Each gem is a child of gem_container, which is a child of main.
Obvious, but wrong
Many beginners (and many beginner tutorials) will solve this problem in an obvious but incorrect manner. They look at the tree image above and think, “main is 2 levels above the gem, so I just need to go 2 levels up the tree.” The result is a solution like this to the gem script:
func _on_gem_area_enter(area):
    if area.get_name() == 'player':
        queue_free()
        get_node('../..').gem_grabbed()
And on main.gd:
func gem_grabbed():
    score += 10
    print(score)
Now, this will work, and you will see the score being printed every time you grab a gem. However there are several problems with this approach. First, it can ruin your ability to test a scene separately. For example, we can run the gem scene by itself (remember how we did that with the player to test out movement?), but when we do, there is no node 2 levels above it! If you have code that uses get_node('../..'), it will report an error.
This method is also very fragile. Because the gem scene is now written specifically to work with the main scene as it is now, if you ever change the structure of main, your gem code will be broken.
Signaling events
The correct method to solve this problem in Godot is to use signals. We’ve already used one of the built-in signals that Area2D provides to trigger an event. Now, we want to define a custom signal that we can use when the gem is collected. This can be done with the signal keyword:
extends Area2D

signal gem_grabbed

func _ready():
    pass

func _on_gem_area_enter( area ):
    if area.get_name() == "player":
        emit_signal("gem_grabbed")
        queue_free()
Here, we’ve created a custom signal called gem_grabbed and then when the player touches the gem, we use emit_signal() to trigger it.
Now, in main.gd we just need to connect that signal to a function:
func spawn_gems(num):
    for i in range(num):
        var g = gem.instance()
        gem_container.add_child(g)
        g.connect("gem_grabbed", self, "_on_gem_grabbed")
        g.set_pos(...

func _on_gem_grabbed():
    score += 10
    print(score)
As each gem instance is created, we connect its gem_grabbed signal to a local function called on_gem_grabbed() (following the _on_* naming scheme that Godot uses by default). Any time that signal is emitted, the function will be called.
Running the game now will result in exactly the same behavior as before, but by using Godot’s signal functionality, we avoid the pitfalls of hard-coding the tree structure in our code. If you ever find yourself typing get_node('..') or get_tree().get_root() you probably would be better off using a signal instead.
Displaying information
Finally, let’s display the score on the game screen, rather than printing it in the console log. To start, we’re going to add to main a Control node. This is the base node type for all Godot’s various GUI nodes. Name this node HUD (“heads-up display”). The HUD will contain all the nodes we want to have displaying information on the screen, as an overlay on top of the rest of the game.
We want the HUD to be the same size as our game window, so we will use the anchor properties of the node (all Control nodes have these properties) and set them like this:
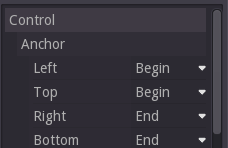
These settings control where the margin of the node will be measured in relation to the parent node. So if we set our margins like this:
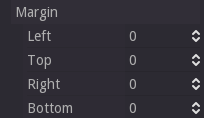
The HUD’s size will be exactly the same as the parent’s, even if the parent node changes. Click the button at the top to prevent accidentally clicking the node and moving it.
Now to display the score, we will use a Label and name it score_label.
This is a simple node that displays text. You can type directly into the Text property and see it on the screen:

We won’t be talking about formatting the text (fonts, styles, etc.) just yet, but if you want the text bigger, don’t resize the node (that will set the size of the node, not the text inside), you can use the Scale property in the inspector. Set it to something like (2.5, 2.5). It won’t look great, but that’s ok for now.
To have the score displayed, we just need to have our script update the Text property whenever the score changes, so add this to main.gd:
onready var score_label = get_node("HUD/score_label")
func _on_gem_grabbed():
score += 10
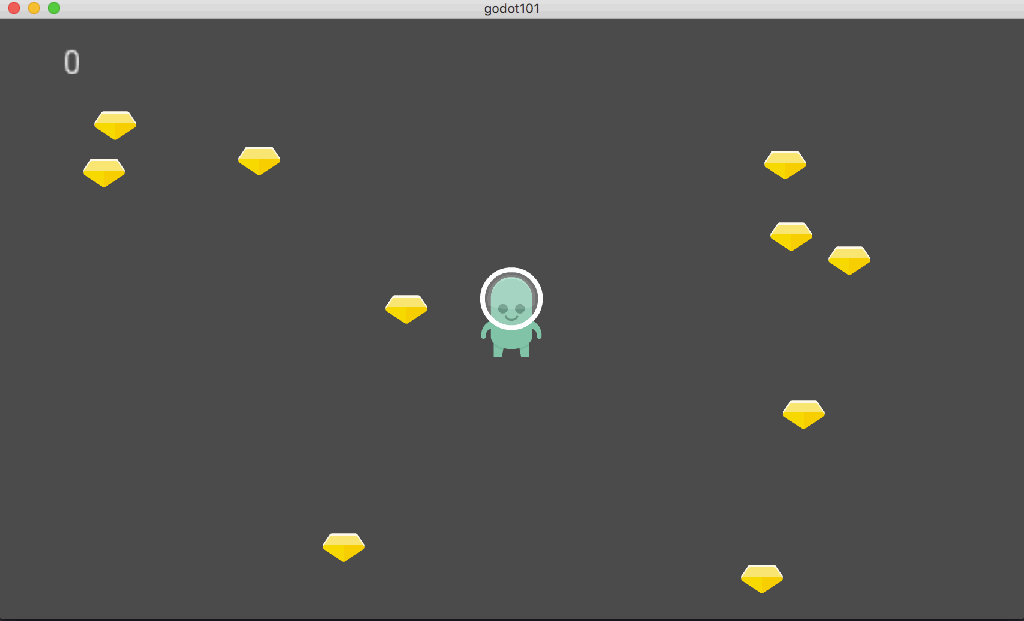
score_label.set_text(str(score))Now we can see our score change whever we grab a gem:
 Click to enlarge
Wrapping Up
Signals are a very powerful feature in Godot, and something that is important to understand well. Resist the temptation to use get_node('..'), especially when using instanced scenes. It may be hard to grasp at first, but with practice you’ll find it’s a far more robust way of doing things.