Pygame Lesson 1-1: Getting Started
Fri, Aug 12, 2016This is part 1 of our tutorial series, “Game Development with Pygame”. It is intended for beginner/intermediate programmers who are interested in game development and improving their Python coding skills.
You can watch a video version of this lesson here:
What is Pygame?
Pygame is a “game library” - a set of tools to help programmers making games. Some of these things are:
- Graphics and animation
- Sound (including music)
- Control (keyboard, mouse, gamepad, etc.)
Game Loop
At the heart of every game is a loop, which we call the “Game Loop”. This loop is constantly running, over and over again, doing all the things that are needed to make the game work. Each time the game goes through this loop is called a frame.
Each frame, many different things may happen, but they can be organized into three different categories:
1. Process Input (or Events)
This means anything from outside your game that you want to pay attention to - anything that you need the game to respond to. These may be keys being pressed on the keyboard, the mouse being clicked, etc.
2. Update Game
This means changing anything that needs to change on this frame. If a character is up in the air, gravity needs to pull it down. If two objects run into each other, they need to explode.
3. Render (or Draw)
In this step, we draw everything on the screen. Backgrounds, characters, menus, or anything else that the player needs to see must be drawn on the screen in its correct, updated location.
Clock
One other important aspect of the loop is controlling how fast the whole loop runs. You may have heard the term FPS, which stands for Frames Per Second. This means how many times per second should this loop happen. This is important because you don’t want your game to run too fast or too slow. You also don’t want it to run at a different speed on different computers - if your character should take 10 seconds to run across the screen, that should be true no matter what computer it’s happening on.
Building a Pygame Template
Now that we know what pieces we need to make the game work, we can start writing some code. To begin with, we’re going to make a simple pygame program that does nothing but open a window and run a game loop. This will be a great starting point for any pygame project you want to make.
At the top of our program, we’re going to import the libraries we need and set a few variables for our game options:
# Pygame template - skeleton for a new pygame project
import pygame
import random

WIDTH = 360  # width of our game window
HEIGHT = 480 # height of our game window
FPS = 30 # frames per second
Next we need to open the game window:
# initialize pygame and create window
pygame.init()
pygame.mixer.init()  # for sound
screen = pygame.display.set_mode((WIDTH, HEIGHT))
pygame.display.set_caption("My Game")
clock = pygame.time.Clock()
pygame.init() is the command to start up pygame and “initialize” it (which is a fancy word for start). screen will refer to our game screen, and we create it at the size we set in our configuration constants. Finally, we create a clock so that we will be able to make sure our game runs at the FPS we want.
Now it’s time to make the game loop:
# Game Loop
running = True
while running:
    # Process input (events)
    # Update
    # Render (draw)
Here is our game loop, which is a while loop controlled by the variable running. If we ever want the game to end, we just have to set running to False and the loop will end. Now we can fill in each of the sections with some basic code.
Render / Draw Section
We’ll start with the Draw section. We don’t have any characters yet, but we can fill the screen with a solid color. To do this, we need to talk about how computers handle color.
Computer screens are made up of pixels, and these pixels have 3 parts to them: red, green, and blue. How much each part is lit up determines what color that pixel is, like this:
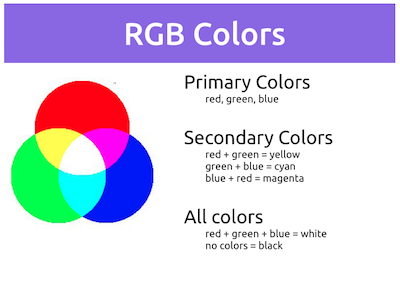
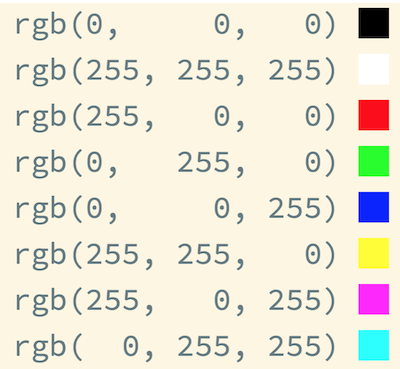
Each of the three primary colors can have a value between 0 (off) and 255 (100% on), so there are 256 different possibilities for each of the three primary colors. Here are some examples of some colors you can make:
You can find the total number of colors a computer can display by multiplying:
>>> 256 * 256 * 256 = 16,777,216Now that we understand colors, let’s define a few at the top of our program:
# Colors (R, G, B)
BLACK = (0, 0, 0)
WHITE = (255, 255, 255)
RED = (255, 0, 0)
GREEN = (0, 255, 0)
BLUE = (0, 0, 255) # Draw / render
screen.fill(BLACK)Imagine we had one of those whiteboards that is 2-sided and can flip over to show one side or the other. The front will be the display (the screen the player sees), while the back is hidden and only the computer can “see” it. Every frame, we do all of our drawing on the back side - every character, every bullet, every sparkly light, etc. Then, when we’re done, we flip the board over and show the new frame. This means that we’re only doing that slow process of talking to the display once every frame, and not for every single thing on the screen.
All this happens automatically in pygame. You just have to tell it to flip that whiteboard when you’ve finished drawing. In fact, the command is even named flip():
    # Draw / render
    screen.fill(BLACK)
# *after* drawing everything, flip the display
pygame.display.flip()flip() last. If you try to draw something after the flip, it won’t be seen!
Input / Events Section
We don’t have a game just yet, so we can’t really say what keys or mouse buttons or other controls we want to listen for. However, there’s one important event that we need to set up. If you tried running the program right now, you’d see that you have a problem: there’s no way to close the window! Clicking on the ‘X’ in the corner doesn’t work. That’s because that’s actually an event, and we need to tell our program to listen for that event and have it exit the game.
Events can happen any time. What if the player clicks the ‘jump’ button while the update or draw part of the loop is happening? You don’t want to just ignore that input - the player will be frustrated. So what Pygame does is save up all the events that have happened since the last frame. That way if the player is quickly mashing lots of buttons, you can make sure you know about all of them. This will be a list, so we run a for loop to look at all of them:
for event in pygame.event.get():
# check for closing window
if event.type == pygame.QUIT:
running = Falsepygame.QUIT is the event that happens when the ‘X’ is clicked, so we set running to False and the game loop will end.
Controlling FPS
We don’t really have anything to put in the ‘Update’ section yet, but we do still need to make sure we use our FPS setting to control the speed. We can do that like this:
while running:
# keep loop running at the right speed
clock.tick(FPS)The tick() command tells pygame to figure out how long the loop took and then pause for however long it takes to make the whole loop (meaning the whole frame) to last the right amount of time. If we set FPS to 30, that means we want a frame to last 1⁄30 or 0.03 seconds. If our loop code (updating, drawing, etc) only takes 0.01 seconds, then pygame will wait for 0.02 seconds, for example.
Wrapping up
Finally, let’s make sure that when the game loop does end, we actually destroy the game window. We do this by putting pygame.quit() at the very end of our code. So our final pygame template looks like this:
# Pygame template - skeleton for a new pygame project
import pygame
import random
WIDTH = 360
HEIGHT = 480
FPS = 30
# define colors
WHITE = (255, 255, 255)
BLACK = (0, 0, 0)
RED = (255, 0, 0)
GREEN = (0, 255, 0)
BLUE = (0, 0, 255)
# initialize pygame and create window
pygame.init()
pygame.mixer.init()
screen = pygame.display.set_mode((WIDTH, HEIGHT))
pygame.display.set_caption("My Game")
clock = pygame.time.Clock()
# Game loop
running = True
while running:
# keep loop running at the right speed
clock.tick(FPS)
# Process input (events)
for event in pygame.event.get():
# check for closing window
if event.type == pygame.QUIT:
running = False
# Update
    # Draw / render
    screen.fill(BLACK)
    # *after* drawing everything, flip the display
    pygame.display.flip()
pygame.quit()Congratulations! You have a working Pygame template. Save this file with a good name, something like pygame template.py so that you can re-use this every time you start on a new Pygame project.
In the next tutorial, we’ll use this template as the starting point for learning how to draw objects on the screen and make them move around.