Pygame Shmup Part 11: Player Lives
Sat, Sep 17, 2016This is part 11 of our “Shmup” project. If you haven’t already read through the previous parts, please start with Part 1. In this lesson we’ll add multiple lives to the player as well as a nice explosion when player dies.
About this series
In this series of lessons we’ll build a complete game using Python and Pygame. It’s intended for beginning programmers who already understand the basics of Python and are looking to deepen their Python understanding and learn the fundamentals of programming games.
You can watch a video version of this lesson here:
Player explosion
We’re going to use a different explosion animation for the player’s death, also from the same Kenny Game Art package, called the “Sonic Explosion”.
Click here to download a zip of these images.
We just need to load those frames like we did for the other explosions. We’ll just add another explosion type called 'player' and load it in the same loop, since it has the same number of frames as the other explosion we’re loading. Now our loading code will look like this:
explosion_anim = {}
explosion_anim['lg'] = []
explosion_anim['sm'] = []
explosion_anim['player'] = []
for i in range(9):
    filename = 'regularExplosion0{}.png'.format(i)
    img = pygame.image.load(path.join(img_dir, filename)).convert()
    img.set_colorkey(BLACK)
    img_lg = pygame.transform.scale(img, (75, 75))
    explosion_anim['lg'].append(img_lg)
    img_sm = pygame.transform.scale(img, (32, 32))
    explosion_anim['sm'].append(img_sm)
    filename = 'sonicExplosion0{}.png'.format(i)
    img = pygame.image.load(path.join(img_dir, filename)).convert()
    img.set_colorkey(BLACK)
    explosion_anim['player'].append(img)
We don’t need to change anything in our Explosion sprite class, so we just need to create a player explosion when the player’s shield runs out. We can add that in the game loop where we’re checking for player vs. meteor collisions:
# check to see if a mob hit the player
hits = pygame.sprite.spritecollide(player, mobs, True, pygame.sprite.collide_circle)
for hit in hits:
    player.shield -= hit.radius * 2
    expl = Explosion(hit.rect.center, 'sm')
    all_sprites.add(expl)
    newmob()
    if player.shield <= 0:
        death_explosion = Explosion(player.rect.center, 'player')
        all_sprites.add(death_explosion)
		running = False
But if you run the program you’ll see we now have a problem: when the player dies, we’re setting running to False so the game ends before we have a chance to see our pretty explosion!
To fix this, we need to not end the game until the explosion finishes. So we’ll delete the player, but not set running until the explosion disappears:
    if player.shield <= 0:
        death_explosion = Explosion(player.rect.center, 'player')
        all_sprites.add(death_explosion)
		player.kill()

# if the player died and the explosion has finished playing
if not player.alive() and not death_explosion.alive():
	running = False
The alive() function just returns whether a particular sprite is alive. Since we kill() the explosion when it finishes playing, we can now end the game when it finishes.
Lives
Now we’re going to give the player multiple lives. We can track this with a variable, but we also want to be able to display it on the screen. Rather than just show a number, it will look better if we use a smaller image of the player’s ship to indicate how many lives are left. First, we’ll create that smaller image:
player_img = pygame.image.load(path.join(img_dir, "playerShip1_orange.png")).convert()
player_mini_img = pygame.transform.scale(player_img, (25, 19))
player_mini_img.set_colorkey(BLACK)
Now we’ll add a few new parameters to the Player class __init__(): a lives counter, a flag (a variable that can be True or False) to hide/show the player, and a timer to control how long we keep the player hidden:
self.lives = 3
self.hidden = False
self.hide_timer = pygame.time.get_ticks()
Now, when the player dies, instead of using kill(), we’re going to hide the player and subtract 1 from lives. We also reset the shield for the next life:
if player.shield <= 0:
        death_explosion = Explosion(player.rect.center, 'player')
        all_sprites.add(death_explosion)
        player.hide()
        player.lives -= 1
        player.shield = 100

# if the player died and the explosion has finished playing
if player.lives == 0 and not death_explosion.alive():
    running = False
Next, we need to define how hiding works. Back in class Player() we’re going to add a hide method which sets the hidden flag to True and starts the timer. We also need to make sure that while the player is hidden, it can’t be hit by meteors. There are few ways we could do this, but a simple one that doesn’t require adding/removing from groups, etc. is to just move the player off the bottom of the screen temporarily:
def hide(self):
    # hide the player temporarily
    self.hidden = True
    self.hide_timer = pygame.time.get_ticks()
    self.rect.center = (WIDTH / 2, HEIGHT + 200)
And in the player’s update() method, we need to unhide if enough time has passed (we’ll use 1 second for now):
def update(self):
	# unhide if hidden
	if self.hidden and pygame.time.get_ticks() - self.hide_timer > 1000:
	    self.hidden = False
	    self.rect.centerx = WIDTH / 2
	    self.rect.bottom = HEIGHT - 10
Life counter display
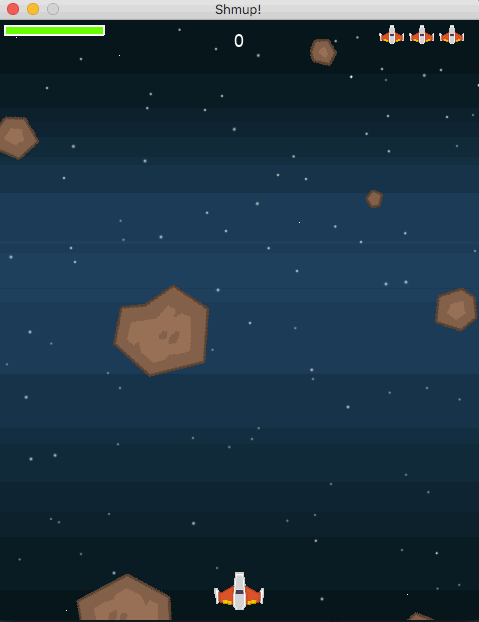
To display the lives, we will create a function similar to our draw_shield_bar(), which will let us place the life counter in a given location:
def draw_lives(surf, x, y, lives, img):
    for i in range(lives):
        img_rect = img.get_rect()
        img_rect.x = x + 30 * i
        img_rect.y = y
        surf.blit(img, img_rect)
We just loop a number of times equal to the number of lives, and then space each image out by 30 pixels (the player_mini_img is 25 pixels wide, so that will leave a small space between them).
Then, add a call to this function in the draw section of our game loop:
draw_lives(screen, WIDTH - 100, 5, player.lives,
	   player_mini_img)
And now we can see the final result:
In the next lesson, we’ll add some powerups to the game.