Pygame Shmup Part 10: Explosions
Fri, Sep 9, 2016This is part 10 of our “Shmup” project. If you haven’t already read through the previous parts, please start with Part 1. In this lesson we’ll some animated explosions when the player shoots a meteor.
About this series
In this series of lessons we’ll build a complete game using Python and Pygame. It’s intended for beginning programmers who already understand the basics of Python and are looking to deepen their Python understanding and learn the fundamentals of programming games.
You can watch a video version of this lesson here:
Auto-fire
First, let’s make a small change to the way our player shoots. Right now, we have to hit the space bar for every shot. This leads to the player rapidly pounding on the keyboard and perhaps even a broken space bar. Instead, let’s make the ship shoot automatically as long as the space bar is held down.
To accomplish this, we’re going to add two new properties to our player:
self.shoot_delay = 250
self.last_shot = pygame.time.get_ticks()
shoot_delay will measure how long in milliseconds the ship should wait before launching another bullet. last_shot will keep track of what time the last bullet was fired, so that we will know when enough time has passed to fire again.
Now we will add the fire key to our keyboard check in the player’s update:
def update(self):
    self.speedx = 0
    keystate = pygame.key.get_pressed()
    if keystate[pygame.K_LEFT]:
        self.speedx = -8
    if keystate[pygame.K_RIGHT]:
        self.speedx = 8
    if keystate[pygame.K_SPACE]:
        self.shoot()
And we’ll place all of the shooting logic in a new method:
def shoot(self):
now = pygame.time.get_ticks()
if now - self.last_shot > self.shoot_delay:
    self.last_shot = now
    bullet = Bullet(self.rect.centerx, self.rect.top)
    all_sprites.add(bullet)
    bullets.add(bullet)
Now when the space bar is held down, the game will check how much time has passed since the last bullet was created. If it has been shoot_delay milliseconds, then another bullet is fired, and last_shot is updated. Finally, we can delete the following lines from our game loop:
elif event.type == pygame.KEYDOWN:
    if event.key == pygame.K_SPACE:
        player.shoot()
Animated Explosions
For our next addition, we’d like to make the destruction of the meteors more visually appealing by making them explode rather than just vanish. To accomplish this, we will need a set of animation frames for the explosion graphics, and we’ll need to create a sprite at the location of the destroyed meteor that will cycle through the sequence of animation frames. Here is the animation sequence we’re going to use:
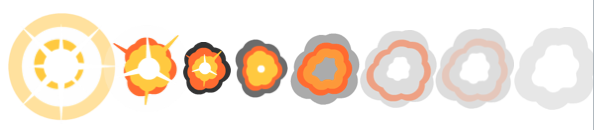
Click here to download a zip of these images.
First, we need to load those graphics into our game and store them in a list. As with the player sprite, we’re going to need to resize the images and while we’re doing that, we’ll create two different sized explosions: a large one, for when a meteor is destroyed; and a small one, for when a meteor hits the player’s shield. So we’ll have a dictionary, explosion_anim, containing two lists, lg and sm. Since the files are all named the same, with a number from 00-08, we can just use a loop to load them all, resize, and append them to the lists:
explosion_anim = {}
explosion_anim['lg'] = []
explosion_anim['sm'] = []
for i in range(9):
    filename = 'regularExplosion0{}.png'.format(i)
    img = pygame.image.load(path.join(img_dir, filename)).convert()
    img.set_colorkey(BLACK)
    img_lg = pygame.transform.scale(img, (75, 75))
    explosion_anim['lg'].append(img_lg)
    img_sm = pygame.transform.scale(img, (32, 32))
    explosion_anim['sm'].append(img_sm)
Explosion Sprite
Next, we’ll define a new sprite that will be the actual explosion when it’s on screen. This sprite’s image will rapidly change from one image to the next in our list of animation frames. When it reaches the last frame, the sprite will be deleted. When we spawn the sprite, we will tell it where to spawn (the location of the meteor), and which size to use. Similar to how we did the auto-fire function above, we will also have a frame_rate attribute, which will let us control how quickly the animation runs - if we were to change the image every update (1⁄60 s), then the whole explosion would only last for about 1⁄10 of a second. Here is the code for the Explosion sprite:
class Explosion(pygame.sprite.Sprite):
    def __init__(self, center, size):
        pygame.sprite.Sprite.__init__(self)
        self.size = size
        self.image = explosion_anim[self.size][0]
        self.rect = self.image.get_rect()
        self.rect.center = center
        self.frame = 0
        self.last_update = pygame.time.get_ticks()
        self.frame_rate = 50

    def update(self):
        now = pygame.time.get_ticks()
        if now - self.last_update > self.frame_rate:
            self.last_update = now
            self.frame += 1
            if self.frame == len(explosion_anim[self.size]):
                self.kill()
            else:
                center = self.rect.center
                self.image = explosion_anim[self.size][self.frame]
                self.rect = self.image.get_rect()
                self.rect.center = center
Now we need to spawn one of these whenever a mob is destroyed:
# check to see if a bullet hit a mob
hits = pygame.sprite.groupcollide(mobs, bullets, True, True)
for hit in hits:
    score += 50 - hit.radius
    random.choice(expl_sounds).play()
    expl = Explosion(hit.rect.center, 'lg')
    all_sprites.add(expl)
    newmob()
and when the player is hit:
# check to see if a mob hit the player
hits = pygame.sprite.spritecollide(player, mobs, True, pygame.sprite.collide_circle)
for hit in hits:
    player.shield -= hit.radius * 2
    expl = Explosion(hit.rect.center, 'sm')
    all_sprites.add(expl)
    newmob()
    if player.shield <= 0:
        running = False
And now we can see the final result:
In the next part, we’ll make the game last a little bit longer by adding lives to the player.